Game Hacking 101: Unleashing the Power of Memory Manipulation
Introduction
Welcome to a comprehensive guide on game hacking, where we explore the fascinating world of gaining an edge in your favorite games through memory manipulation. In this blog post, we’ll demystify the inner workings of game-hacking techniques and provide you with the essential tools, skills, and ethical considerations necessary for successful game-hacking. So, fasten your seatbelts and get ready to dive deep into the captivating realm of game hacking!
Table of Contents
- Unleashing the Power: Exploring the Intricate World of Game Hacking
- What is Mount and Blade Warband?
- What is Memory and How to Manipulate Memory3.1 Understanding Memory
- What is Virtual Memory?
- How Does Virtual Memory Work?
- Benefits of Virtual Memory
- Locating Memory Addresses
- Modifying Memory
- Pointers and Dynamic Memory Analysis
- Behind the Scenes: Understanding Memory Manipulation in Game Hacking
- Tools for Memory Manipulation
- Cheat Engine: Harnessing the Power of Memory Editing
- Download and Install Cheat Engine
- Launch Cheat Engine and Select a Game Process
- Perform Initial Value Scan
- Refine the Search
- Modify Memory Values
- Save and Protect Your Hacks
- Using C++ for Memory Manipulation Code
- Manipulating Our Money
- Manipulating Character Skills
- Breaking the Code: Demystifying the Inner Workings of Game Hacking Techniques
- Ethical Considerations: The Responsible Approach to Game Hacking
- Evading Detection: Protecting Your Hacks from Anti-Cheat Systems
Unleashing the Power: Exploring the Intricate World of Game Hacking
In this section, we delve into the captivating world of game hacking, uncovering its secrets and shedding light on its potential. We’ll explore various techniques and methodologies game hackers employ to gain an edge in their virtual adventures. From memory manipulation to code injection, get ready to unlock a whole new level of understanding as we unravel the complexities and possibilities of game hacking.
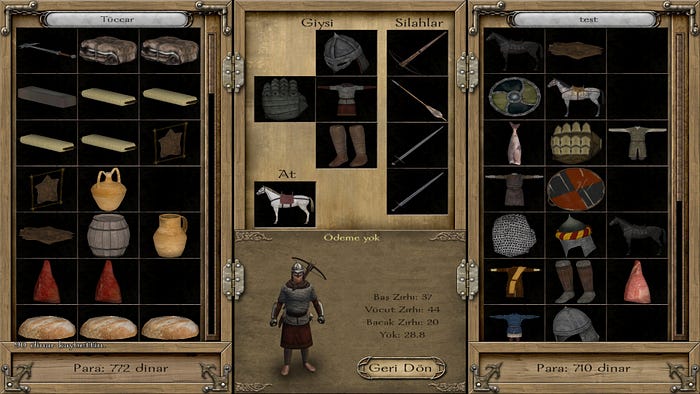
What is Mount and Blade Warband?
Mount and Blade Warband is a popular medieval-themed action role-playing game developed by TaleWorlds Entertainment. Set in a fictional continent called Calradia, the game offers a unique blend of strategic gameplay, immersive combat, and open-world exploration. Players can create their own characters, build armies, engage in epic battles, and even establish their own kingdoms. With its sandbox-style gameplay and a vast array of modding possibilities, Mount and Blade Warband has garnered a dedicated fanbase, making it a captivating choice for those seeking a dynamic and immersive gaming experience in a medieval setting.

What is Memory and How to Manipulate Memory
Understanding Memory
Memory is a fundamental component of a computer system where data and instructions are stored. In the context of game hacking, memory refers to the volatile memory of the game’s process, where important variables, values, and game states reside. By manipulating the memory, we can alter these variables and gain control over various aspects of the game.
What is Virtual Memory?
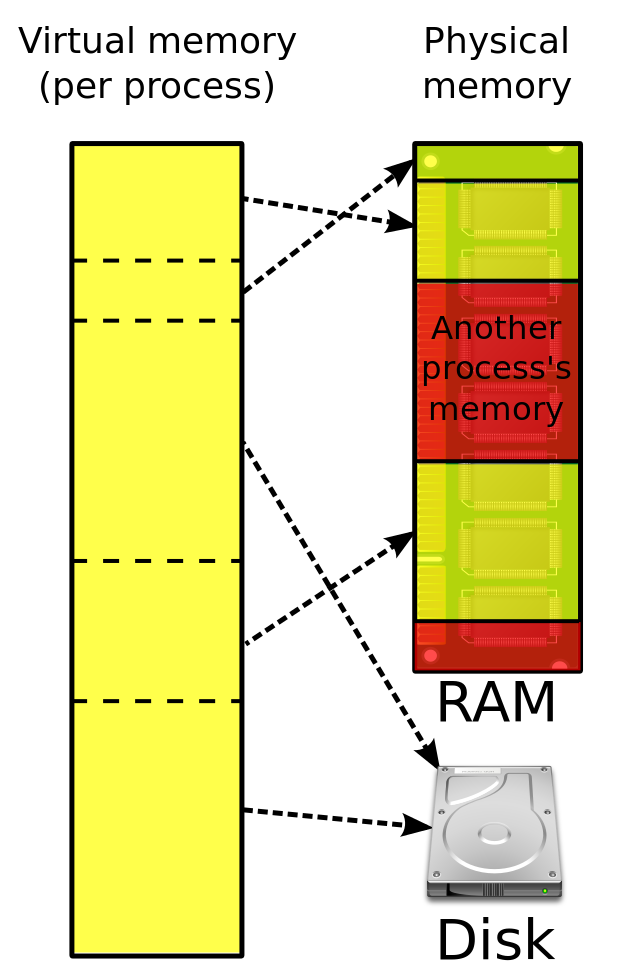
Virtual memory is a memory management technique employed by modern operating systems to provide each process with a virtual address space that is independent of the physical memory available in the system. It allows programs to operate as if they have access to a larger amount of memory than what is physically installed. This virtual address space is divided into smaller units called pages, which can be mapped to physical memory or stored on secondary storage devices like hard drives or solid-state drives (SSDs).
How Does Virtual Memory Work?
When a program is executed, it is loaded into the virtual address space, which is typically divided into multiple segments, such as code, data, and stack. The virtual memory system maps the virtual addresses used by the program to physical addresses in the physical memory or secondary storage. This mapping is managed by the operating system’s memory management unit (MMU) in collaboration with the hardware.
Benefits of Virtual Memory
1. Increased Addressable Memory
Virtual memory allows each process to have its own virtual address space, which can be much larger than the physical memory available in the system. This enables programs to execute and utilize more memory than what is physically installed, improving the system’s ability to run larger and more complex applications.
2. Memory Isolation and Protection
Virtual memory provides memory isolation between different processes, ensuring that each process has its own dedicated address space. This isolation prevents one process from accessing or modifying the memory of another process, enhancing security and stability. Additionally, virtual memory enables memory protection mechanisms, such as read-only memory regions and no-execution memory areas, to safeguard against unauthorized access and code execution.
3. Efficient Memory Utilization
Virtual memory allows for efficient memory utilization by storing portions of the program that are not actively being used in secondary storage, such as the hard drive or SSD. This frees up physical memory for processes that require immediate access. The operating system dynamically manages the movement of data between physical memory and secondary storage based on usage patterns, optimizing overall system performance.
4. Memory Sharing
Virtual memory facilitates memory sharing between processes. Multiple processes can map the same portion of a file into their virtual address spaces, enabling efficient resource utilization and communication between processes. This is particularly useful for inter-process communication and shared libraries.
Impact on System Performance
Virtual memory, when used effectively, can enhance system performance. However, excessive swapping of data between physical memory and secondary storage, known as thrashing, can lead to performance degradation. To mitigate this, the operating system employs various strategies, such as intelligent page replacement algorithms and pre-fetching techniques, to minimize the frequency of data swaps and optimize memory access.
Locating Memory Addresses
To manipulate memory effectively, we need to locate the specific memory addresses associated with the variables we want to modify. Memory addresses act as unique identifiers for each piece of data stored in the game’s memory. We can use memory scanning techniques to search for these addresses based on certain criteria, such as the current value of the variable or its data type.
Modifying Memory
Once we’ve identified the memory addresses, we can modify the values stored at those addresses to achieve the desired changes in the game. This can involve increasing resources, adjusting health or stamina levels, or unlocking hidden features. Memory modification techniques typically involve reading the current value from a memory address, performing the necessary calculations or changes, and writing the modified value back to the same address.
Pointers and Dynamic Memory Analysis
In more complex game-hacking scenarios, we may encounter dynamic memory structures and pointers. Pointers are memory addresses that point to other memory locations. They are commonly used to access dynamically allocated memory or navigate through complex data structures. Understanding pointers and performing dynamic memory analysis allows us to traverse the game’s memory space more effectively and locate the desired variables or structures for manipulation.
Behind the Scenes: Understanding Memory Manipulation in Game Hacking
Memory manipulation lies at the core of many game-hacking techniques. Here, we take you behind the scenes and explore the intricacies of memory manipulation. Discover how to locate and modify specific memory addresses to alter in-game variables, unlock hidden features, and gain an unfair advantage. We’ll cover concepts like static and dynamic memory analysis, pointers, and memory scanning techniques, equipping you with the knowledge to manipulate game memory effectively.
Tools for Memory Manipulation
Several tools are available to aid in memory manipulation for game hacking. Memory editors or trainers provide a user-friendly interface to scan and modify memory values in real time during gameplay. Debuggers, such as Cheat Engine or OllyDbg, allow for more advanced memory manipulation and dynamic analysis by providing features like breakpoints, memory inspection, and disassembly. These tools simplify the process of locating and manipulating memory addresses, enabling game hackers to make precise and efficient changes.
Remember, game hacking through memory manipulation requires a thorough understanding of the game’s memory structure, programming concepts, and relevant tools. It’s essential to approach memory manipulation responsibly and ethically, ensuring that the changes made enhance your gaming experience without disrupting the intended gameplay or negatively affecting others.
Cheat Engine: Harnessing the Power of Memory Editing
Cheat Engine is a popular and powerful memory editing tool widely used in the game hacking community. It allows you to scan, modify, and manipulate memory values in real time, providing you with extensive control over various aspects of a game. Let’s explore how to use Cheat Engine effectively for game hacking.
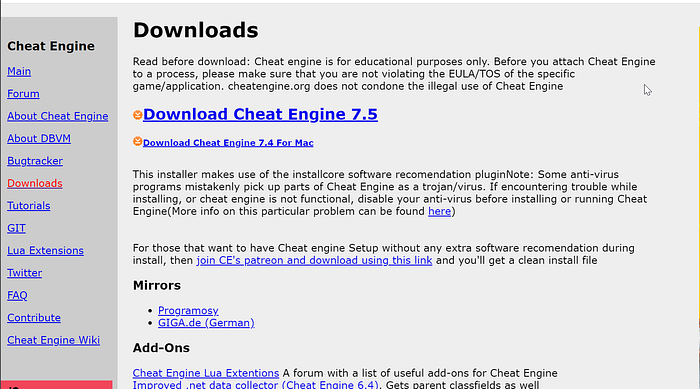
1. Download and Install Cheat Engine
To get started, visit the official Cheat Engine website and download the latest version compatible with your operating system. Once downloaded, run the installer and follow the on-screen instructions to install Cheat Engine on your computer.
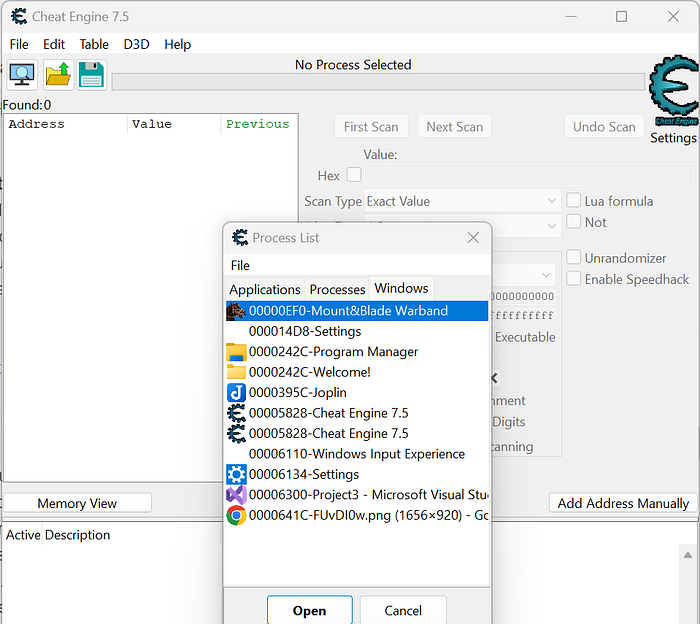
2. Launch Cheat Engine and Select a Game Process
Launch Cheat Engine and you’ll be presented with a process selection screen. Click on the computer icon in the top-left corner of the Cheat Engine window to open the process list. Select the process corresponding to the game you want to hack from the list. Make sure the game is running and active before selecting the process.
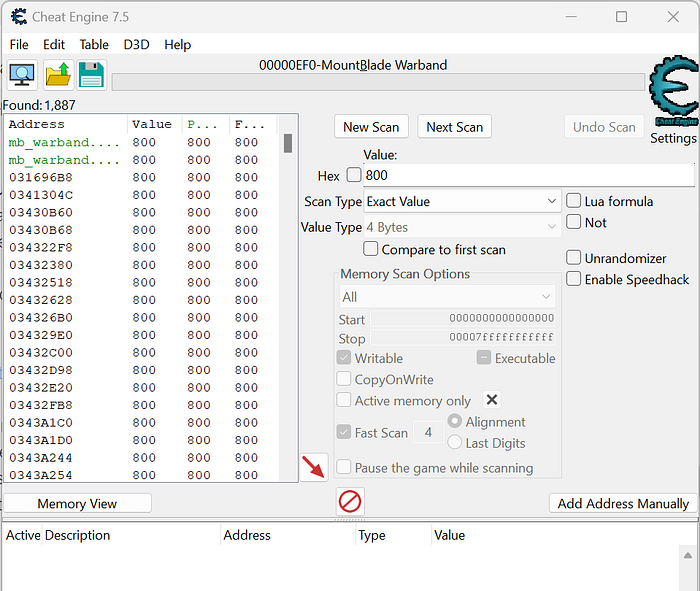
3. Perform Initial Value Scan
Now, let’s perform an initial value scan to locate the memory addresses associated with the desired variable in the game. First, identify the variable you want to modify. It could be the player’s health, ammunition count, or any other in-game value you wish to alter.
In Cheat Engine, enter the current value of the variable in the “Value” field and select the value type from the dropdown menu (e.g., 4 bytes for integer values). Click the “First Scan” button to initiate the scan.
4. Refine the Search
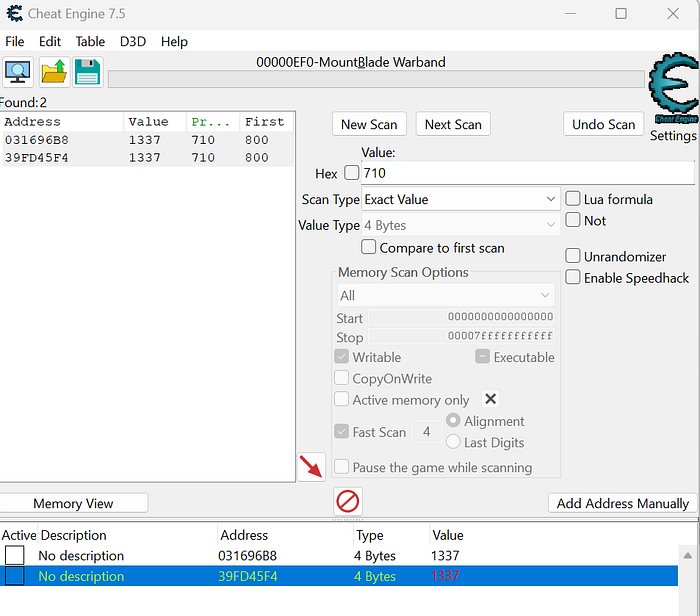
The initial scan will result in a long list of memory addresses that match the provided value. To narrow down the search, perform actions in the game that cause the variable’s value to change. Once the value has changed, go back to Cheat Engine and enter the new value in the “Value” field.
Click the “Next Scan” button to refine the search. Repeat this process of altering the value in the game and performing subsequent scans until you have a manageable number of memory addresses remaining.

5. Modify Memory Values
With the refined list of memory addresses, you can now modify the memory values to affect the gameplay. Double-click on a memory address or select multiple addresses and click the red arrow to add them to the address list at the bottom of the Cheat Engine window.

To modify a value, double-click on the value column of the selected memory address and enter the desired new value. Once changed, the game will reflect the modified value, giving you an advantage or unlocking new features.
6. Save and Protect Your Hacks
After making the desired modifications, you can save your cheat table by clicking the floppy disk icon in the Cheat Engine window. This allows you to reload the cheats whenever you launch the game in the future.
It’s important to note that game developers actively work on preventing cheating, and many games employ anti-cheat systems. To avoid detection, it’s crucial to exercise caution, use cheat tables responsibly, and stay up-to-date with the latest anti-cheat measures employed by game developers.
Cheat Engine is a versatile tool with many advanced features that we haven’t covered in this brief overview. Feel free to explore Cheat Engine’s official documentation and community resources to expand your knowledge and unlock the full potential of this powerful memory editing tool.
Remember to always approach game hacking responsibly, respecting the integrity of the game, and the gaming community.
Using C++ for Memory Manipulation Code
Manipulating our Money
Finding Offsets
Here’s a step-by-step guide on how to use Cheat Engine to find out what accesses a particular address:
- Start Cheat Engine and launch the game you want to cheat in.
- In Cheat Engine, click on the “Select a process to open” button (computer icon) in the top-left corner of the Cheat Engine window. It will open a process list.
- Select the process of the game you want to cheat in from the process list and click the “Open” button.
- In the Cheat Engine window, click on the “Scan” button (magnifying glass icon) to open the “Value Scan” window.
In the “Value” field, enter the memory address you want to investigate and select the appropriate value type (e.g., 4 bytes for integers).
- Click the “First Scan” button. Cheat Engine will search for all instances of the entered value in the game’s memory.
- After the scan is complete, you should see a list of addresses in the left pane of Cheat Engine.
- Double-click on the desired address to add it to the bottom pane.
- Right-click on the added address and select “Find out what accesses this address” from the context menu.
- Cheat Engine will open the “Cheat Engine Disassembler” window, displaying the assembly instructions related to the address you selected.
- You can set breakpoints or step through the code to analyze what accesses or modifies the address.
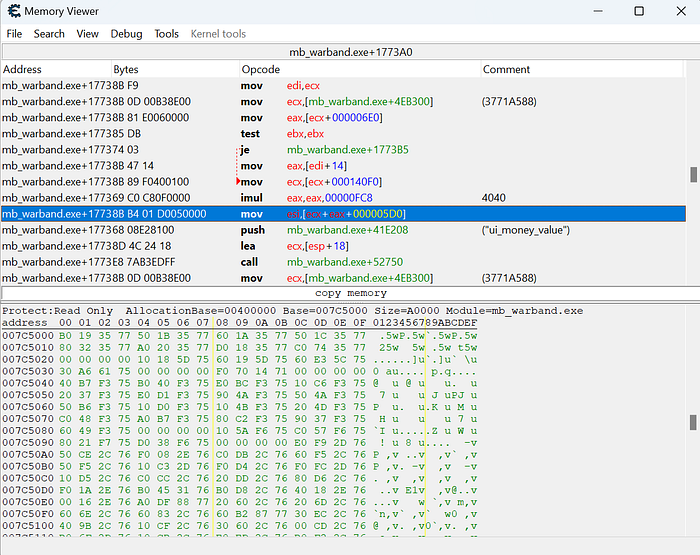
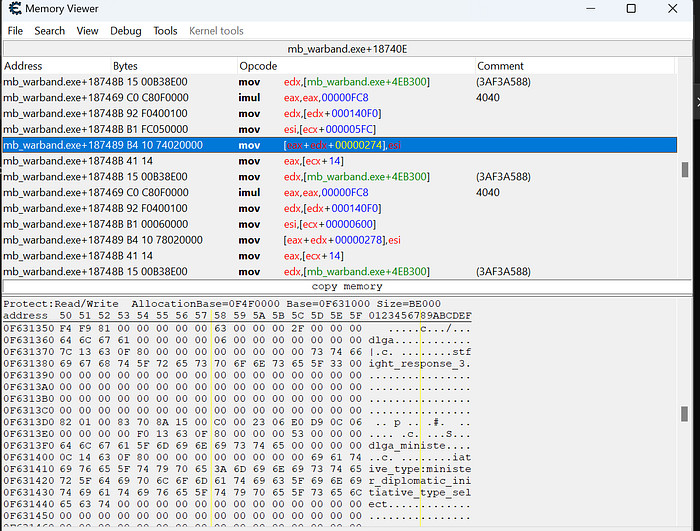
Let’s break down the given assembly code and explain its functionality:
1. `mov ecx, [ecx + 140f0]`: This instruction moves the value at memory address `[ecx + 140f0]` into the `ecx` register. The `ecx` register is being used as a pointer or address holder.
2. `imul eax, eax, fc8`: This instruction multiplies the value in the `eax` register by the constant value `fc8` (which is in hexadecimal notation). The result is stored back in the `eax` register. This multiplication operation is likely used for some kind of calculation.
3. `mov esi, [ecx + eax + 5d0]`: This instruction moves the value at memory address `[ecx + eax + 5d0]` into the `esi` register. The value being loaded into `esi` is the money value. The memory address is calculated by adding the contents of `ecx` and `eax` registers along with the offset `5d0`.
4. `push 81e208`: This instruction pushes the value `81e208` onto the stack. The purpose of this value is not clear from the given code snippet.
5. `lea ecx, [esp + 18]`: This instruction calculates the effective address of `[esp + 18]` and stores it in the `ecx` register. The `lea` (Load Effective Address) instruction is often used to perform arithmetic calculations to calculate memory addresses.
Based on the provided assembly code, the value of the money is being loaded into the `esi` register from the calculated memory address `[ecx + eax + 5d0]`. The other instructions perform various calculations and memory operations, which may be related to the manipulation of the money value or other game-related operations.
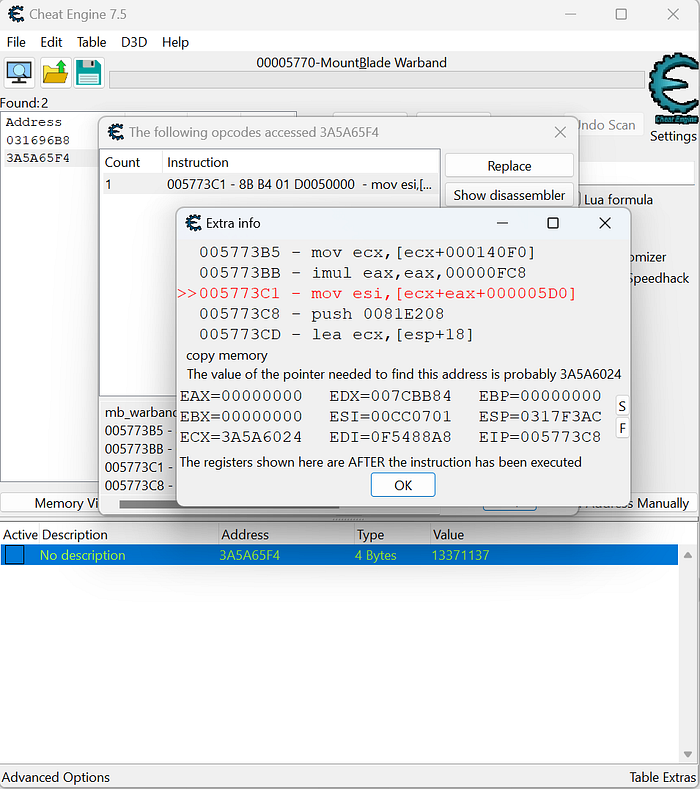
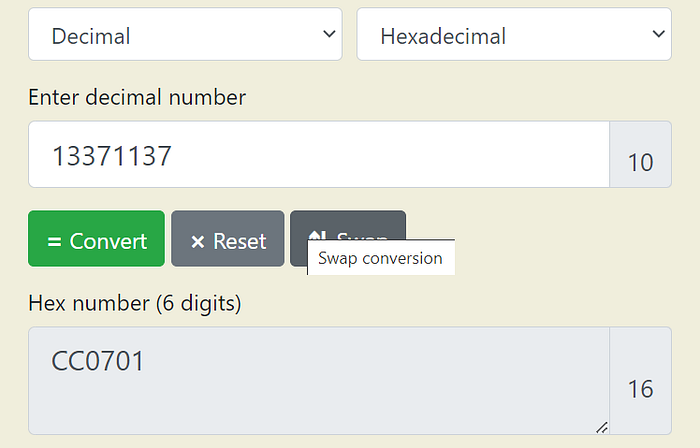
Now, let’s convert the hexadecimal money value, which is represented as “cc0701,” into its decimal equivalent using an online converter like RapidTables’ Hex to Decimal Converter.
Converting “cc0701” from hexadecimal to decimal gives us the value 13371137.
To manipulate the currency value effectively, we need to determine the `base address` of the game executable, `mb_warband.exe`. Let’s delve deeper into the assembly code and locate the instruction responsible for modifying the `ecx` register because `eax` is 0 so we need ecx:
1. `mov ecx, [ecx + 140f0]`:
This assembly instruction indicates that the `ecx` register is modified using the value at memory address `[ecx + 140f0]`.
2. Further analysis reveals that `ecx` changes at the memory address `mb_warband.exe + 177388` through the instruction `mov ecx, [mb_warband.exe + 4eb300]`.
Manipulating the In-Game Currency:
To manipulate the currency, we need to find the base address of `mb_warband.exe`. Once we have the base address, we can apply offsets to access and modify the desired memory locations.
Writing Code
C++ is a powerful programming language that allows you to create robust and efficient memory manipulation code for game hacking. Let’s explore an example snippet that demonstrates memory manipulation using C++ in the context of Mount and Blade Warband.
Windows API
The Windows API is a collection of functions and data structures that allow developers to access and control various aspects of the Windows operating system. It provides an interface for interacting with processes, files, windows, networking, and other system resources. These APIs enable developers to create powerful applications that leverage the capabilities of the underlying operating system.
Let’s examine the provided C++ code snippet and explore its implementation of process handling and snapshot creation using the Windows API:
Memory(const std::string_view processName) noexcept
{
::PROCESSENTRY32 entry = { };
entry.dwSize = sizeof(::PROCESSENTRY32);const auto snapShot = ::CreateToolhelp32Snapshot(TH32CS_SNAPPROCESS, 0);
while (::Process32Next(snapShot, &entry))
{
if (!processName.compare(entry.szExeFile))
{
processId = entry.th32ProcessID;
processHandle = ::OpenProcess(PROCESS_ALL_ACCESS, FALSE, processId);
break;
}
}// Free handle
if (snapShot)
::CloseHandle(snapShot);
}
Process Handling and Snapshot Creation:
1. The `Memory` constructor takes a `std::string_view` parameter called `processName`, representing the name of the target process.
2. The `::PROCESSENTRY32` structure, named `entry`, is declared and initialized with zero using the `{ }` initializer. This structure contains information about a process, such as its process ID and executable file name.
3. The `dwSize` member of the `entry` structure is set to the size of `::PROCESSENTRY32` to ensure compatibility with the Windows API functions.
4. The `CreateToolhelp32Snapshot` function is called to create a snapshot of the currently running processes. It takes the `TH32CS_SNAPPROCESS` flag as the first parameter, indicating that we want to capture information about processes.
5. The returned snapshot handle is stored in the `snapShot` variable.
6. A `while` loop is used to iterate through each process entry using the `Process32Next` function and the `entry` structure. This function retrieves the next process information from the snapshot.
7. Within the loop, the `compare` function is used to check if the `processName` matches the name of the current process entry (`entry.szExeFile`).
8. If a match is found, the process ID (`entry.th32ProcessID`) is assigned to the `processId` variable.
9. The `OpenProcess` function is called to obtain a handle to the target process using the `PROCESS_ALL_ACCESS` flag, granting full access rights. The resulting handle is stored in the `processHandle` variable.
10. Once the target process is found and the handle is obtained, the loop is exited.
11. Finally, the `CloseHandle` function is called to free the snapshot handle (`snapShot`) and release system resources.
Reading Memory
template <typename T>
constexpr const T Read(const std::uintptr_t& address) const noexcept
{
T value = { };
::ReadProcessMemory(processHandle, reinterpret_cast<const void*>(address), &value, sizeof(T), NULL);
return value;
}
The core of our approach is a template function called `Read`, which takes a memory address as input and returns the value stored at that address. Let’s dissect the function step by step:
1. Template Declaration:
The `Read` function is declared as a template function, allowing us to specify the desired type of the value we want to read. The `typename T` syntax introduces the type parameter `T`, which will be resolved at compile-time.
2. Function Signature:
The function signature is defined as `constexpr const T Read(const std::uintptr_t& address) const noexcept`. Breaking it down:
- `constexpr`: This keyword indicates that the function can be evaluated at compile-time if the necessary conditions are met. It allows for optimization and potentially improves performance.
— `const T`: Specifies that the return type of the function is a constant value of type `T`.
— `const std::uintptr_t& address`: The function takes a reference to a `std::uintptr_t` variable named `address` as its parameter. This parameter represents the memory address we want to read from.
— `const noexcept`: These keywords indicate that the function is marked as const and noexcept, implying that it does not modify the state of the object it belongs to and does not throw exceptions.
3. Variable Initialization:
Within the function, a variable `value` of type `T` is declared and initialized using zero-initialization. This prepares the variable to store the value read from the memory address.
4. ReadProcessMemory:
The `ReadProcessMemory` function is called with the following arguments:
- `processHandle`: This variable is assumed to be defined elsewhere and represents the handle to the target process.
— `reinterpret_cast<const void*>(address)`: The memory address is converted to a `const void*` pointer using the `reinterpret_cast` operator. This conversion is necessary because `ReadProcessMemory` expects a pointer to the memory location to read from.
— `&value`: The address of the `value` variable is passed as the destination for the read operation. By providing the address, we enable `ReadProcessMemory` to write the value directly into `value`.
— `sizeof(T)`: The size of the value to read is determined using `sizeof(T)`, where `T` is the type specified when calling the `Read` function. This ensures that the correct number of bytes is read from the process’s memory.
— `NULL`: This argument indicates that no bytes were read. The `ReadProcessMemory` function sets the number of bytes read in this parameter, but since we don’t need that information, we pass `NULL`.
5. Return the Read Value:
After the `ReadProcessMemory` call, the `value` variable contains the value read from the specified memory address. The function then returns this value as the result.
Writing to Memory
template <typename T>
constexpr void Write(const std::uintptr_t& address, const T& value) const noexcept
{
::WriteProcessMemory(processHandle, reinterpret_cast<void*>(address), &value, sizeof(T), NULL);
}
The heart of our approach is a template function named `Write`, which accepts a memory address and a value, and writes the value to the specified memory address. Let’s delve into the function step by step:
1. Template Declaration:
The `Write` function is declared as a template function, enabling us to specify the type of the value we want to write. The `typename T` syntax introduces the type parameter `T`, which will be resolved at compile-time.
2. Function Signature:
The function signature is defined as `constexpr void Write(const std::uintptr_t& address, const T& value) const noexcept`. Breaking it down:
- `constexpr`: This keyword indicates that the function can be evaluated at compile-time if the necessary conditions are met. It allows for optimization and potentially improves performance.
— `void`: Specifies that the function does not return any value.
— `const std::uintptr_t& address`: The function takes a reference to a `std::uintptr_t` variable named `address` as the first parameter. This parameter represents the memory address we want to write to.
— `const T& value`: The second parameter is a reference to a `const T` variable named `value`, representing the value we want to write to memory.
— `const noexcept`: These keywords indicate that the function is marked as const and noexcept, indicating that it does not modify the state of the object it belongs to and does not throw exceptions.
3. WriteProcessMemory:
The `WriteProcessMemory` function is called with the following arguments:
- `processHandle`: This variable is assumed to be defined elsewhere and represents the handle to the target process.
— `reinterpret_cast<void*>(address)`: The memory address is converted to a `void*` pointer using the `reinterpret_cast` operator. This conversion is necessary because `WriteProcessMemory` expects a pointer to the memory location to write to.
— `&value`: The address of the `value` variable is passed as the source for the write operation. By providing the address, we enable `WriteProcessMemory` to read the value directly from `value`.
— `sizeof(T)`: The size of the value to write is determined using `sizeof(T)`, where `T` is the type specified when calling the `Write` function. This ensures that the correct number of bytes is written to the process’s memory.
— `NULL`: This argument indicates that no bytes were written. The `WriteProcessMemory` function sets the number of bytes written in this parameter, but since we don’t need that information, we pass `NULL`.
Cheat Code
// Include necessary headers
#include <iostream>
#include “Memory.h”int main()
{
// Create an instance of the Memory class and specify the game executable
const auto mem = Memory(“mb_warband.exe”);
std::cout << “Mount and Blade Warband found!” << std::endl;// Get the base address of the game module
const auto base_address = mem.GetModuleAddress(“mb_warband.exe”);// Read a value from memory using an offset from the base address
int ecx = mem.Read<int>(base_address + 0x4eb300);
std::cout << “Value at address: “ << ecx << std::endl;// Perform additional memory reads and manipulation
int eax = mem.Read<int>(ecx + 0x6e0);
ecx = mem.Read<int>(ecx + 0x140f0);
int money = mem.Read<int>(ecx + 0x5d0);// Write a new value to a memory address
mem.Write<int>(ecx + 0x5d0, 13371137);return 0;
}
https://github.com/aydinnyunus/MemoryBlade/blob/main/main.cpp
In this example, we create an instance of the `Memory` class and specify the game executable “mb_warband.exe”. We retrieve the base address of the game module and perform memory reads and manipulations by adding appropriate offsets to the base address. Finally, we write a new value to a memory address using the `Write` function.
Remember, the provided code is a simplified example for demonstration purposes, and actual memory manipulation code may vary depending on the game and the specific variables you want to modify. It’s essential to understand the game’s memory structure, locate the correct memory addresses, and use caution and responsibility when performing memory manipulations.
Additionally, it’s crucial to implement a robust and reliable `Memory` class that handles read and write operations appropriately. This might involve using operating system-specific functions or libraries to access and modify the game’s memory.
Always approach game hacking responsibly, respect the game developers’ efforts, and consider the impact of your actions on the gaming community.
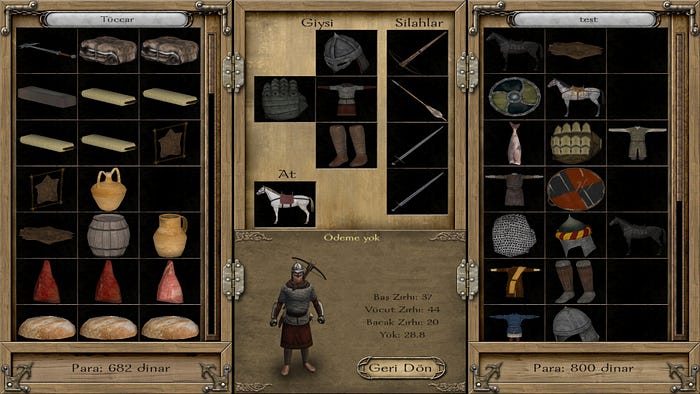
Manipulating Character Skills
In the captivating realm of Mount and Blade: Warband, your character’s skills play a crucial role in shaping their destiny. As you embark on epic quests and engage in strategic battles, four key skills will be your steadfast companions: strength, agility, intelligence, and charisma. Each skill represents a unique aspect of your character’s abilities and can greatly influence your gameplay experience. In this blog post, we will explore these essential skills and their impact on your journey through the captivating world of Mount and Blade: Warband.
Finding Offsets for Character Skills
Manipulating character skills requires identifying the memory offsets associated with each skill. These offsets serve as a reference point for Cheat Engine to locate and modify the corresponding values. Here’s a step-by-step guide on finding the offsets for character skills using Cheat Engine:
Step 1: Launch Cheat Engine and Select the Game Process
Start by launching Cheat Engine and selecting the process associated with Mount and Blade: Warband. This will allow Cheat Engine to scan and interact with the game’s memory.
To begin, open the character screen in the game and take note of the current value for a specific skill. In this example, let’s focus on the “Power” skill. Enter the current value in Cheat Engine and initiate a “First Scan” to search for potential memory addresses associated with the skill.
After the initial scan, return to the game and modify the value of the skill. For instance, increase the Power skill by allocating points to it. Then, return to Cheat Engine and perform a subsequent scan, entering the updated value. This process helps narrow down the memory addresses associated with the skill.
Step 2: Analyzing Registers
In the provided screenshot, it is evident that the eax register is set to 0, indicating that the edx register becomes instrumental in manipulating character skills. To fully comprehend how the edx register influences skill manipulation, we need to conduct a thorough analysis.
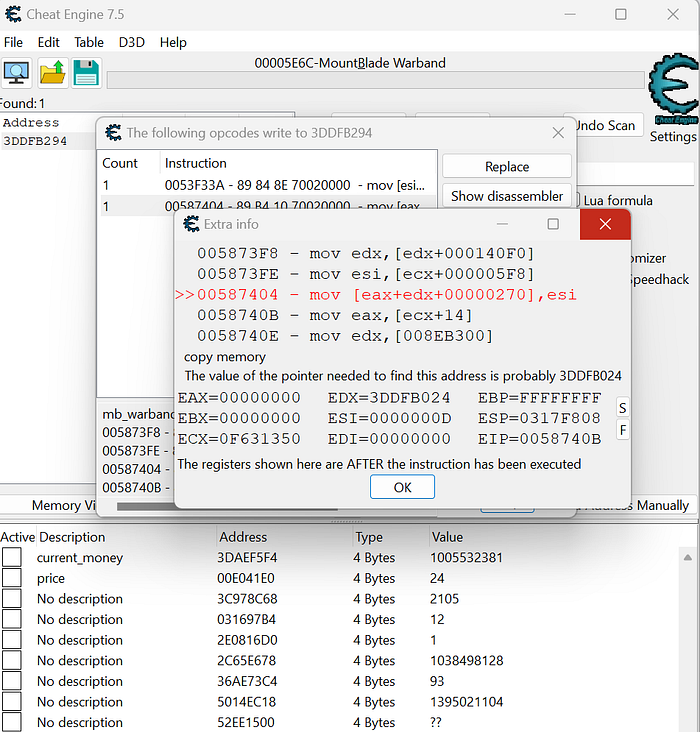
Now, we have discovered a significant breakthrough in our quest for skill manipulation. By understanding the impact of the edx register and its connection to the instruction `mov edx, [mb_warband.exe + 43b300]`, we can focus on finding the base address.
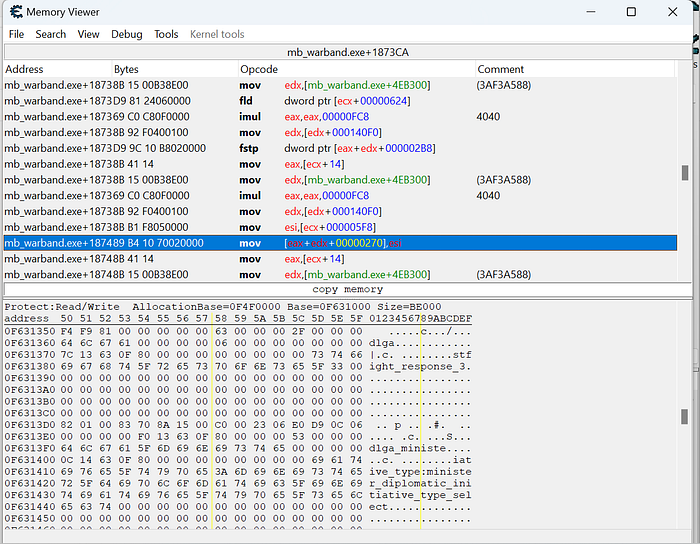
Step 3: Repeating the Process
Continue refining the search by repeating steps 2 and 3, altering the value of the skill and performing subsequent scans until only a few memory addresses remain. These remaining addresses are likely to be the offsets for the Power skill.
Our focus will be on two skills as examples: Strength and Agility. The offset for the Strength skill is 0x270, while the offset for the Agility skill is 0x274. The offset represents the memory address where the skill’s value is stored. So we can find the intelligence and charisma offsets too.
Step 4: Modifying the Skill Value
Once you have identified the offset for a skill, you can modify its value in Cheat Engine. Double-click on the offset, enter the desired value for the skill, and see the changes reflected in the game.
The Results
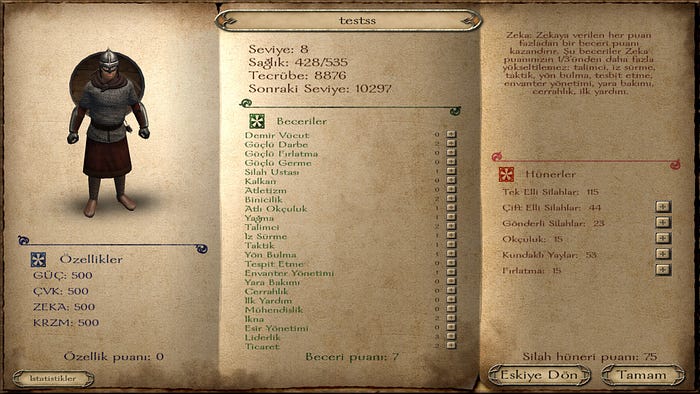
By using Cheat Engine to manipulate character skills, you can enhance your gameplay experience in Mount and Blade: Warband. Whether you want to experiment with different character builds, speed up character progression, or simply have some fun, Cheat Engine provides a versatile tool for customization.
Cheat Code
// Include necessary headers
#include <iostream>
#include “Memory.h”int main()
{
// Create an instance of the Memory class and specify the game executable
const auto mem = Memory(“mb_warband.exe”);
std::cout << “Mount and Blade Warband found!” << std::endl;// Get the base address of the game module
const auto base_address = mem.GetModuleAddress(“mb_warband.exe”);
int edx = mem.Read<int>(base_address + 0x4eb300);
edx = mem.Read<int>(edx + 0x140f0);
mem.Write<int>(edx + 0x270, 500);
mem.Write<int>(edx + 0x274, 500);
mem.Write<int>(edx + 0x278, 500);
mem.Write<int>(edx + 0x27c, 500);return 0;
}
Breaking the Code: Demystifying the Inner Workings of Game Hacking Techniques
In this game-hacking series, we peel back the layers of game-hacking techniques, unraveling the underlying principles and code that make it all possible. Through clear explanations and illustrative examples, we demystify the intricate workings of various game-hacking methods, such as memory manipulation, code injection, and dynamic analysis. Prepare to gain a deeper understanding of how game hacks operate and the mechanisms behind their functionality.
Ethical Considerations: The Responsible Approach to Game Hacking
While game hacking can provide thrilling benefits, it’s crucial to understand the ethical boundaries. In this section, we explore the responsible approach to game hacking, discussing the importance of fair play, respect for game developers, and the impact of hacks on the gaming community. We’ll delve into ethical considerations, encouraging readers to use their hacking skills responsibly and consider the implications of their actions.
Evading Detection: Protecting Your Hacks from Anti-Cheat Systems
Implementing an effective anti-cheat system in C++ to prevent memory hacking involves multiple steps. Here’s a general outline of the process:
1. Secure Code Execution: Write your game code with security in mind, using techniques like code obfuscation, encryption, and runtime integrity checks to make it harder for hackers to tamper with the game’s memory.
2. Memory Scanning: Periodically scan the game’s memory for suspicious patterns or modifications. Compare the expected values with the actual values in memory to detect any unauthorized changes.
3. Anti-Debugging Techniques: Implement anti-debugging measures to detect and deter debugging tools commonly used by hackers. This can include checks for debugger presence, breakpoints, or code modification during runtime.
4. Code Signature Verification: Employ techniques to verify the integrity of critical game code or functions, ensuring that they have not been modified or replaced by malicious code.
5. Input Validation: Validate and sanitize user input to prevent potential exploits through buffer overflows, injection attacks, or other memory manipulation techniques.
6. Secure Communication: Protect network communication between the game client and server using encryption and authentication protocols to prevent tampering or unauthorized access.
7. Behavior Analysis: Monitor player behavior for suspicious activities or patterns that may indicate cheating, such as abnormal movement speed or impossible actions. Use heuristics and statistical analysis to identify potential cheaters.
8. Ban and Reporting System: Implement a system for detecting and banning cheaters. Provide players with a means to report suspicious behavior, allowing for manual investigation and subsequent action against confirmed cheaters.
Stay tuned for upcoming episodes where we will explore the development of an advanced anti-cheat system written in C++, aiming to safeguard against memory hacking and ensure fair gameplay