Disclaimer
I was motivated to make this article out of a desire to learn more about Android mobile application security. This writeup will obviously contain spoilers and I encourage readers to attempt this CTF before reading this article. Try to solve as many of these challenges as you can and then come back later to read this article if you get stuck or want to see a potentially different approach to solving a challenge. Without any further delay, lets jump in 😃!
H1 Thermostat (Easy, 2 Flags)
I started this challenge by downloading the application APK file and installing it on my emulator device using Android Debug Bridge (ADB)
adb install thermostat.apkOpening the application showed that it only had a single activity with a thermostat and a gauge, allowing the user to raise or lower the temperature setting.

Next, I generated a static analysis report for the APK file using the Mobile Security Framework (MobSF) tool. I started reviewing the report by examining the AndroidManifest.xml file.

Looking through the manifest file, I can see that the application has requested only the android.permission.INTERNET permission, which allows the application to create network sockets. The developer has set the attributes android:usesCleartextTraffic and android:allowBackup to true which means the application intends to use cleartext traffic and can have it’s contents backed up by the user.
The application also appears to only have two components. A activity called com.hacker101.level11.ThermosActivity has been declared with an intent filter. A content provider called ProcessLifecycleOwnerInitializer has also been declared but it is not exported. I decided to examine the java source code for the com.hacker101.level11.ThermosActivity.

Looking through the source code of the activity, I noted that a network request was being made. A class called PayloadRequest was used inside this network request as seen highlighted in green. Examining the source code for the PayloadRequest class, I discover both flags for the challenge.

It appears that one flag is hashed using MD5 and then base64 encoded before being added as a value to a header called X-MAC. The other flag is simply added as a plaintext value to the header X-Flag. I can use the tool BurpSuite to intercept this network request when interacting with the application.

As seen in the image above, the intercepted network request shows the X-MAC and X-Flag headers with their equivalent values. Nice and easy for the first challenge 😃!
Intentional Exercise (Moderate, 1 Flag)
Following a similar approach as seen in the previous challenge, I installed the application using ADB and generated a static analysis report of the APK file using MobSF. Opening the application showed an activity with a welcome message and a link called “Flag”.

Clicking on the link leads to a “Invalid request” error. Guess it won’t be that easy 😏.

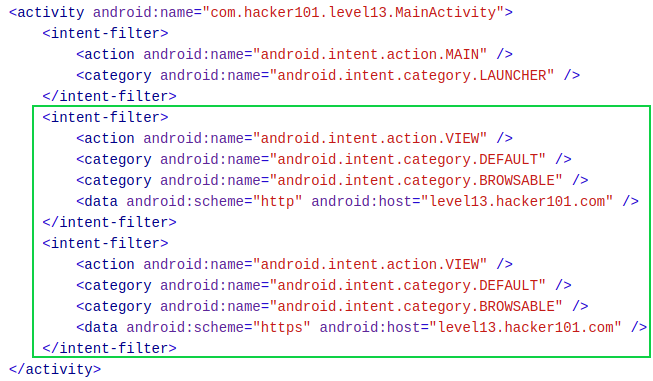
As seen with the previous challenge, I started by looking at the manifest file for the application. There is only one activity declared in the manifest file. What standouts about the activity, is that it has been declared with three intent filters. The two intent filters surrounded by green in the image below shows how you create a deep links for your app’s content (see references).
N.B. Deep Links are a concept that help users navigate between the web and applications. They are basically URLs which navigate users directly to the specific content in applications.
To test the first deep link (i.e. http), I can use ADB with the activity manager (am) tool to test that the intent filter URI’s specified for deep linking resolve to the correct app activity. The command seen below successfully starts the main activity for the application.
adb shell am start -W -a "android.intent.action.VIEW" -d "http://level13.hacker101.com" com.hacker101.level13I decided to look at the source code for the MainActivity. Looking through the java code, I can see that the application creates a WebView. Two string variables are also declared, with the variable str containing a hardcoded URL.
N.B. The URL for your application will be different.

Entering this URL into a browser brings up the same page seen earlier in the application’s main activity.

Clicking the Flag link still returns an invalid request.

Looking at the source code again, I saw that the application retrieved the data stored in the intent used to launch the main activity. Examining the manifest file from earlier, I know that this data is the http://level13.hacker101.com URL. The application then proceeds to use the java subString(28) method to ignore the first 28 characters (i.e. http://level13.hacker101.com URL) in the data string retrieved from the intent and appends the remaining string value in the str2 variable with the hardcoded URL link string in the str variable. The application then checks if the string contains a “?” and adds it to the end of the string if it does not.

I do not know what the value of str2 is yet based on my static analysis thus far. The final value of str so far is a combination of the hardcoded URL link, the the str2 value (Which at this point is just an empty string) and the “?” at the end of the string.
http://34.74.105.127/398abac4c8/appRoot'empty str2 value'?The final block of code consists of creating a message digest using the SHA-256 hashing algorithm. The hash is updated twice. The first is with a key called s00p3rs3c3rtk3y and the second is with the str2 value. The WebView will then load a newly constructed URL which includes the str value (i.e.URL), the string “&hash” and the SHA-256 hash value.

The final constructed URL so far can be seen below:
http://34.94.3.143/398abac4c8/appRoot'empty str2 value'?&hash="hash value"Using a tool called BurpSuite, I can intercept the request made by the application when it is launched and observe the URL that is constructed by the MainActivity source code.

Looking at the host value and GET request made by the application, I can see the full URL.
http://35.227.24.107/3ef212b832/appRoot?&hash=61f4518d...etcN.B. The number value in the URL (i.e. 3ef212b832) has changed due to me downloading a new version of the app.
Entering this value into the URL will still just bring me to the default WebView with a link to get the flag. I know that this link is used to get the flag somehow and by looking at the page source for the link, I can see that it uses /flagBearer as part of the URL address. This is placed right after appRoot and could be the missing str2 value.

If I add /flagBearer to where the missing str2 value should be, I have the following URL path.
http://35.227.24.107/3ef212b832/appRoot/flagBearer?&hash=61f4518d...etcEntering this URL path into my browser presents a new error message which says “Invalid hash”.

This means that /flagBearer is the unknown str2 value and can be confirmed by typing other values in it’s place, which results in a Not Found error.

Despite having the correct URL path, I am stilled presented with a hash error. As seen earlier while statically analyzing the MainActivity source code, the str2 value (i.e. /flagBearer) is used with the key s00p3rs3c3rtk3y to make up the full SHA-256 hash. However, since the data URL path specified in the intent filter (i.e. http://level13.hacker101.com) does not contain the string /flagBearer and is completely ignored by the the java subString(28) method, the str2 value is left empty. This means the hash is incorrect since there is no value present in str2 (i.e. /flagBearer).
This is where the deep links come into play. After reading an article titled “The Zaheck of Android Deep Links!” (see references), I learnt that if there is insufficient URL validation being carried out then I can load my own arbitrary URL. I know that no URL validation is being performed on the URL used to trigger the intent filter and launch the application’s Main Activity. This means I can provide my own URL with the /flagBearer path attached, which will launch the Main Activity and result in the str2 value being equal to /flagBearer. I can accomplish this by using ADB, as seen previously above when testing the intent filter URI’s.
adb shell am start -W -a "android.intent.action.VIEW" -d "http://level13.hacker101.com/flagBearer" com.hacker101.level13This results in the flag being presented 😄.

Another approach to solve this challenge without using the deep link is to simply create the hash yourself by combining the key s00p3rs3c3rtk3y and the /flagBearer string. I used an online tool called CyberChef to create the SHA-256 hash.

I then added this new hash to my URL path, giving me the flag.

Oauthbreaker (Moderate, 2 Flags)
Using ADB and MobSF, I again installed the application and generated a static analysis report. Opening the application, I am greeted with an activity with a button that says authenticate.

Clicking on this button, the WebView browser on my emulator is opened with an address in the URL bar and a link to authorize my mobile application.

The full address in the URL bar can be seen below.
http://34.74.105.127/81857ddddb/oauth?redirect_url=oauth%3A%2F%2Ffinal%2Flogin&response_type=token&scope=allClicking on the Authorize Mobile Application link brings me to a new activity, with a message saying I have “Successfully authenticated via OAuth!”.

While exploring the functionality of the application, I decided to open the URL shown in the WebView browser on my emulator. While looking at the source code for this page, I discovered the first flag.

Examining the Android Manifest file showed that two activities called “com.hacker101.oauth.Browser” and “com.hacker101.oauth.MainActivity” were declared with intent filters. As seen with the previous challenge, these intent filters are used to create deep links.
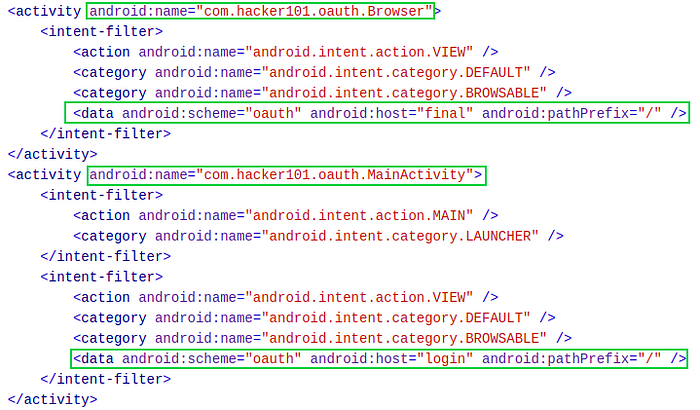
After reviewing the manifest file, I started to look at the source code for the MainActivity. When the Main Activity is created, a variable called authRedirectUri is equal to the value “oauth://final/”. This is the deep link URL used to bring the user to the Browser activity. The data contained in the intent used to launch the Main Activity is retrieved and checked to see if it has any data or if the query parameter redirect_uri is null. If the intent parameter redirect_uri is not null, then the value of this parameter is assigned to authRedirectUri.

Further down, I can see that when I click the button “Authenticate”, a URL is constructed which includes the URL encoded authRedirectUri value. A new intent is then created and the URL is added as data to this intent. This intent is then used to trigger the Browser activity.

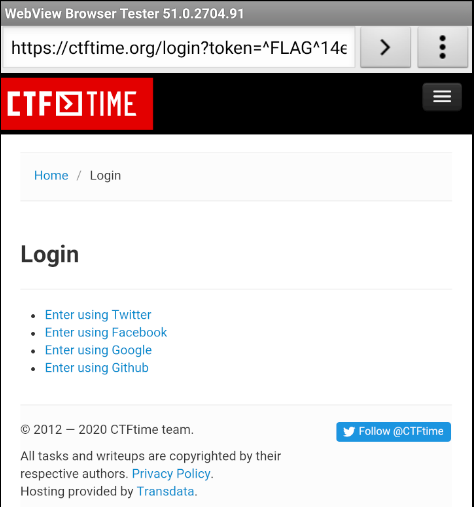
From this source code, I can see that the user will be redirected to whatever the redirect_uri parameter value is. To test this, I can assign a value to the redirect_uri intent parameter and observe if it successfully redirects me.
adb shell am start -W -a "android.intent.action.VIEW" -d "oauth://final/redirect_uri=https://ctftime.org/" com.hacker101.oauthThis works and I am successfully redirected to the ctftime.org website. The first flag is also shown in the URL.
I was still unsure about how to use this exploit, so I decided to start looking at the Browser activity. I saw that a private class called SSLTolerentWebViewClient is created. Inside this class, the shouldOverrideUrlLoading() method is declared which allows the host application a chance to take control when a URL is about to be loaded in the current WebView (see references). This explains why the WebView browser is opened on my emulator. The method SslErrorHandler() is also declared and is used to simply ignore SSL errors.

Moving further down in the source code, I can see that a variable called str is declared with the value set to a URL address. This URL address is the success message I saw earlier, which tells me I am authenticated. The data from the intent used to launch the activity and the intent parameter called uri are checked to see if it is null. The str value is then made equal to the data contained in the uri intent parameter.

Beneath this, I can see that a new WebView is created. Two important pieces of information are noted when the WebView is being created. The first is that the WebView has enabled JavaScript execution using setJavascriptEnabled(). The second is that the method addJavascriptInterface() is declared. This injects a supplied Java object into the WebView and allows the Java object’s methods to be accessed from JavaScript. This method takes two parameters:
- The class instance to bind to JavaScript (i.e. WebAppInterface)
- The name to be used to expose the instance in JavaScript (i.e. iface).

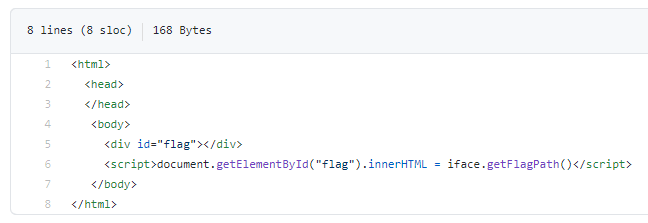
This allows me to take control of any methods inside the WebAppInterface class. Looking at this class, I can see an interesting method called getFlagPath(). This method contains what appears to be a large array of int values as seen below.

The code below this appears to perform a variety of operations that result in a path to a html file being created.


To call this method, I can create a simple web page using Github Pages. I can then add the following JavaScript seen below to the web page, which will call the getFlagPath() method using the “iface” name which exposes the class instance.
Next, I can redirect to my Github Pages website as seen earlier by assigning the uri parameter with the sites URL address as it’s value when calling the Browser activity.
adb shell am start -W -a "android.intent.action.VIEW" -d "oauth://final/uri=https://github.website.url" com.hacker101.oauthThis results in a path for a HTML page.
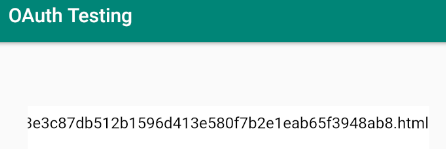
I can simply add this path for the HTML file to the end of the address seen below.
http://34.94.3.143/cb1f155695/path-to-flag.htmlThis gives me the second flag 😃.

Mobile WebDev (Moderate, 2 Flags)
Once again, using ADB and MobSF, I installed the application and generated a static analysis report. Opening the application, I am greeted with an activity which allows me to refresh the page and edit the pages content.

Clicking on the edit button displays a new page which shows the files I can edit.

Clinking on the file allows me to edit it.

If I click save and return to view, I can see that my edit has been applied.

After looking at the functionality of the application, I moved on to examining the Android Manifest file for the application. Only one activity called MainActivity has been declared.

I decided to look at the source code for the MainActivity. Reading down through the source code, I first notice a variable called HmacKey with a string value which appears to be a private key.

Further down, I see a method called Hmac() which has not been implemented yet, as hinted by the exception message.

Below this, I find the rest of the source code which facilitates the functionality of the application as seen earlier. I can see the different URLs used for viewing and editing content. I can also see that JavaScript has been enabled for the WebView that displays content.

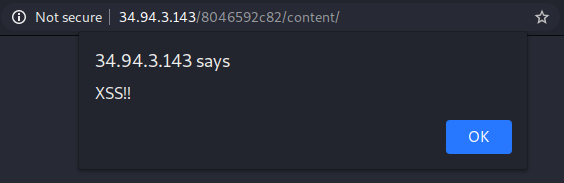
I wasn’t really sure what to do with the HMAC key at first, so I ended up trying some different approaches. For example, my initial instinct was to see if I could perform an XSS attack since I could edit the content of the page and JavaScript execution was enabled in the WebView. I presumed if I could execute some JavaScript, a flag might present itself. I added some JavaScript to the index.html page as seen below.

After saving the file and viewing the contents page in my browser, I can see the XSS attack works but no flag is displayed.
After looking around some more, I eventually found a clue on the edit.php page. A comment left by the developer referred to a page called upload.php.

As the name suggests, when I visit this page I can upload a file.

Looking at the page source, I can see that the upload form accepts zip files.

When I attempt to upload a zip file however, I am presented with the following error.

It appears that I need to provide a HMAC signature when uploading my zip file.
N.B. The HMAC algorithm can be used to verify the integrity of information passed between applications or stored in a potentially vulnerable location. The basic idea is to generate a cryptographic hash of the actual data combined with a shared secret key. The resulting hash can then be used to check the transmitted or stored message to determine a level of trust, without transmitting the secret key.
Now that I know the purpose of the HMAC private key, I can proceed to create a HMAC signature. To achieve this I used a simple python script available online (see references) that computes an HMAC signature.

Executing this script generates my HMAC signature, as seen below.

Using Burpsuite, I can then upload my zip file again and this time add my HMAC signature to the POST request as another section in the body of the request.

This is successful and results in the first flag being displayed.

Upon successfully uploading the zip file, a message is displayed which says that the zip file has been extracted to a folder called /temp but needs to be copied to the /content folder.

After some searching online for zip file upload directory traversal vulnerabilities, I discovered a vulnerability called the Zip Slip vulnerability.
N.B. A Zip Slip vulnerability allows attackers to create Zip archives that use path traversal to overwrite important files on affected systems, either destroying them or replacing them with malicious alternatives.
To test if this vulnerability exists, I used a zip slip file provided by Snyk on their Github (see references). I used my python script to create a HMAC signature again but this time with the zip-slip.zip file. I then used BurpSuite to intercept the POST request and add the HMAC signature as seen before. Upon successfully uploading the zip file, I received the second flag!

Closing Remarks
I really enjoyed solving these challenges and found them very useful for teaching how to exploit vulnerabilities that can be found in Android applications. I hope HackerOne will continue to release more Android based CTF challenges in the future and thanks for reading till the end 😄!
References
- https://developer.android.com/training/app-links/deep-linking
- https://medium.com/bugbountywriteup/the-zaheck-of-android-deep-links-a5f57dc4ae4c
- https://developer.android.com/reference/android/webkit/WebViewClient#shouldOverrideUrlLoading(android.webkit.WebView,%20android.webkit.WebResourceRequest)
- https://developer.android.com/reference/android/webkit/SslErrorHandler#proceed()
- https://developer.android.com/reference/android/webkit/WebSettings#setJavaScriptEnabled(boolean)
- https://www.codeproject.com/Articles/392603/Android-addJavaScriptInterface
- https://pymotw.com/2/hmac/
- https://stackoverflow.com/questions/8659808/how-does-http-file-upload-work
- https://github.com/snyk/zip-slip-vulnerability/blob/master/archives/zip-slip.zip