Hail Frida!! The Universal SSL pinning bypass for Android applications

Hi everyone, in this article, I’ll explain how to bypass SSL pinning of android applications using frida framework. I’ll try to explain all things in details yet more clearly.
This article will cover:
- Introduction to Frida and SSL pinning
- Requirements
- Setup and Installation
- Frida Server Setup
- Setup BurpSuite
- Pushing the proxy’s CA Certificate:
- Script injection to bypass SSL pinning
- All stuff in a nutshell
- Troubleshooting
1. Introduction to Frida and SSL pinning
Frida framework is the last stop for SSL pinning bypass.
As per frida website:
“ It’s Greasemonkey for native apps, or, put in more technical terms, it’s a dynamic code instrumentation toolkit. It lets you inject snippets of JavaScript or your own library into native apps on Windows, macOS, GNU/Linux, iOS, Android, and QNX. Frida also provides you with some simple tools built on top of the Frida API. These can be used as-is, tweaked to your needs, or serve as examples of how to use the API.”

Certificate pinning is hardcoding certificate trusted by the remote server within application itself so that it will ignore devices certificate store and will trust on his own hardcoded certificate which further application will use to communicate with remote server “securely”.
SSL pinning bypass is major step needs to be done when we even start the dynamic analysis of HTTP requests for most of the mobile application nowadays as organizations are more concern about data privacy and secure transfer of data over the network from threads like Man-in-The-Middle (MiTM) attacks.
Frida is a framework that injects scripts to native apps to manipulate application’s logic in runtime which is more dynamic approch for pentesting mobile applications.
2. Requirements
Let's gather and fulfill all requirements before performing our magic trick. This setup takes some time for the first time as the requirement list is quite long. Once we are done with all setup, from next time it will be a piece of cake. If you stuck at any step there is “Troubleshooting” section at the end of the blog. Saving all downloaded stuff in one folder is recommended.
I. Rooted device/emulator:
We will be needing a rooted device or emulator as we need to inject script into the root directory of the device. I’m using genymotion for this one. Genymotion is easy to set-up and use and can download it from below.
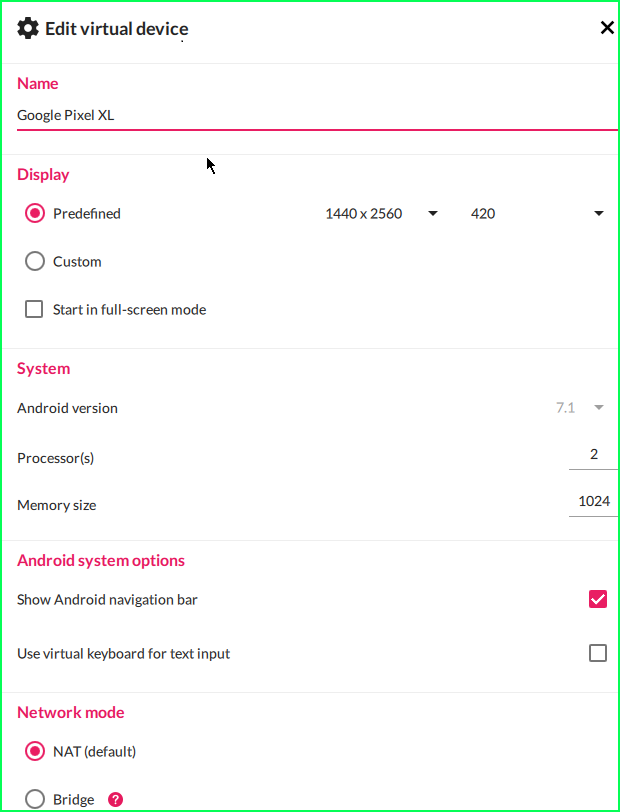
Once we are done installing genymotion, we need to install an android device. Android 7+ version will be good to go. I will be using ‘Google pixel XL’ device with the following configuration.
II. Python frida packages installation:
Install Python for windows from here.
We need to install some python packages for frida server. For this enter following command in terminal:
python -m pip install Frida
python -m pip install objection
python -m pip install frida-toolsorpip install Frida
pip install objection
pip install frida-tools
III. Platform-tools (adb):
Download platform-tools for windows from the following the link:
https://dl.google.com/android/repository/platform-tools-latest-windows.zip

IV. Download injection script:
We need to download injection script from below which we will push into the device for injecting into target application.
https://codeshare.frida.re/@pcipolloni/universal-android-ssl-pinning-bypass-with-frida/
or you can save this code as fridascript.js in same folder as adb.
/*
   Android SSL Re-pinning frida script v0.2 030417-pier$ adb push burpca-cert-der.crt /data/local/tmp/cert-der.crt
   $ frida -U -f it.app.mobile -l frida-android-repinning.js --no-pausehttps://techblog.mediaservice.net/2017/07/universal-android-ssl-pinning-bypass-with-frida/

   UPDATE 20191605: Fixed undeclared var. Thanks to @oleavr and @ehsanpc9999 !
*/setTimeout(function(){
    Java.perform(function (){
     console.log("");
     console.log("[.] Cert Pinning Bypass/Re-Pinning");var CertificateFactory = Java.use("java.security.cert.CertificateFactory");
     var FileInputStream = Java.use("java.io.FileInputStream");
     var BufferedInputStream = Java.use("java.io.BufferedInputStream");
     var X509Certificate = Java.use("java.security.cert.X509Certificate");
     var KeyStore = Java.use("java.security.KeyStore");
     var TrustManagerFactory = Java.use("javax.net.ssl.TrustManagerFactory");
     var SSLContext = Java.use("javax.net.ssl.SSLContext");// Load CAs from an InputStream
     console.log("[+] Loading our CA...")
     var cf = CertificateFactory.getInstance("X.509");

     try {
      var fileInputStream = FileInputStream.$new("/data/local/tmp/cert-der.crt");
     }
     catch(err) {
      console.log("[o] " + err);
     }

     var bufferedInputStream = BufferedInputStream.$new(fileInputStream);
    var ca = cf.generateCertificate(bufferedInputStream);
     bufferedInputStream.close();var certInfo = Java.cast(ca, X509Certificate);
     console.log("[o] Our CA Info: " + certInfo.getSubjectDN());// Create a KeyStore containing our trusted CAs
     console.log("[+] Creating a KeyStore for our CA...");
     var keyStoreType = KeyStore.getDefaultType();
     var keyStore = KeyStore.getInstance(keyStoreType);
     keyStore.load(null, null);
     keyStore.setCertificateEntry("ca", ca);

     // Create a TrustManager that trusts the CAs in our KeyStore
     console.log("[+] Creating a TrustManager that trusts the CA in our KeyStore...");
     var tmfAlgorithm = TrustManagerFactory.getDefaultAlgorithm();
     var tmf = TrustManagerFactory.getInstance(tmfAlgorithm);
     tmf.init(keyStore);
     console.log("[+] Our TrustManager is ready...");console.log("[+] Hijacking SSLContext methods now...")
     console.log("[-] Waiting for the app to invoke SSLContext.init()...")SSLContext.init.overload("[Ljavax.net.ssl.KeyManager;", "[Ljavax.net.ssl.TrustManager;", "java.security.SecureRandom").implementation = function(a,b,c) {
      console.log("[o] App invoked javax.net.ssl.SSLContext.init...");
      SSLContext.init.overload("[Ljavax.net.ssl.KeyManager;", "[Ljavax.net.ssl.TrustManager;", "java.security.SecureRandom").call(this, a, tmf.getTrustManagers(), c);
      console.log("[+] SSLContext initialized with our custom TrustManager!");
     }
    });
},0);
3. Setup and installation:
I. Connect device to adb:
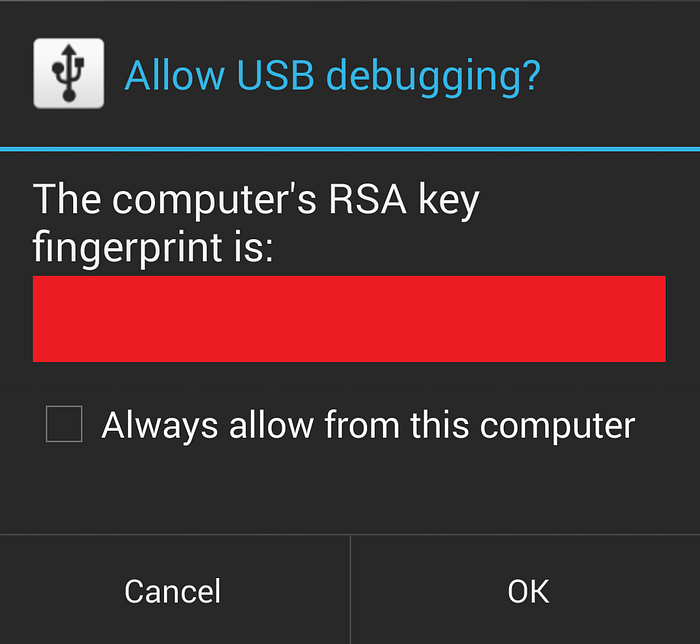
We need to connect our device to adb to run commands on device. But first goto settings >> Developer options and enable debugging mode in device so that adb can communicate with the device.
Goto the folder where platform tools have been extracted and run the following command to connect the device to adb
//adb connect <ip of device:port>
adb connect 192.168.1.190:5555
Click on ‘Allow’ if pop-up appears in device.
To check if device is connected to adb:
adb devicesYou should see ip of your device along with device name.
II.Download frida server for supported android device’s arch version:
We need to download the frida server package for our android device according to our device’s arch version.
To find out the arch version of the device, run following command.
adb shell getprop ro.product.cpu.abiTo cut short download following if device configuration is the same as mentioned above:
frida-server-12.4.7-android-x86.xz
frida-server-12.4.7-android-x86_64.xz
IV. Install the target application in the device.
Install your application who’s SSL pinning has to be bypassed in our device. Open the application and keep it running in the background.
4. Frida Server Setup:
We need to run frida server into device before injection our script. Follow the steps below:
I. Push frida-server into device:
Now we need to push our frida-server file into device. Extract and Copy “frida-server-12.4.7-android-x86” file in adb folder rename file as “frida-server”. After this, run following command.
//adb push <path_of_frida_server_folder><space></data/local/tmp>adb push C:\ADB\frida-server /data/local/tmp
II. Give permissions to frida-server:
adb shell chmod 777 /data/local/tmp/frida-server5. Setup BurpSuite’s:
Follow this awesome guide to set proxy in burp for android device:
6. Pushing the proxy’s CA Certificate:
In order to be able to intercept the traffic, frida needs to have access to our Burpsuite’s CA certificate. We will push the same certificate downloaded in step 5. in BurpSuite Setup.
Push the certificate into the device and into the same location as the frida-server, name it cert-der.crt (as this name and path has been already mentioned in fridascript.js to avoid any issues)
// adb push <path to cacert.der> /data/local/tmp/cert-der.crt
adb push cacert.der /data/local/tmp/cert-der.crt
7. Script injection to bypass SSL pinning:
Now its time for real magic. we will inject ‘fridascript.js’ into the target application.
I. Push fridascript.js into device:
Copy fridascript.js into adb folder and run following command to push fridascript.js into device.
//adb push <path_to_fridascript.js_folder> /data/local/tmp
adb push C:\ADB\fridascript.js /data/local/tmp
II. Check and run frida server in device
adb shell /data/local/tmp/frida-server &This will run frida-server into device. Maybe you will not get any output of this command in terminal.
III. List all running processes on device:
Now, we need to find out id of our target application. We will list all running services on devices including your application process.
Open new terminal and type following command.
frida-ps -UIV. Locate your application’s package name.

V. Hook fridascript.js into target application:
Finally, we will hook fridascript.js into the native application with the following command:
//frida -U -f <your_application_package_name> -l <path_to_fridascript.js_on_your_computer> --no-pausfrida -U -f com.twitter.android -l D:\frida\fridascript.js --no-paus
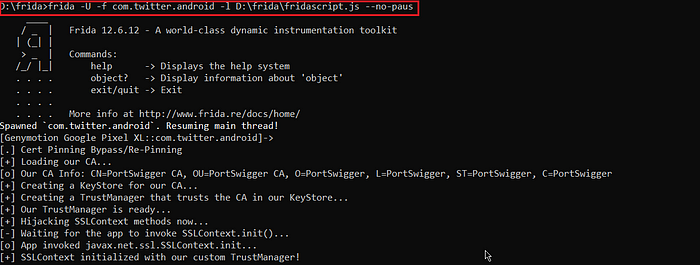
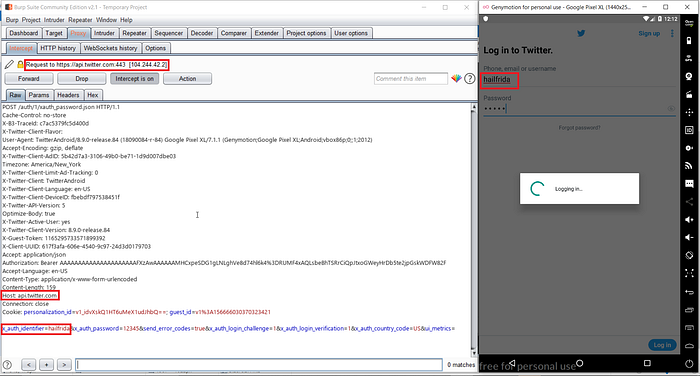
VI. Bypassed!!
Once all things go smooth, all traffic of the target app will get intercepted into BurpSuite. We need to keep frida server on as long as we are intercepting traffic into BurpSuite.
8. All stuff in a nutshell:
1. Download and install the device on genymotion
2. Install frida and objection tools
python -m pip install Frida
python -m pip install frida-tools
python -m pip install objectionorpip install Frida
pip install frida-tools
pip install objection
3. Download adb platform tools
4. Download frida injection script
5. Connect device to adb
//adb connect <ip of device:port>6.Download frida server for supported android device’s arch version
7. To find out arch version of device
adb shell getprop ro.product.cpu.abi8. Install the target application in the device.
9. Push frida-server into device:
//adb push <path of frida-server folder><space></data/local/tmp>10. Give permissions to frida-server:
adb shell chmod 777 /data/local/tmp/frida-server11. Setup burpsuite
12. Pushing the proxy’s CA Certificate
// adb push <path to cacert.der> /data/local/tmp/cert-der.crt13. Push fridascript.js into device:
//adb push <path to fridascript.js folder> /data/local/tmp14. Check and run frida server in device
adb shell /data/local/tmp/frida-server &15. List all running processes on device:
frida-ps -U16.Locate your application’s package name
17. Hook fridascript.js into target application
//frida -U -f <your_application_package_name> -l <path_to_fridascript.js_on_your_computer> --no-paus18. Intercept traffic in BurpSuite.
9. Troubleshooting:
1. ADB Deamon failed to connect
If you are getting error like this:
adb devices
adb server is out of date. killing...
cannot bind 'tcp:5037'
ADB server didn't ACK
*failed to start daemon*
error:
i. Open environment System properties>>Advanced>>Environment Variables
ii. Click on path and delete entry of C:/Android or path where adb tools are pointed
iii. Copy all platform tools into genymotion>>tools folder
iv. Create new path and add path of genymotion>>tools folder.
2. frida/ pip is not recognized as an internal or external command
i. Open environment System properties>>Advanced>>Environment Variables
ii. Create new path and add path of Python>>script folder
3. Arm translation error while installing application into device.
i. Download arm translation file from here
https://androidfilehost.com/?fid=23252070760974384
ii. Drag and drop file into device emulator or flash this file from recovery if you are using physical device
iii. Restart device and you will be able to drag and drop install target application
4. Failed to spawn: the ‘argv’ option is not supported when spawning Android apps
Check your fridascript.js path on your computer. Path maybe incorrect. You have to give the absolute path of fridascript.js file. Absolute path?
5. Started frida server but not able to list services
Disconnect and re-connect wifi in device.

Thanks for reading this article. You are awesome!! If you face any problems, let me know in comments I’ll try to resolve and add in the Troubleshooting section. Claps appreciated!! 😄
