How I Move Web App Data to Splunk using HEC Tokens
Ingesting Data from Knowbe4 PhishER Into Splunk

Organizations rely on robust data analysis tools to extract valuable insights and monitor their web applications’ performance. Splunk, a leading platform for machine-generated data analysis, offers powerful capabilities for log management, security monitoring, and operational intelligence. One crucial aspect of maximizing Splunk’s potential is ensuring seamless integration with various data sources.
With its automatic prioritization feature, PhishER™ enables your InfoSec and Security Operations team to effectively navigate the cluttered inbox and promptly address the most critical threats. This capability empowers your team to swiftly identify and respond to high-risk email incidents, ensuring a more efficient and targeted approach to threat management.
This article will guide you through the process of moving web application data from Knowbe4 PhishER to Splunk using the HTTP Event Collector (HEC). By leveraging HEC tokens, you can effortlessly ingest PhishER data into Splunk and unleash the platform’s analytical prowess.
We will cover the necessary steps, starting from configuring the HEC settings in Splunk to setting up webhooks in PhishER and defining the data to be sent. With this integration, you can effectively analyze and visualize PhishER data within Splunk, enabling you to detect and respond to phishing threats more efficiently.
Getting PhishER data into Splunk using the HTTP Event Collector
- Navigate to your settings in Splunk and choose Data inputs.

- Choose HTTP Event Collector

- You will see the following Screen

- Click “New Token” button at the top right and add a name in this case, PhishER and then click next

- Choose Automatic (this can be changed later if necessary) and click next

- Be sure to choose your default Index

- Click Submit

You will get a Token successfully created message

Sending the Data from PhishER
- Now we need to add the information in PhishER. Login to PhishER and choose settings (the gear icon) and then Webhook

- Click New WebHook.
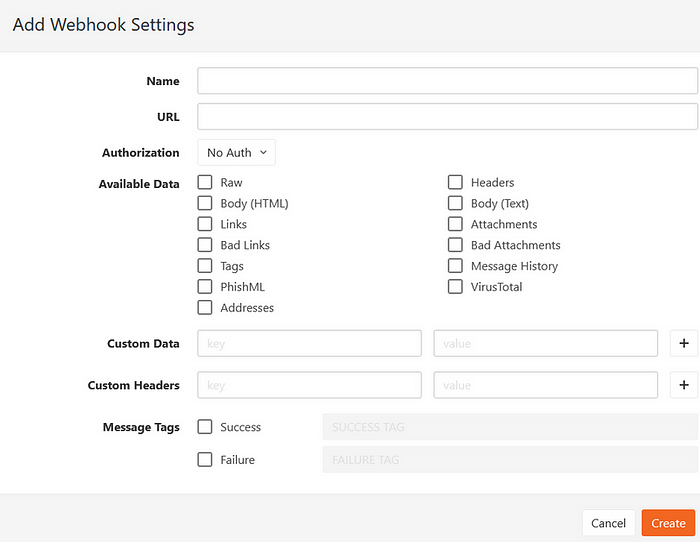
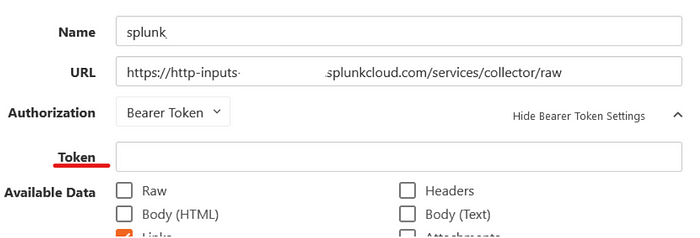
- Give the Webhook a name. In my case I called it Splunk.
Set the URL.
PhishER uses RAW data when sending to a HEC. For Splunk use the following URL being sure to change the Splunk instance to your Splunk location
https://http-inputs-my-splunk-instance.splunkcloud.com/services/collector/raw
Authorization
Here you will choose Bearer Token and copy/paste the token you generated in Splunk in the previous step
Choose the Data you want sent
You will also need to choose the data you want sent to Splunk. Check the boxes in the Available Data.

Setting up the Headers
For the custom headers you will type in the input boxes Authorization as the key and Splunk <tokenhere> as the value. It is important to be sure that the A in Authorization is capitalized and the S in Splunk is capitalized. There needs to be a space between Splunk and the token value as well.
KEY = Authorization VALUE = Splunk YOUR_TOKEN

- Click update and you have completed the setup.

Testing the Webhook
If you would like to test the webhook you can build a manual trigger action in PhishER and add it to the Quick Action bar.
- Click Actions, give the action a name, and choose “Manual Trigger Only”

- Check “Add Tags” and give the tag a name (Hook-Tested)

- Choose “Send to Webhook” and add your webhook name from the drop down menu

- Check the box for “Include this action in the QuickActions bar”

- Click Save Action

Now you can click on any email look to the right side and see that there is a QuickAction with the webhook test. Click this QuickAction and a test will be sent to the Splunk Webhook.

You will receive a confirmation that the action was successful.

Data should be in json and look as follows. Check your Data Inputs if the data is messy. It is important to note that the data ingestion process has resulted in varying levels of cleanliness, with some instances being well-structured and others being less so. Consequently, it may be necessary to develop specific search queries to cleanse the data and tailor it to your requirements.

Setting up the webhook to send events automatically
Click on Actions and the sample webhook. Alternatively you could create a new webhook. Choose “Every Message”.

- This is the only real change you need to make here. Click save action.

Now move the webhook action to the top of the Action List so the webhook fires at every event that hits PhishER.

Tip for filtering in Splunk
If the data you have sent to Splunk is messy you can filter out the null values using the following Splunk Search.
index="<yourPhishErIndex>"
| rex field=_raw "object\": (?<object>[^,]+), \"status\": \"(?<status>[^\"]+)\""
| search NOT (object="null" OR status="null")
Conclusion
Congratulations! You have successfully established the connection between Knowbe4 PhishER and Splunk, allowing you to seamlessly transfer and analyze web application data. With the data now available in Splunk, you can gain valuable insights, detect patterns, and create actionable visualizations to combat phishing threats effectively. This data will allow you to stay vigilant, continuously fine-tune your ingestion processes, and leverage the power of Splunk to proactively protect your web applications and strengthen your organization’s cybersecurity resilience in the face of evolving threats.
Links
- See what I’m up to on Twitter: https://twitter.com/R_Eric_Kiser
- Subscribe! https://medium.com/@ekiser_48014/subscribe
- Linkedln — https://www.linkedin.com/in/r-eric-kiser-43b35a263/

